Ortur-Aufero Laser 2 – Our Review and Demonstration
We were recently approached to see if we were interested in doing a review of the Ortur Aufero Laser 2 engraving/cutting machine. Of course we said we would love to…I mean, who wouldn’t!?
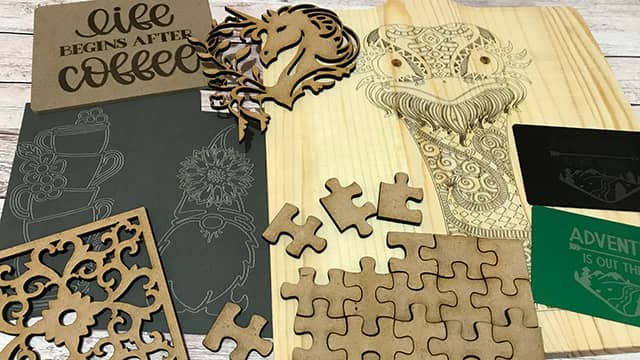
Now neither of us have had used a machine like this before so it was all new to us, but you can see the types of things we ended up creating in the image below. We had a ball – this is definitely going to be a new hobby for the both of us.
But let’s get on and delve a little deeper…if you are a crafter, you are going to love this!
Watch the video below or scroll down for the written instructions
(Can’t see the video? You may have an ad blocker installed.)
People & Products Mentioned in the video
Engraving/Cutting Machine
Image Files
- Love SVG – Enchanted Unicorn – Life Begins After Coffee – Adventure is Out There
- COAPACutfiles – Stacked Teacups
- Line Art Lover – Cute Line Art Ostrich
- Love Home by Christine – Ornate Panel Design
- The Wood I Like – Jigsaw puzzle
- Crafty Laser Cut – Sunflower Gnomes
Materials
Other Helpful Information
- LA Hobby Guy – Art and Materials Libraries for Laser Engravers and Cutters for use with Lightburn
Software used
A Little Bit About the Aufero Laser 2
The Aufero Laser 2 is as name suggests an engraving and cutting machine. It’s suitable for those of us who are novices when it comes to using a laser machine, but that doesn’t mean it’s only for beginners. This machine is an ideal addition for both the home hobbyist and those who are maybe thinking about starting a business engraving items or even making die cuts.
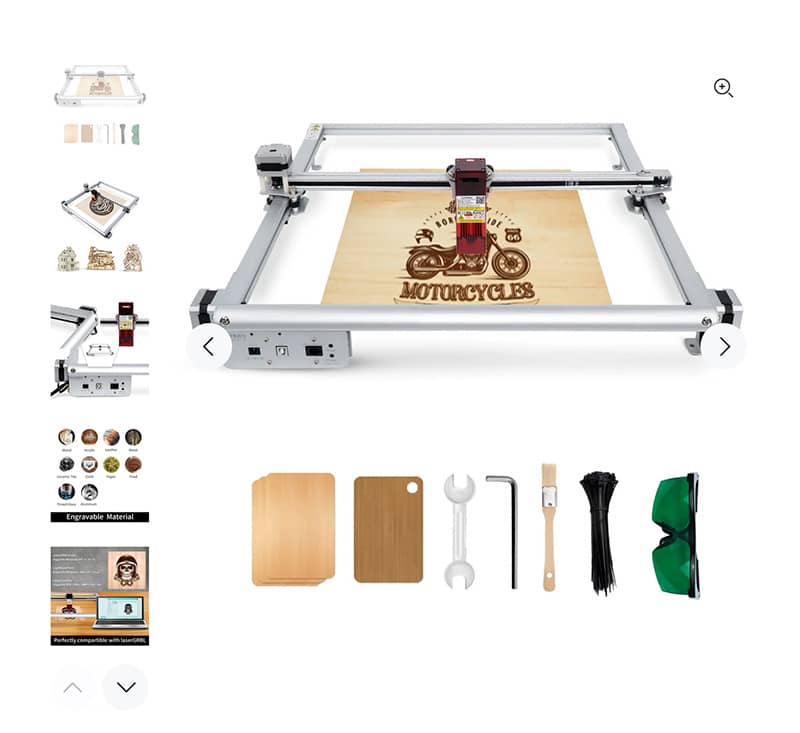
It’s easy to set up and to start using as you can see from the results we got with literally no previous experience. There is also a lot of information provided by Ortur on their website and in their facebook community.
- The machine is a lightweight aluminum with metal brackets
- The engraving area of the machine is 390mm x390mm – so a nice big area for engraving.
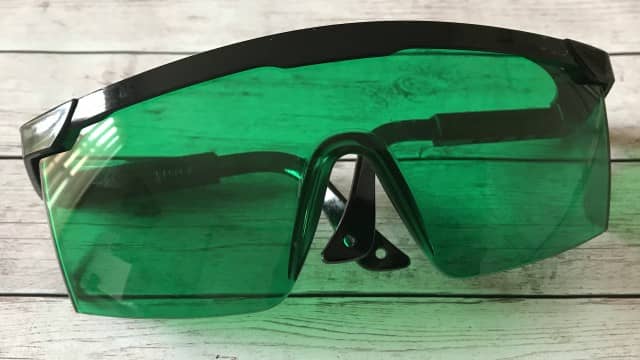
- There is a Laser Beam Safety Guard – Make sure you wear the goggles provided at all times when using the machine.
- There is no HOME button on the machine so you need to move the laser module to the 0X 0Y position manually, but that really isn’t an issue. The laser module moves easily into position.
What Materials Can the Aufero Laser Machine ENGRAVE?
- Wood
- Bamboo
- Cardboard
- Cardstock
- Plastic
- Leather
- PCB
- Aluminum oxide
- Non-reflective electroplating and paint metal
What Materials Can the Aufero Laser Machine CUT?
- Cardboard
- Cardstock
- Felt
- Non-woven fabric
- Leather
- 6MM plywood
- 10MM pine board
- Some plastic boards, and more.
Our Experience
The machine arrived and was really well packaged to keep the bits from moving around and getting damaged during shipping.
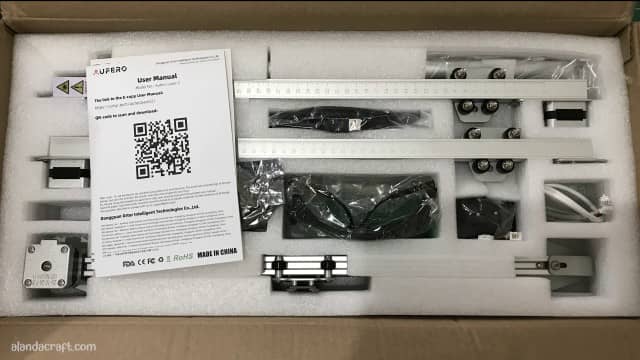
We unpacked the bits and went “okay now what?” There is no instruction manual as such, however, you can find out how to assemble the machine by scanning the code on the user manual. This will take you to the Ortur site and fortunately, we found a really good YouTube video to watch that shows how to assemble the machine, and it didn’t take too long to put it together.
Now the thing is with laser machines is that they need to be in a well ventilated space because of the fumes put out by the materials being cut. So we moved stuff around in the garage and set the laser cutter up on a sturdy work surface. We didn’t want to get any burn marks on our table so we purchased a large tile from our local Bunnings hardware store and placed the machine on top of that. Alternatively, you could use a piece of plywood to protect your surface.

Setting Up the Machine
The machine needs to be attached to a computer or laptop so it has access to the software that makes it run. So we set up an old Mac computer next to the machine and plugged everything in.
Next trick was deciding on a software program. There are plenty of free ones available but we finally decided to go with Lightburn. It seems to be one of the most popular software programs to use with a laser machine and they have a 30 day trial period before you buy. There is also lots of support available if you get stuck.
This is what it looks like when you open it up for the first time.
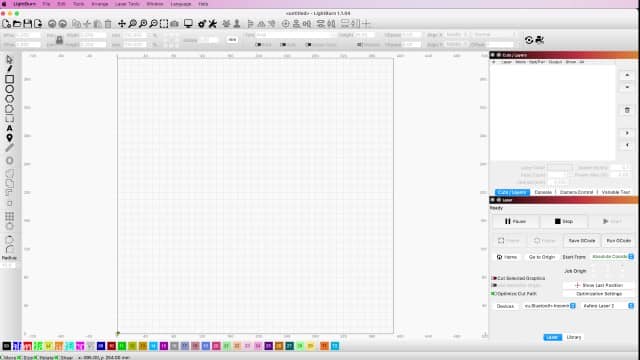
New Learning Curve on How to Use Lightburn.
If you have used ScanNCut Canvas, Cricut Design Space or other die cutting machine software, you will soon learn to navigate around Lightburn. The main features that were new to us were the cut speed and power output for different projects.
My biggest problem has been learning to get my designs centered. But like everything there is always someone on YouTube who has solved the problem beforehand. We found Rich over at the LA Hobby Guy and I am soooo glad we did. He has libraries of art files and a very useful materials guide that gives the speed and power required for various materials. These resources are freely available to his forum members (it’s also free to sign up). This has been a godsend, believe me.
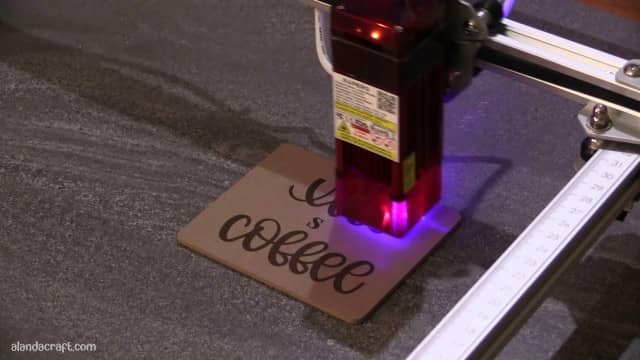
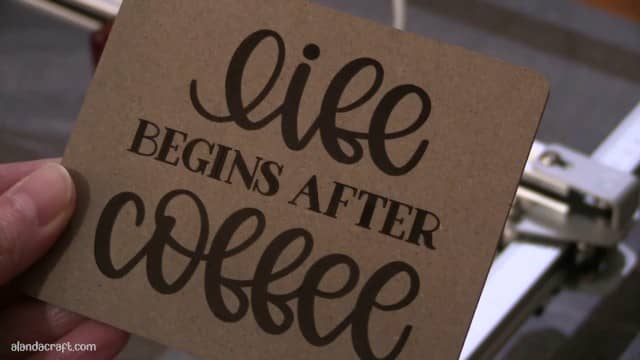
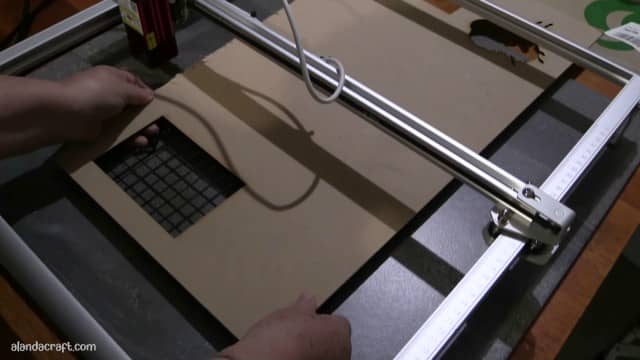
Lightburn uses SVG images so if you have a die cutting machine you will be familiar with downloading those types of files. The first thing we decided to do was a coaster on wood. We downloaded the ‘Life Begins After Coffee‘ SVG file from LoveSVG and imported it into Lightburn. This is not a post about using Lightburn so I am not going to go into detail about using Lightburn in this blog post. Suffice to say we put a square frame around the image and centered it on the table by eye. Not the best way to try and centre the design but it was our first attempt.
Once you place your project piece onto the table you adjust the laser height by placing the acrylic spacer on top of the project and bringing the laser down to rest on it. Tighten the screw on the side of the laser and remove the spacer. This gives you the ideal amount of space between the laser and the project.
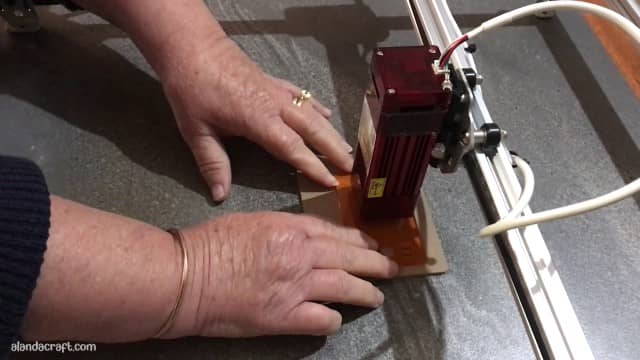
Although the laser is protected by a shield it’s still a good idea to wear the goggles provided by Ortur before starting the Aufero Laser 2.
Projects – Engraving
Wooden Coasters
Our very first project was an MDF coaster. After lining everything up we pressed the start button and let the Aufero 2 perform its magic. At this stage we weren’t sure about settings so we went with the default setting in Lightburn. We were happy with the first result (after all this was the first laser engraving we had ever done), but thought it could be darker. So we played with the settings and did a second run on a new coaster. This one was even lighter so those settings weren’t right. By this time, we had found LA Hobby Guy as mentioned above, where we were able to download a settings file for the Aufero Laser 2. So on the third run using his settings, we got a result that we liked.
Now if you are a newbie like us, be prepared for a bit of a learning curve, but it’s not difficult, you just need to remember the steps to go through before you press start. But I will tell you this much once you start it’s addictive. You will be looking for things around your house to engrave. Nothing will be safe.
Aluminum
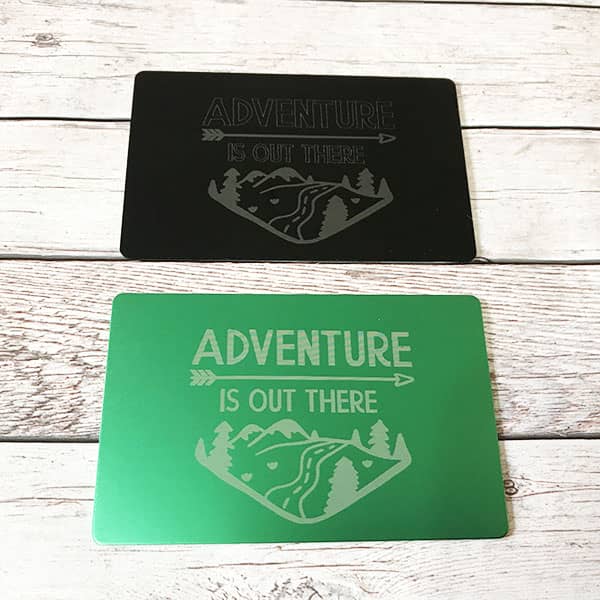
For our next project we engraved on a couple of pieces of the aluminum that came with our Zoom Precision Engraving Kit. We used the ‘Adventure is Out There‘ SVG file for these pieces. On the black plate you will notice that I have used a line engraving with a fill on the bottom part of the image and on the other plate I have used a fill for the full image.
I think I prefer having the entire image filled for this one but each application will have it’s place in your projects.
Wood
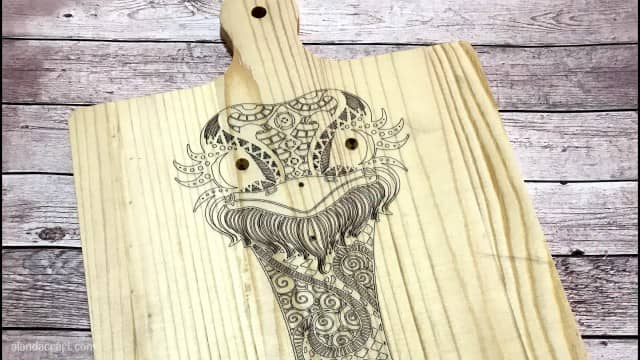
What’s next!!!! Ahh a wooden ipad/book holder. Now the image used on this item is a super cute Ostrich that we purchased from Line Art Lover on Etsy. this store has some amazing line art images that are ideal to use on your Aufero engraving machine. We select the plywood setting from the materials library (which was the file we got from La Hobby Guy). The project took 12 mins to complete.
Card Stock
Now if you are a regular to our YouTube channel and blog you will know that apart from quilting we also make cards and journals. So the next thing to try was some cardstock. We found a really cute Stacked Teacup SVG image at COAPACutfiles on Etsy, and we engraved the image onto Lawn Fawn 100 lb cardstock.
- 1st attempt – The design showed up nicely on the dark cardstock but with the settings at 9000 speed and 50% power the engraving was a tad too deep and cut through parts of the image. However, I will cut out the rest of the design and use it as an die cut piece.
- 2nd attempt – Was just right. Used 11,000 speed and 50% power.

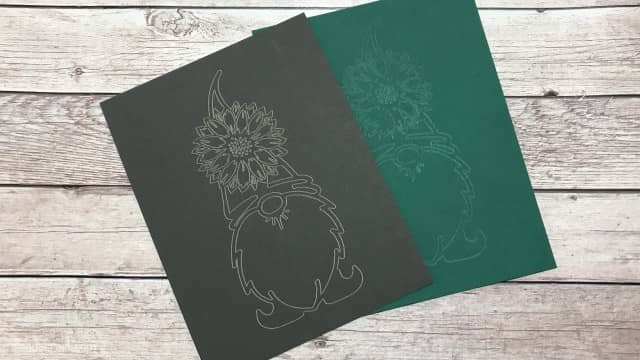
We also engraved a cute sunflower gnome onto some green cardstock but it didn’t come out very well. However, once we changed to a darker cardstock it made a big difference. So it looks as though darker card stock is the way to go, but do try out different things yourself.
I can certainly see this machine getting lots of use for my card and journaling projects.
Slate Coaster
We purchase some lovely slate coasters to try. The first design we did was the Unicorn image from LoveSVG that we used in a previous video for the HTVRont heat press machine. This is one of my favourite designs, after all who doesn’t like unicorns .
- 1st attempt – We chose the line feature rather than the fill, and the design was perfect. We selected Slate from the material library and we applied the setting of 100 Speed and 00 power with 1 pass, to the design layer.
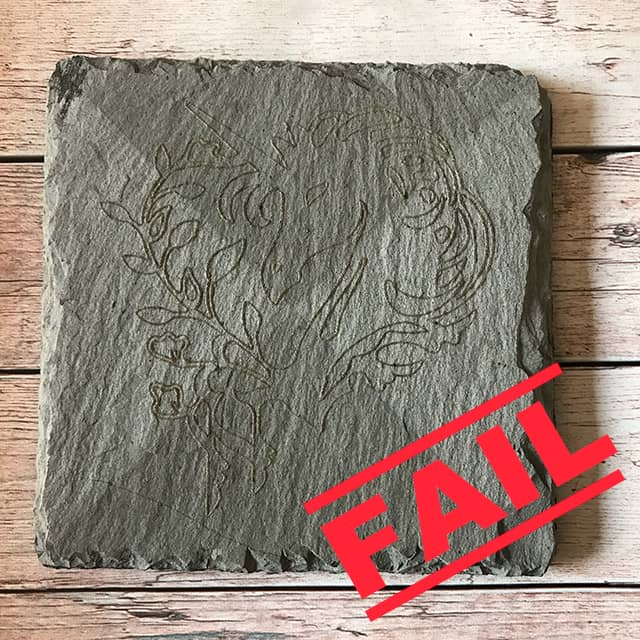
It’s at this point that I will point out that you should always run through the Preview feature in Lightburn before cutting. I forgot to do this for this coaster and there was an overlay on the design that I didn’t pick up because i didn’t check it first. So although the machine had beautifully engraved the unicorn, it then proceeded to overly and completely cover the design with lines. (absolutely Operator Error)
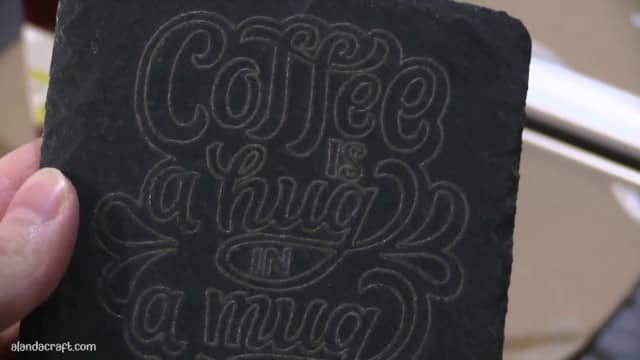
- 2nd attempt – This time we used the ‘Coffee is a hug in a mug’ image from Rich, the LA Hobby Guy. We used the same speed and power and the Aufero Laser 2 engraved the design easily with just one pass.
Projects – Cutting
Now that we were comfortable engraving with the machine it was time to try cutting out a design. For these projects we used MDF Board (Medium Density Fiberboard).
As we were going to cut the design we needed to add some height to the project so that the machine wouldn’t cut through to our base tile (which we are attempting to keep in a somewhat pristine condition for a while). We noticed on YouTube that a lot of the guys use a honeycomb plate, which we don’t have, although we have since ordered one. So being resourceful women we used a cake cooling rack which worked perfectly.

Having the project raised from the base allows the smoke to dissipate and we found that we had less soot build up and charring on the reverse of the design.
We set the MDF board on top of the cake cooling rack and this gave us a buffer between the project and the tile.
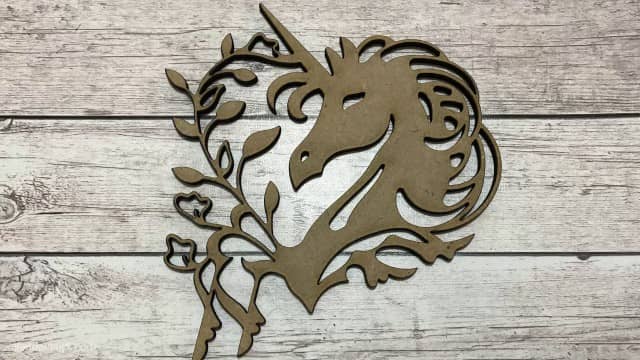
Unicorn
- We used the unicorn design from LoveSVG once again. Have to say this is a favourite design of mine.
- Selected the Plywood setting from the Materials Library
- Set the Speed 100 and Power 100.
- Previewed the project – don’t skip this step.
- The plywood settings with this design took approx 20 mins.
Absolutely love the result. I will be looking to buy some thinner MDF or maybe balsa wood to make great cutouts for card front designs.
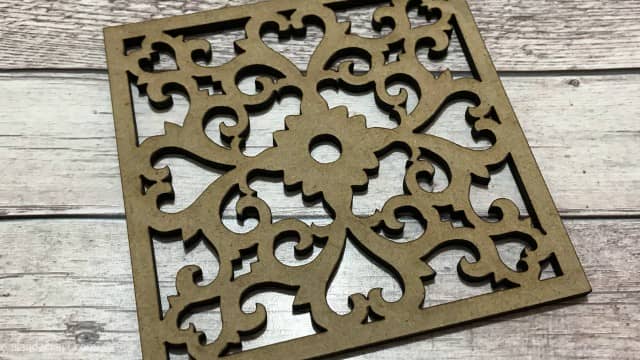
Ornate Panel
These are the sort of designs that look lovely on the front of cards and then embellished with flowers etc.
- The ornate panel design was purchased from Love Home by Christine.
- We reduced the size of the design to 80mm x 80mm
- Selected the Plywood setting from the Materials Library
- Set the Speed 100 and Power 100.
- Previewed the project
- The plywood settings with this design was approx 21 mins
Jig Saw Puzzle
- We purchased a jigsaw puzzle design from The Wood I Like on Etsy.
- Selected the Plywood setting from the Materials Library
- Set the Speed 100 and Power 100.
- Previewed the project
- The plywood settings with this design took approx 20 mins
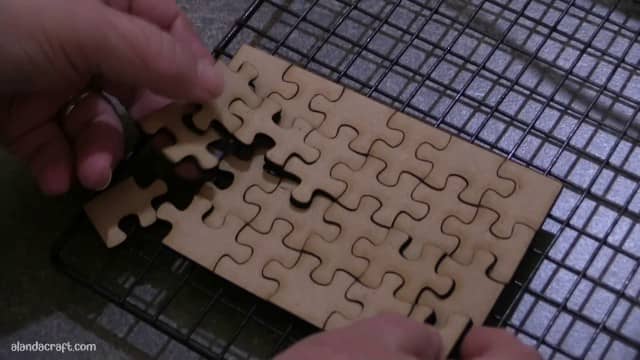
I can see lots of possibilities making jigsaw puzzles. Ours is plain because we are show casing how beautifully our Aufero Laser 2 cuts. But you could maybe print out a design on adhesive paper and adhere it to the board before cutting out the design. I haven’t tried this yet but I will let you know once I do.
What do we think about the Aufero Laser 2
In our opinion the Aufero Laser 2 is the ideal machine for those of us who are just starting out with laser engraving and cutting. This machine cut and engraved each of the materials we used, efficiently and precisely. And it isn’t limited to those materials, you can engrave on glass, metal plastic, denim, in fact just about anything. I have even seen some people on YouTube engrave on chocolate, eggs and fruit. So the thing is your creativity is only limited by your imagination. I love this machine and can’t wait to try out other projects.
The machine is lightweight which makes it easy to move around if you need to shift it. And just to reiterate – be sure to use it in a well ventilated area. And play around with the settings to see what effects you like best.