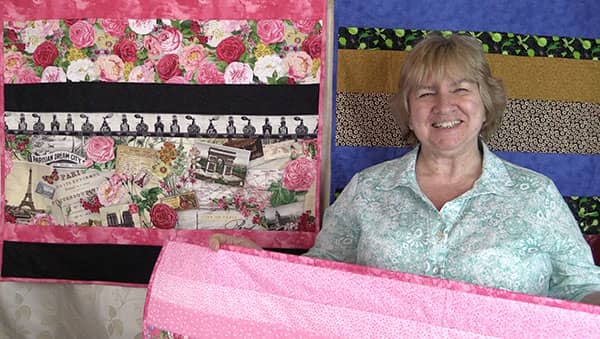
Most quilters find the binding step to be the most time-consuming part of making a quilt but it doesn’t have to be if you use your sewing machine. This method is a popular way to finish a quilt that both saves time (compared to hand sewing) and completes the quilt by giving it a nicely finished border edge.
We personally sew all of our binding using a sewing machine as it’s quick and easy and to be honest, we really don’t like hand sewing all that much.
This tutorial goes over the basics of quilt binding plus it illustrates the actual technique with helpful step-by-step photos. You should also watch the video tutorial below as it will help to make sense of some of the steps in this tutorial.
What is quilt binding?
Quilt binding is the process of using fabric strips to cover the raw edges of a quilt. It is the final step when creating a quilt and prevents the raw edges from unraveling or fraying. The binding is made from several strips of fabric, sewn together to form one long strip that measures slightly longer than the perimeter (or outside edge) of the quilt. We tend to add around an extra 10″ to the length of the binding strip. It is typically made of fabric that matches the top of the quilt so that it coordinates well and provides an attractive finish for the quilt.
How to cut your binding strips
There are three ways you can cut your binding strips:
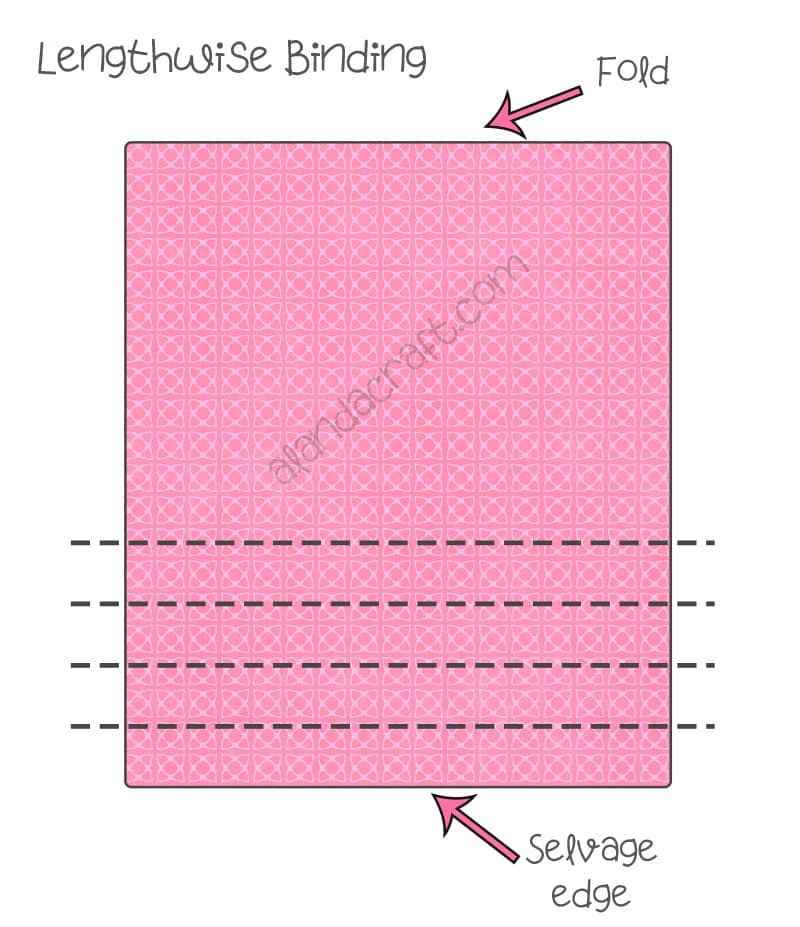
- Lengthwise
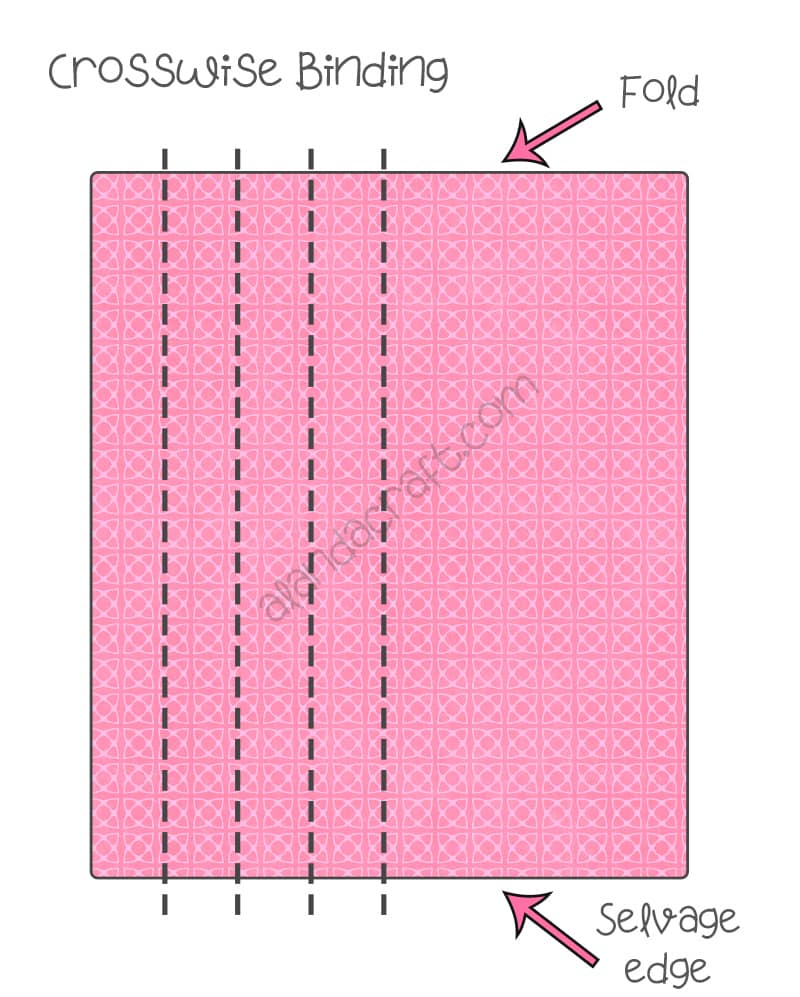
- Crosswise
- Bias
Which is the best?
It will depend on what sort of quilt you are making, plus your personal preference also comes in to play. So let’s quickly take a look at each.
Lengthwise binding is cut parallel to the selvage edge and you will notice that if you stretch the fabric there is no give. This makes it suitable for quilts where you need to stabilize the edges. For example, if you have a border made up of pieced blocks or a border that has been cut on the bias, there is the potential for warping. These types of borders aren’t as stable as say a border made of one piece of fabric, so adding binding that has no give helps to minimize any possibility of stretching or warping.
Crosswise binding is cut vertically from fold to selvage and if you stretch the fabric you will find that there is a bit of give. This type of binding works well with straight edge quilts where the borders are made up of one piece of fabric. It is the easiest to cut and also the most economical way of cutting binding out of the three methods.
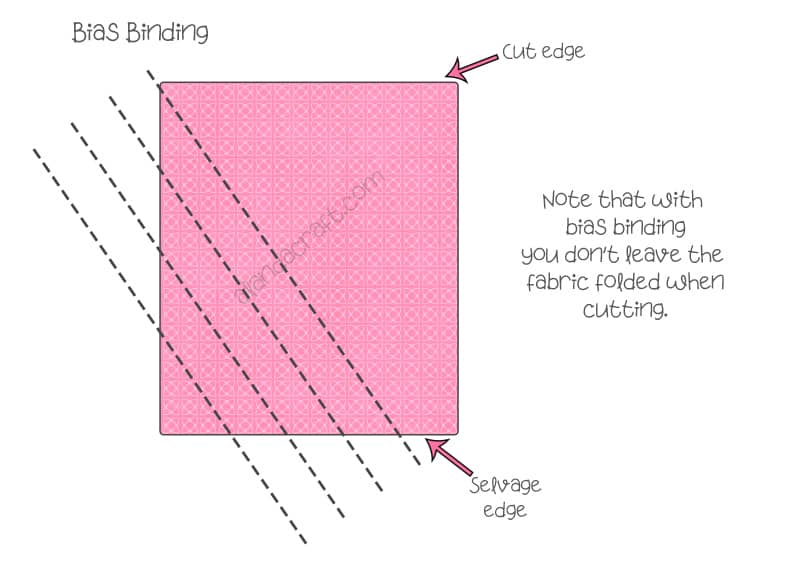
Bias binding is cut diagonally at a 45 degree angle. It is not very economical in terms of fabric usage and it can be a bit fiddly to cut but it is considered to be the most long lasting of all types of binding. If you stretch the fabric, there is a lot of give so it works really well with quilts that have curved or scalloped edges but will work just as well for straight-edged quilts.
What do we do?
We mostly use the crosswise method since it is the quickest and easiest to cut and it saves on fabric.
How wide do you cut fabric strips for binding?
As a beginner, the two most common widths for quilt binding (based on the double-fold method and using a quarter inch seam) are :
- 2 ¼”
- 2 ½”
However, you can cut smaller or larger widths and use a different seam allowance based on the look you are wanting to achieve and the type of binding you decide to use (see the next section for binding types). For example, if you want a wide binding, you might cut the strips at 3″ and use a 3/4″ seam allowance.
What do we do?
In most cases, we cut our binding strips at 2 1/4″ (and we sew it on to the quilt using a 1/4″ seam allowance).
Double-Fold Binding vs Single-Fold Quilt Binding
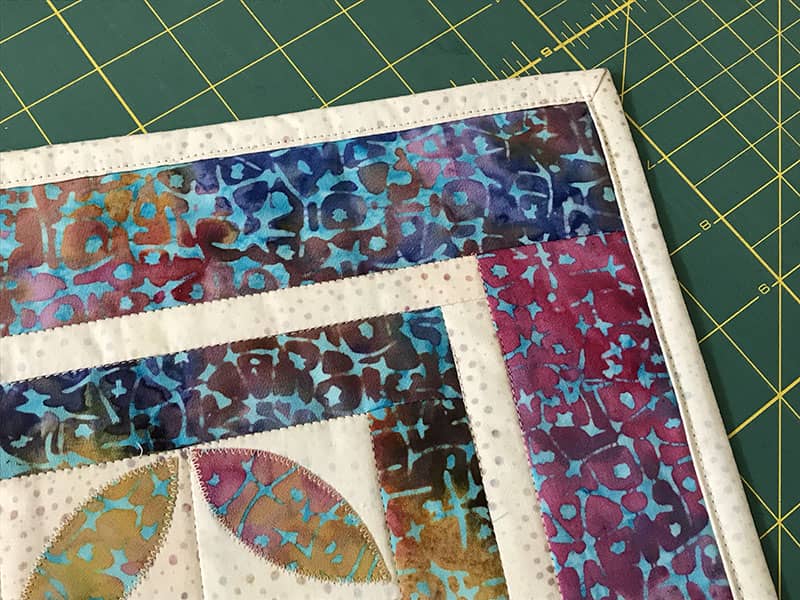
The most common quilt binding method is the double-fold method. This basically means that you have fold the binding strip in half before sewing it on to the quilt. (See image below). This makes for a stronger more long-lasting binding and is our preferred method.
The single-fold binding method as the name suggests means that you have left the fabric strip unfolded before sewing it onto the quilt. The main benefit of this method is that you use less fabric since your strips don’t have to be cut as wide but it is less sturdy than the double strip method. Keep this method for sewing onto quilts that won’t see a lot of wear and tear like an art quilt or decorative piece for instance.
What do we do?
We use the double-fold method in most cases.
How to calculate the quilt binding length – the easy way and the hard
To determine the length of the binding you will need for your quilt, use an app. Yep, you heard it right, we use an app that calculates how much we will need based on the size of the quilt. Using a quilting calculator makes it so much easier than having to think it all through. The one we use is the Robert Kaufmann app…and it’s free! Here’s the link.
But hey, it’s worth knowing how to manually calculate it for when the zombie apocalypse hits and you have no access to the internet. So here it is:
The easiest way to do this is to just multiply the length of the quilt x 2, the width of the quilt x 2, and add those amounts together. Then you need to add a bit extra as you will need to overlap the ends and also for the mitered corners. We normally allow about 10″.
So your calculation would be something like this:
(length of quilt x 2) + (width of quilt x 2) + 10″ = length of quilt binding
For example:
Let’s say my quilt measures 60″ x 80″. My calculation would be as follows:
(80″ x 2) + (60″ x 2) + 10″ = 290″
So I would need 290″ of quilt binding for my quilt.
How to work out yardage requirements & number of strips to cut for your quilt binding
I really want to tell you again to just use an app to figure this out (the Robert Kaufmann one mentioned above will do this for you) but I’m going to be good and give you the calculations so you can manually work it out on your own.
To work out how much yardage and the number of strips you will need to cut from that yardage, you will need to know three things:
- The perimeter of your quilt (plus a bit extra) – remember back to the little calculation in the previous section above? That calculation will give you the number we need here. In my example, it was 290″. Here’s the calculation again so you don’t have to scroll back: (length of quilt x 2) + (width of quilt x 2) + 10″ = perimeter of quilt
- The width of your binding strips – work out whether you are going to cut your strips at 2 1/4″ or 2 1/2″ or something else. That’s the number we need here. In my case, I am going to cut strips that measure 2 1/2″ in width.
- The WOF – the width of fabric (WOF) of quilting fabric is the measurement from selvage to selvage when you unfold your fabric. This usually measures around 44″ but can be more or less. As a general rule of thumb, most quilters will use 40″ as their WOF. This allows for the selvages (which need to be removed) and possible shrinkage if you prewash your fabric (plus it’s just easier to calculate with a round number).
Here’s the calculation to work out the number of strips you will need:
(perimeter of quilt) ÷ 40 = no. of strips to cut (always round up)
Now here’s the calculation to work out the amount of yardage you will need:
(no. of strips) x (width of binding strips) = yardage needed
Here’s my example data for my quilt that measures 60″ x 90″:
- Perimeter of quilt = 290″
- Width of binding strips = 2 1/2″
- WOF = 42″
So, the number of strips I will need is:
290″ ÷ 40 = 7.25
I round this up to 8 so I will need 8 strips.
The amount of yardage I will need is:
8 x 2.5 = 20 inches
That’s a little over half a yard so I would probably buy 5/8 of a yard or maybe 3/4 just to be safe. I always like to have extra for those happy little accidents.
If you are still not sure at this point, we do have a video tutorial and more detail for this on our blog post here – How to calculate quilt binding requirements
Do you sew the binding on the front or back of a quilt?
In the quilting community, there is ongoing debate over whether to sew the binding on the front or back of a quilt.
As a beginner, you may be wondering what this even means.
Well, when you sew on a binding you start by sewing it around the edge of one side of the quilt. But which side do you choose to do this on – the front of the quilt or the back?
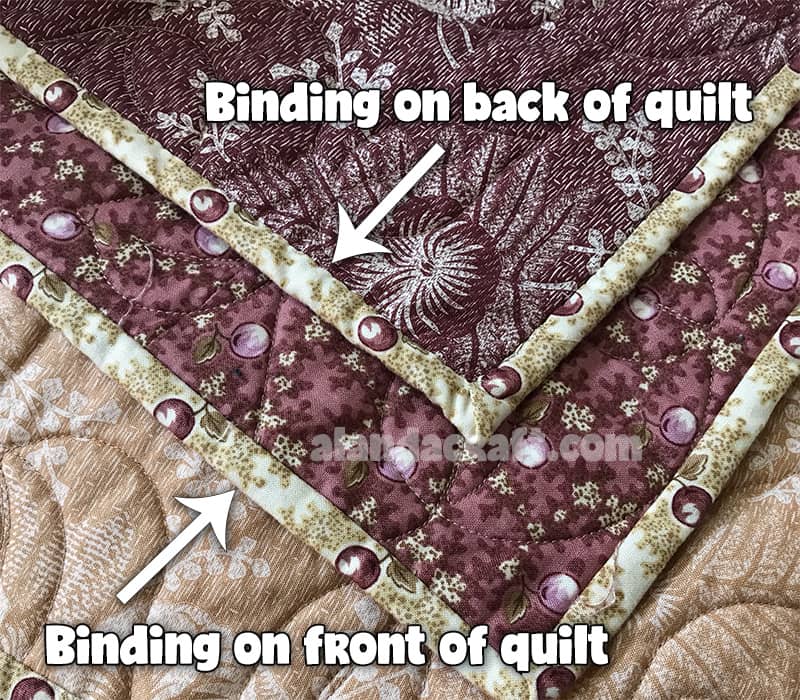
If you don’t mind a bit of hand sewing, then sew the binding using a sewing machine onto the front of the quilt first and then fold it to the back and hand sew it down to finish. This leaves a nice clean edge on the front of the quilt.
You can see an example of this in the image below of a quilt that was machine-sewn to the front of the quilt and then hand-sewn to the back. This was done by the mother of a good friend of ours who did an absolutely beautiful job. You’d be hard-pressed to see the stitching on either the front or the back.
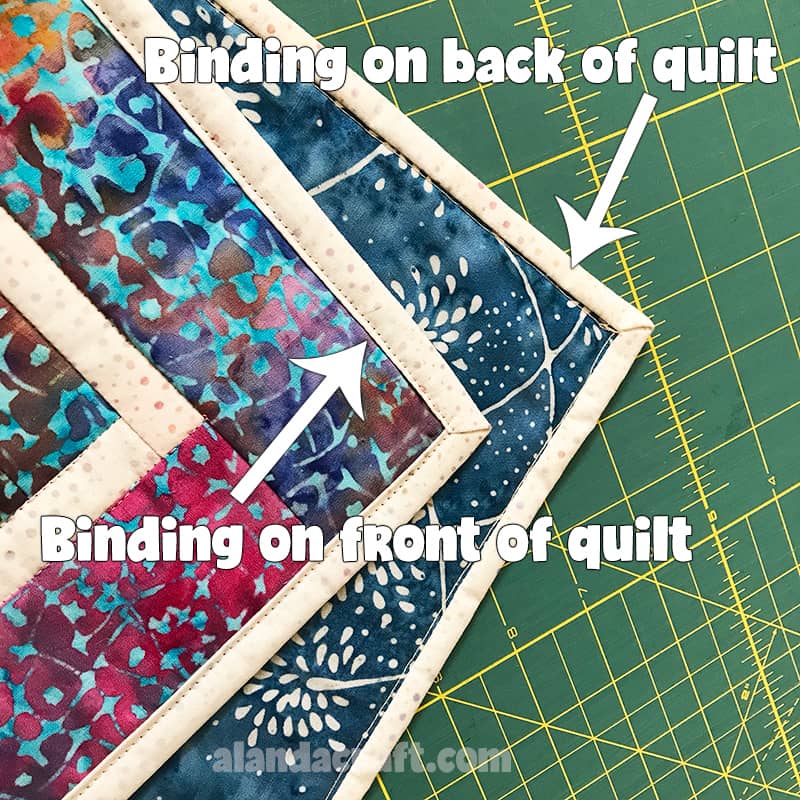
Compare this now with a quilt (see image below) where both the front and the back of the quilt binding were sewn with a sewing machine. In this particular example, the binding was sewn onto the back of the quilt first and then brought around to the front whereupon it was sewn down again with a sewing machine.
You can see that the stitch lines can be seen on both the front and back. Technically it shouldn’t really show up on the back if your binding and quarter inch seam are just right but because you are sewing from the front and can’t see what is going on in the back, it rarely ever works out perfectly.
Sure, it doesn’t look as good as the previous quilt example, but unless you are making a show quilt, most people don’t even notice.
So in answer to the initial question, if you are wanting to only use your sewing machine to sew both sides of the binding onto the quilt, then start by sewing onto the back first. But hey, that’s just our opinion…you do you!
Wanna know what we do?
If you haven’t already guessed, we sew our quilt binding on to the back of the quilt first.
Now on to the step-by-step tutorial
We have both a video tutorial and written instructions for how we sew on a binding. It’s worthwhile watching the video first and then scroll down to read the written instructions as it will make more sense this way.
Watch the video tutorial below or scroll down for the step-by-step written instructions
(Can’t see the video? You may have an ad blocker installed. Watch the video on YouTube here.)
TOOLS WE USE
You can check the latest prices at Amazon by clicking on the links below:
- Creative Grids Ruler 8½” x 24½”
- Olfa 24″ x 36″ double sided healing mat
- Olfa 60mm rotary cutter
- Oliso Iron
- Quilters slidelock
- June Taylor Shape Cut Pro ruler
- Gutermann Sew All thread
How to Machine Bind a Quilt
Before you start you will need to do a quick calculation to ensure that you have enough fabric to go around the outside of your quilt. You can scroll back up to work this out or head over to our tutorial on how to measure the amount of binding that you will need.
- We make our bindings 2½” wide.
- For this baby quilt, we cut 5 x 2½” strips across the width of the fabric.
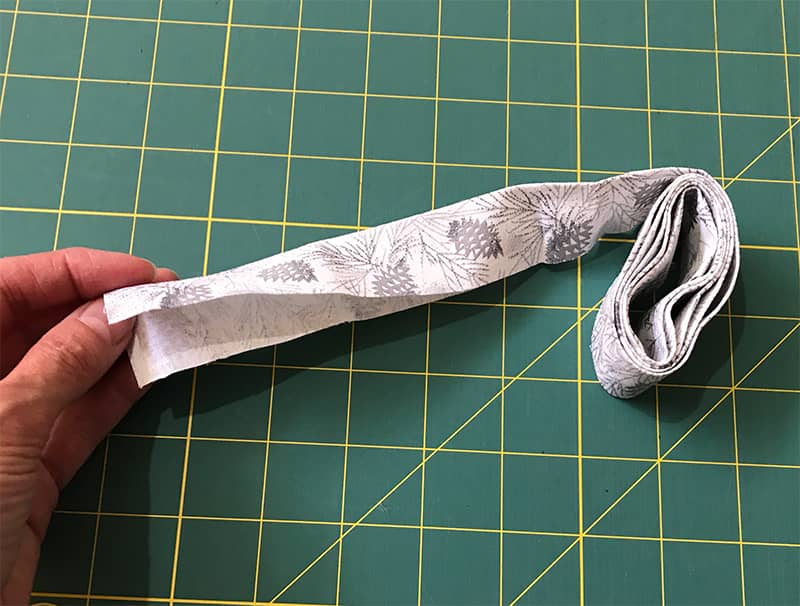
Step 1: Sew the strips together
- Start by overlapping two strips as shown in the image below.
- Sew with a 45º angle from one ‘V’ to the other. We’ve sewn a line on the fabric to show you where to sew. Sewing on an angle reduces bulk on the seam lines and spreads the bulk out.
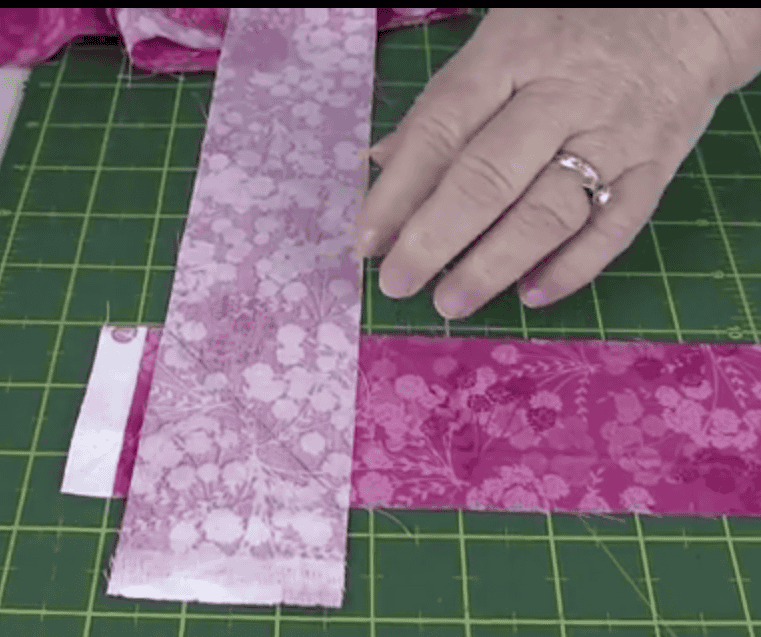
- Trim the excess back to ¼”.

- Continue to sew all of the strips together using this method until you have one really long strip.
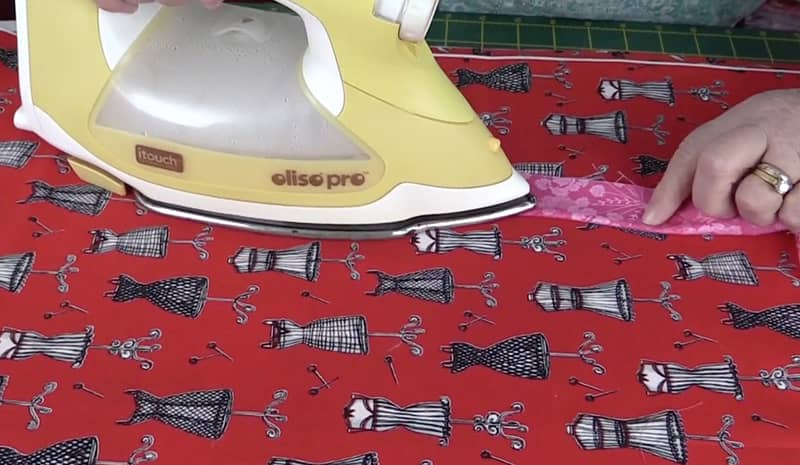
- We are going to be using the double-fold binding method so we will need to fold our strip in half and press.
Step 2: Attach the binding to the quilt
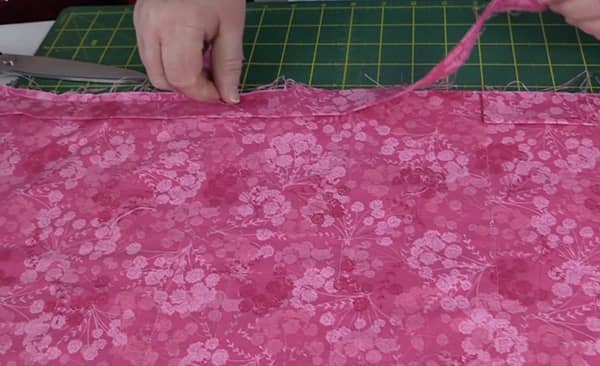
- Now your binding needs to be attached to the edge of the quilt. We attach ours to the back of the quilt.
- Lay the raw edges of the binding to the raw edge of the quilt.
- Start on one of the long edges at around the middle of the quilt, and leave a tailpiece of about 5″- 6, which isn’t sewn to the quilt. You will see why further on.
- Pin the binding down until you reach the first corner of the quilt.
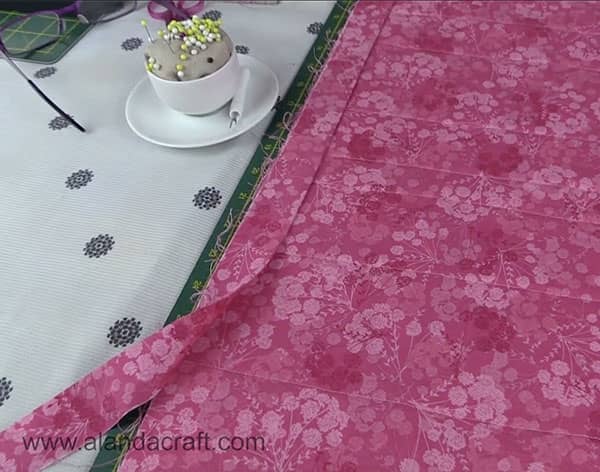
- Now sew down the edge with a ¼” seam and stop ¼” from the corner. Do a backstitch and remove the quilt from the machine.
- You can see what that looks like in the image below.
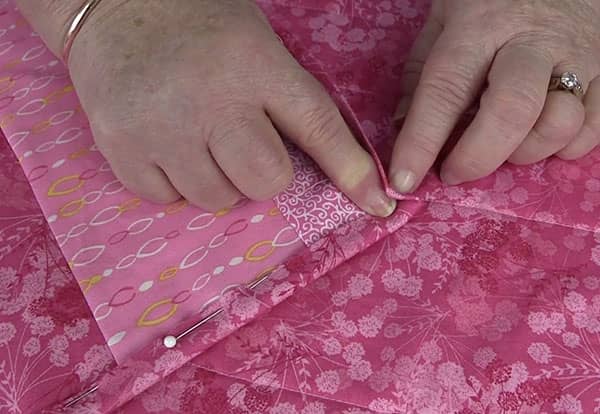
Step 3: Create your mitered corner
- We are now ready to do our first mitered corner.
- Fold the binding back at a 45º angle so that the binding runs parallel with the quilt.
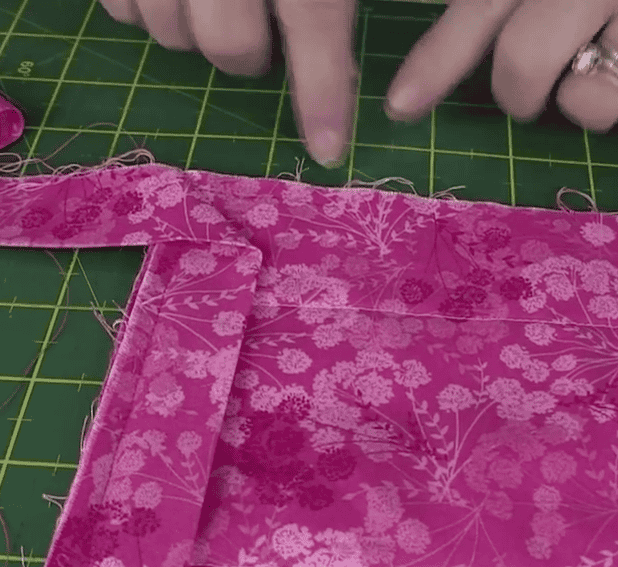
- Then fold the binding back so that the folded edge is parallel with the side you have just sewn and is now laying along the edge of the quilt that is to be sewn next.
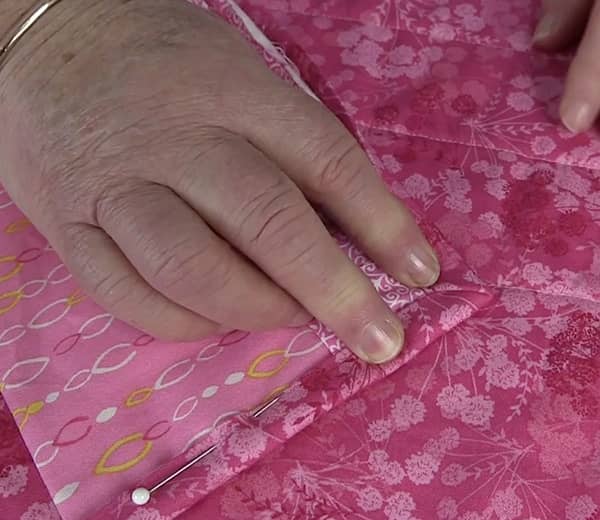
- It should now look like the image below.
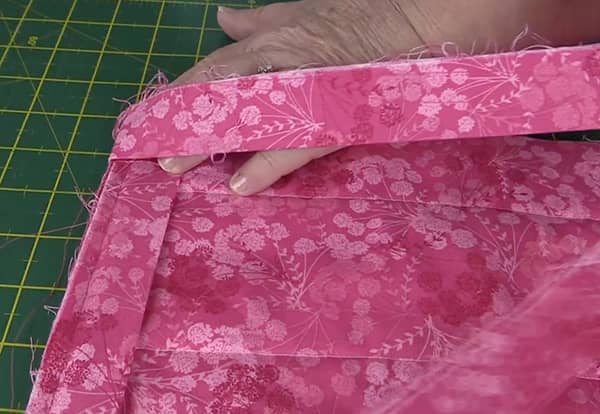
- Now sew from the folded edge, along the edge of the quilt (as shown by the dotted line in the image below) and again, stop ¼” from the next edge.

- Now you need to create your next mitered corner. Just repeat the previous step and then continue until all four mitered corners have been sewn.
I really suggest you watch the video at this point because this next bit may not make as much sense until you see it in action.
Step 4: Attach the end pieces
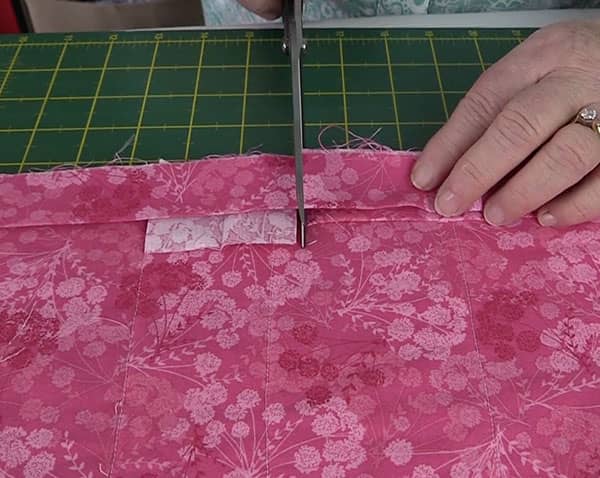
- On the last edge stop about 10″ from the loose tailpiece that we left un-sewn at the start.
- Take a piece of scrap piece of the binding that measures about 2″. You are going to use this as a measure.
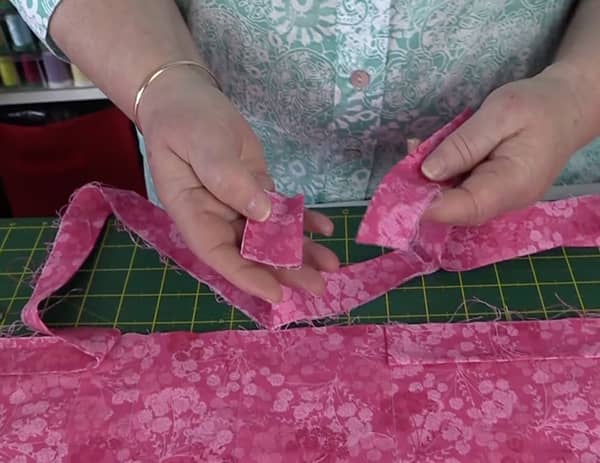
- Open this piece out and lay it down on the top of the tailpiece keeping the edge straight.
- Lay the other piece of binding flap down flat over the tailpiece and the measuring strip.
- You are now going to cut the top piece of binding only, along the edge of the measuring strip.
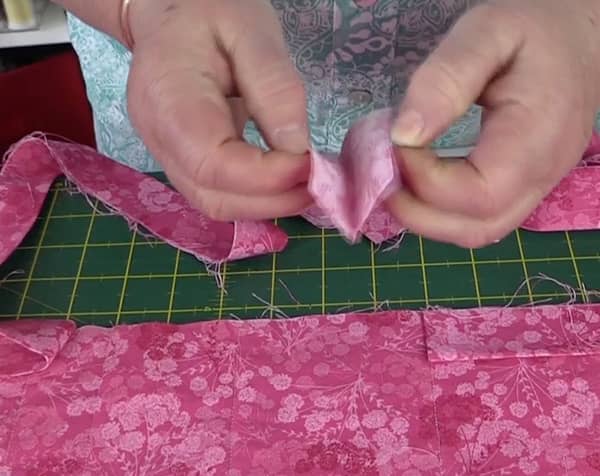
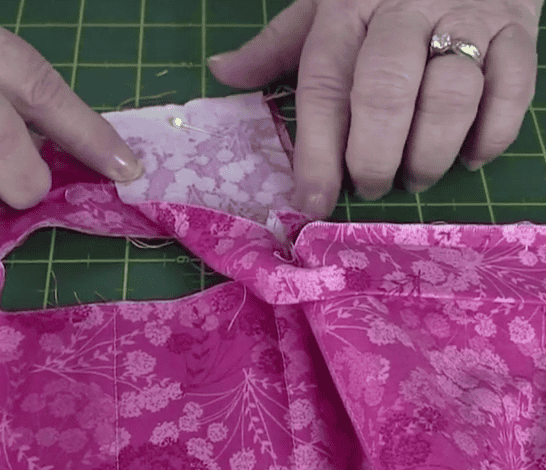
- We now need to join the tails together.
- To do this, join them the same way you joined the binding at the start. In other words, lay the two pieces one on top of the other, pin and check that the binding isn’t twisted, and sew from ‘V’ to ‘V’ on a 45º angle. (We recommend watching the video here as this can be a little complicated.)
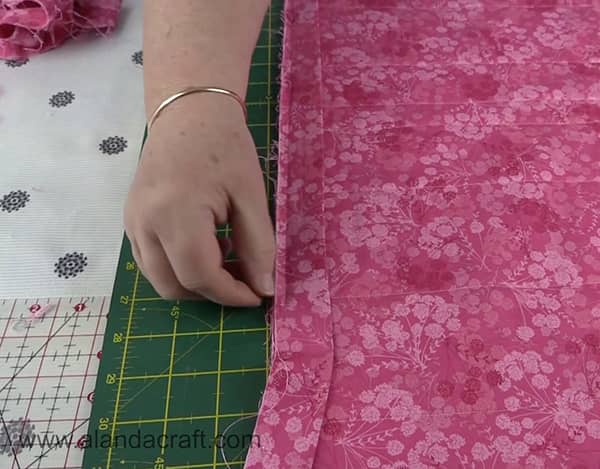
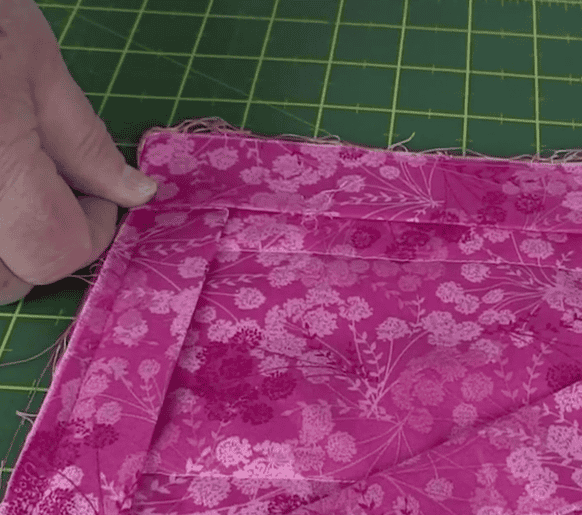
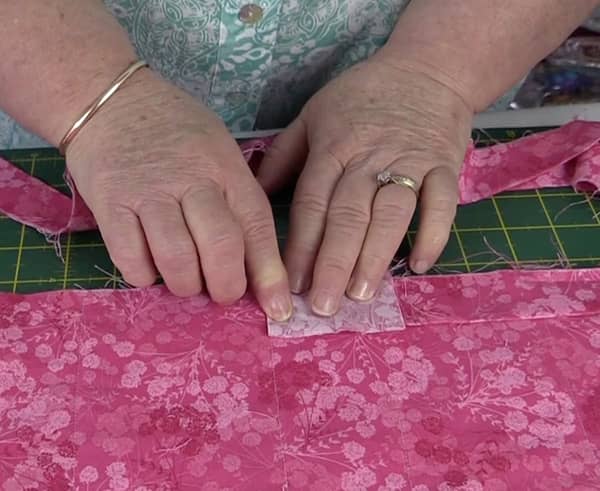
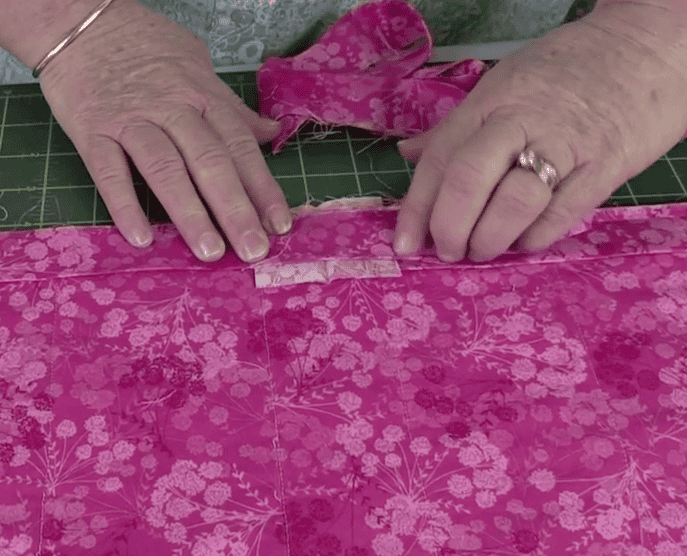
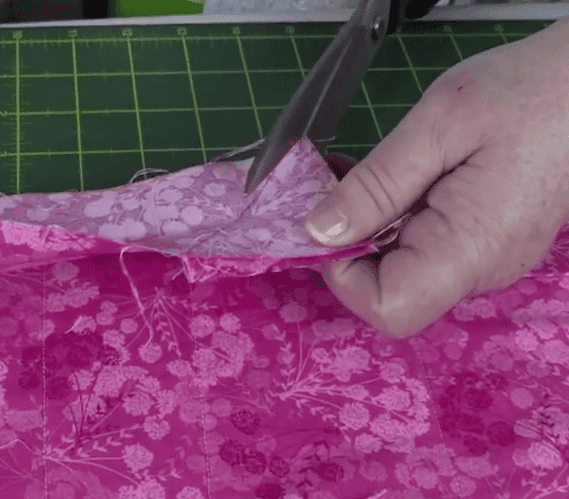
- Firstly, check that the binding piece lays flat along the edge of the quilt.
- Trim the excess fabric.
- NOTE: Don’t trim off the excess until you check that the binding sits nicely along the edge of the quilt and isn’t too short. By checking first you can unpick the seam and resew it, whereas once you have cut it you have a problem if it doesn’t fit. Although you can sew on another strip so all is not lost if the piece is too short.
- Smooth the binding down and line up with the edge of the quilt.
- The pieces should fit nicely and the binding should lay flat. Stitch to finish using a backstitch at the start and finish (as shown in the image below.)

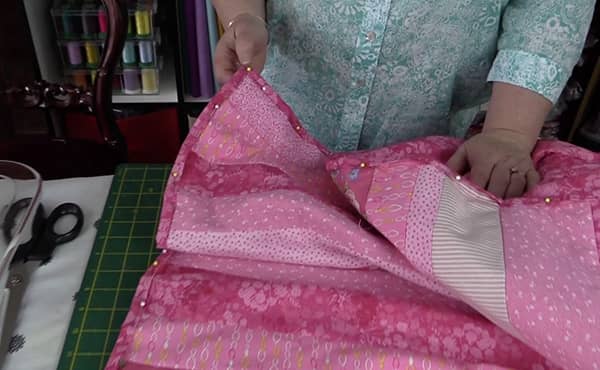
Step 5: Attach the binding to the front of the quilt
- Fold the binding around to the quilt front and pin in place.
- As you get to each corner, create a miter and pin. (Watch the video for this!)
- It should be pinned around the entire quilt ready for sewing.
- Now sew the binding in place trying to match it to the seam line on the back. That’s the goal, but don’t stress if this seems too hard. Simply sew the binding with cotton in your bobbin that matches your backing fabric color and you won’t notice any little mistakes.
- Your binding is now complete.
So that is ‘How you Bind a Quilt’ to get that nice finish and cover the raw edges.


Linda says
Great video, very clear. I HATE hand sewing, yet my marching binding leaves a lot to be desired. I saw a video using a fell foot. What do u think of that? I don’t have that foot, so I haven’t been able to try it. Something HAS to be better then what I turn out. I have quilts that are not finished because of my dilemma. I’m at my wits end. I may have to just bite the bullet and hand sew it if your technique doesn’t work any better then what I’m doing. One more thing…if I used my walking foot, would the results be better? Maybe?
Alanda says
I’m also not a fan of hand sewing, Linda, that’s why I machine sew my binding. I think you will find this technique is simple to do. Just take your time and your binding should turn out fine every time. A walking foot helps because of the bulk that you are sewing. I haven’t ever used a flat felled foot on my quilts so I have no idea if it would work. Another way to finish your quilts is to use our no binding technique. Here is a link to the video on how to do that https://youtu.be/Z7b-1HX2hqc. Hopefully you will get those quilts finished using one of these methods. Good luck
Linda says
Hi Alanda, thanks for your quick reply. I’m going to try your method of binding first. See if I get better results. I’ll go very slow, that might help too.
I did watch your recommended video on No Binding method. A very good idea, but I really prefer binding, I think it gives it a more finished or polished result. More like a quilt should appear.
I’ll let you know how the quilt comes out. Like I said before, if I have to hand sew, then that’s what I’ll do. Really appreciate your assistance.
Thanks again.
Patricia says
Really wish you had mentioned in the video to use a walking foot. I tried two different feet and I was highly disappointed with the results. I happened to go back to video and the questions. The walking foot makes such a difference. Will be ripping out about 2/3 of binding to repair. I have spent so much time and money on quilt and know it will bother me if I am not happy with the binding.as it is a gift for my grandson. Suggest you put a footnote or add to your video to use a walking foot. Otherwise the video is great.
Pauline says
Merci very Nice
Alanda Craft says
Thank you Pauline
Donna Zeeb says
Thank you SO much! This is such a simple tutorial, anxious to finish my quilt?
Alanda Craft says
Happy to hear that our tutorial was helpful to you Donna.
NAnette Langton says
Very informant,
Alanda Craft says
Thank you.
Mary Beth Moser says
Thank you so much for the binding tutorial. It was very helpful. I do have a question. On the mitered corners how far down from the top do you start stitching?
Alanda Craft says
I generally start about an eighth to a quarter of an inch from the edge and backspace to the edge. Then I just continue sewing down in the usual way. Once I have turned the binding to the front I do a couple of stitches over the mitre. and then pivot the needle and continue sewing. I hope this helps, be sure to let me know if it isn’t clear.
Cheri Botle says
I just used this tutorial to sew the binding to my first quilt. It’s a beast! 90×100! For that reason, I chose to machine stitch the binding, so it is done in my lifetime! I have to say, your method has made something I dreaded doing into a breeze! On a side note, you are a delight and would love to spend days on end crafting with you! Thanks force sharing !
Alanda Craft says
Thank you for your lovely comment Cheri. I am so happy to hear that you liked the tutorial. Wow that is one big quilt. I have made a couple that size and they certainly are a challenge to work with. Cheers Wanda
Ruby M Butler says
Thank you, Great Tutorial. Well Done!
Linda says
This is the first video that I have found that I actually understood how to do a binding.
Thank you so much!
Linda
Alanda Craft says
That’s great to hear Linda. Thank you for your lovely comment.😊
Carol says
I have been quilting and sewing on binding with hand sewing the back binding for years. I wanted to try machine binding both front and back. Your instructions and tutorial are excellent. I liked the way you explained calculating the amount of fabric and number of strips needed also. I am excited to try your method of machine binding.
Alanda Craft says
Hand sewing does look better than machine binding and personally, I would rather do it that way if I had the patience. But if you want it done fast, then machine binding both sides is the way to go.
joanne robertson says
Thank you so much this video is very clear and I have been looking for this for years now my bindings may look a lot better
Alanda Craft says
Thank you Joanne. I am happy to hear we were able to help out 😊
Kay says
Thank you so much. Your video and instructions were so easy for me to follow. I’m a fairly new quilter and panic when it’s time to do the binding. Thank you again.
Sarah says
I made my first really big quilt and really struggled with how to do the binding. I am working in a small space with very old equipment and struggled getting everything aligned. This tutorial was exactly what I needed. I am so grateful I found it. This project has taken me two years and I’m so pleased to say that it is finally finished! Thank you for your excellent step by step video and guide!
Cheers,
Sarah
Alanda Craft says
Thank you so much for you lovely comment Sarah. I am happy to hear that our tutorial helped you to get that project done and dusted. It’s such a lovely feeling of accomplishment when a quilt is finished and you can just stand back and admire what you have achieved. 😊
Tracey Puig says
This is the most comprehensive binding video ever! A pleasure to learn from.
Thank you for sharing your knowledge and passing it on.
As I have emailed before I love listening to your accent.
Thank you again for the excellent tutorial!
Tracey
Alanda Craft says
Thank you for your lovely comment Tracey 😊. I am happy to hear that you like the tutorial, and the accent. It’s a mix of Kiwi and Australian. I have lived in Oz for many years but still retain some of the NZ overtones. Many people find binding a bit daunting so I’ve tried to make it easy. Binding does give quilts etc a nice finish. But we also have quilt pattern tutorials without binding that also look nice.
Nadra Calver says
I enjoyed your tutorial and found to be very helpful
Alanda Craft says
Thank you Nadra!
Theresa Watson says
Great video easy to follow.
Alanda Craft says
Thank you Theresa 😊. I’m glad to hear you liked it.
Kathy Knowlton says
I would like to see closed captioning on your videos please and thank you!!
Alanda Craft says
Unfortunately Kathy, we don’t have closed captioning on the videos on the website. However, if you watch them on YouTube most of them have automatic YouTube closed captioning. Here is a link to the video on YouTube https://youtu.be/Z9me4B_etm8
Linda Barth says
I was trying to do a machine binding on a quilt using some written instructions from my local guild. Unfortunately they didn’t specify sewing the binding on the back first but after I did that I couldn’t figure out how to proceed and found your instructions. Is there any way to recover without ripping everything out or just hand sewing the binding?
The instructions are outstanding and will be used in the future.
Alanda Craft says
I would just continue folding the binding to the back and sewing it, Linda. I have done this before when I wasn’t thinking about what I was doing and I thought darn it, I will just continue as if I had sewn the binding to the back. Try to use a thread that matches the front or a neutral colour that will blend into the fabric. As your sewn line will be on the front of the quilt instead of the back.
CAROL says
What a great tutorial. I have been quilting fort 50 years and never thought about sewing the binding on the back of the quilt first. I have one I’m almost ready to bind and will definitely give this a try. Putting the binding on the front and then turning to back works but the stitching line isn’t always straight. This should be a big improvement. Thanks for this information.
Alanda Craft says
Thank you Carol 😊. I also have to admit that I like to use fussy fabric on the back, so that the stitching just blends in nicely.
Jaydee says
Thank you for this brilliant tutorial. I have a few quilts put away for that ‘finishing touch’ that may now be finally finished.
Alanda Craft says
Glad to hear the tutorial is helpful. Those finishing touches are the bane of many quilters lives. Nice to get them finished
Valerie Smith says
Is there any way I can print off theses instructions for binding
Alanda Craft says
There is a tiny PDF print button at the very end of the blog post Valerie. It will include the whole blog post but you can highlight and do a screen print of the part you want to keep.
Cheryl says
This was so informative! I may finally attempt making a quilt after seeing this. Thank you!
Pamela says
Thank you for the 2″piece of binding tip for measuring the cut for final join.
That’s a keeper!
Great instructions thanks very much 🙂
Pamela
Alanda Craft says
Thank you Pamela 😊.