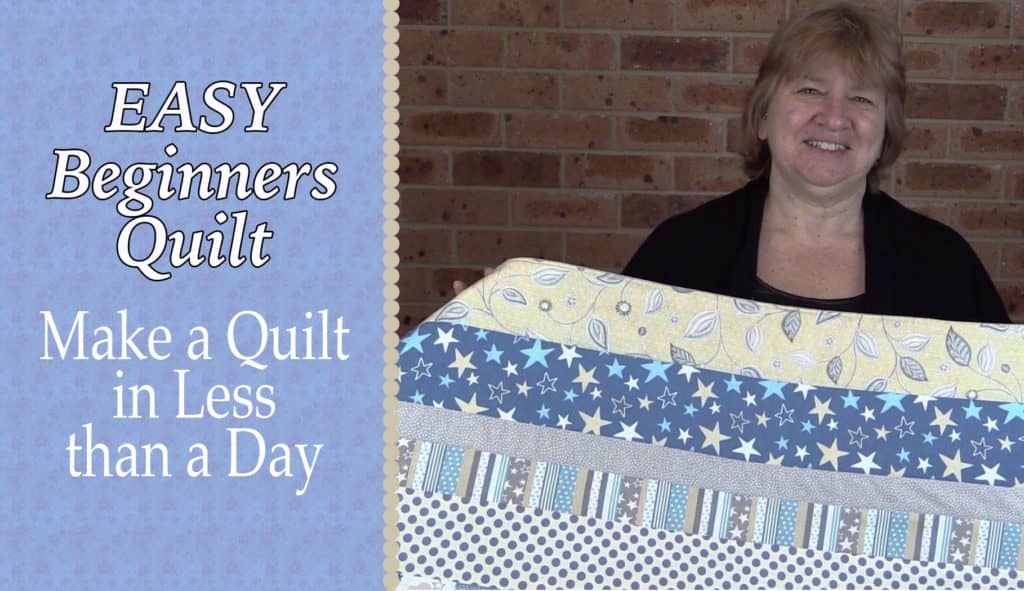
Quilting for Beginners – This is by far the easiest quilt you will ever make
When you’re making your very first quilt it can be a little overwhelming. Those quilt blocks can look quite complicated and knowing which tools are needed can be kind of confusing. Plus, the fancy free motion stitching on the top of the quilt, requires quite a bit of practice to get the hang of. And finally, there’s the binding…now that can be quite tricky when you are just starting out.
But what if there was a quilt you could make that was super simple and didn’t require much in the way of fancy tools or fancy sewing skills?
This is where the easiest quilt ever comes into play.
The easiest quilt for beginners is one that doesn’t require a special sewing machine, doesn’t require you to bind the quilt (this is always the most difficult part for newbies) and doesn’t have you spending hours trying to piece together fancy quilt blocks.
It should be super simple, not require you to sew a perfect quarter-inch seam, be small enough to handle easily in your machine, and not require you to know how to stitch fancy designs on the top to quilt the layers together.
In fact, in order for you to create your very first beginner quilt, it should be as simple as you knowing how to sew a straight line with your sewing machine.
And once you have created your first quilt, you will want to branch out to make more detailed and larger quilts.
This is our goal for you with our easiest quilt ever.
It is as simple as we can make it. You can sew it by hand of course but in this tutorial, we use a sewing machine. So as long as you can sew a straight line on your machine then you are good to go.
In this free quilting tutorial, we show you, step by step, how to make a quilt in less than a day, even if you are a beginner quilter. And the more quilts you make the faster it becomes. This is a ‘quilting for beginners’ type of tutorial so don’t be afraid to tackle it, even if this is your very first quilt. You will love how easy this quilt pattern is.
Are you put off making a quilt because of the binding? – well in this quilt we don’t use binding.
Not up to free motion quilting just yet? – no worries, we don’t do that either.
Don’t want to have to piece together quilt blocks? – you’re in luck, this quilt doesn’t have any.
This is a very simple beginner’s quilt that can be made by anyone who can sew a straight line with their sewing machine. You will be so amazed at how quick and easy this quilt pattern is, that you will soon be making them for gifts. A lot of people are looking for easy quilts to make in a day and this is the easiest one by far.
Quilting for beginners has never been so easy!
Watch the step-by-step video below or scroll down for the written instructions
(Can’t see the video? You may have an ad blocker installed.)
QUILTING SUPPLIES YOU WILL NEED TO COMPLETE THIS PROJECT
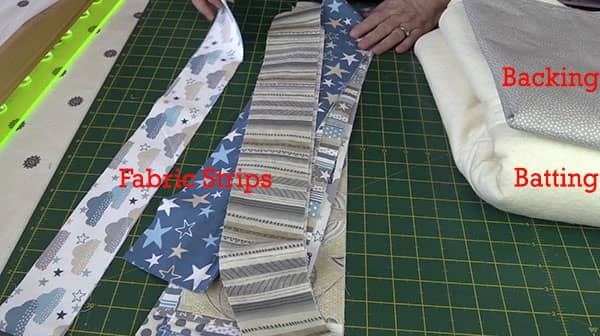
FABRIC
- 2 metres of quilting cotton (approx 2 yards) for the backing fabric (we had some leftover after cutting to size)
- 1/4 metre (approx 1/4 yard) of quilting cotton for each of 8 different types of fabrics (we didn’t end up using it all) – You could also use pre-cut jelly roll strips, but we wanted the strips to be different sizes.
BATTING
- 2 metres (approx 2 yards) of quilting batting (we had some leftover after cutting to size), or you can just buy a pack here.
TOOLS USED IN THIS TUTORIAl
We make a small commission for each sale on Amazon (at no extra cost to you) when you purchase using the links below :
- Creative Grids Ruler 8½” x 24½” – I really like Creative Grids rulers and we have a few in different sizes. This one is great for when you need to cut across the width of the fabric, which is what we are going to do in this project. They also have a very handy smaller 6.5″ x12.5″ ruler which we use a lot. It’s a very handy size. However, for this project we used the longer ruler.
- Olfa 18″ x 24″ double-sided healing mat – We use a larger 24″ x 36″ Olfa mat for projects like this, but when I went to find the link for you on Amazon I was unable to find it. So I have added a link to one of their smaller mats.
- Warm Company Batting – We use Warm and Natural from the Warm Company. A while ago we bought a really big roll of their batting and it seems to be lasting forever, I think it will see us both out the way it’s going. However, it is really handy to have on hand. Their batting comes in a variety of sizes and lofts. So you can choose what sort of batting you want for to use for your quilt. Is it going to be used in Summer or Winter? The Warm Company have just the right batting and they provide all information to help you make the right choice.
- Olfa 60mm rotary cutter – I really like the 60mm rotary cutter for these types of projects. My preference is for the cutter with the straight handle as I find it comfortable to grip and easy to guide. But these things are always a personal choice, you may prefer the Olfa rotary cutters with the slightly curved handle and the trigger function.
One thing I do recommend is that you try to get into the habit of covering the blade when it’s not in use, even if you intend cutting the next strip almost immediately. The blades on rotary cutters are very sharp and you could end up with a nasty cut if the blade is not covered, simply brushing against it as you reach to get something can cut you. - Gutermann Sew All thread – We like using Gutermann sew all thread and keep a supply of the larger reels in white, black and cream on hand. The thread comes in so many different hues so there will pretty much be a thread in a color to suit your current project. Plus you can pick up packs of assorted multi-colored thread sets.
For this quilt I used cream throughout. I tend to stick to neutrals for the front and match the thread bobbin to the main color of the backing fabric. - Quilters Curved Pins for pinning the quilt layers together – you could use regular safety pins or even pins if that is all you have but the quilters curved pins are easy to work with and they go through the layers easily.
- 505 Fabric Adhesive Spray – (optional) for basting the quilt. Now although I do pin, and quite profusely I must say, I also like to use temporary adhesive spray to help hold the layers together. I use adhesive spray on quilts, table runners, cushion covers, in fact anything that has layers that I want to hold together.
The completed size of this quilt is approx 37″ x 50″.
The size of this quilt is approximate because it will depend on how you cut your fabric strips. It will be around the size of a baby quilt or lap quilt but it can be upsized. However, we recommend that if this is your first quilt that you stick with keeping it relatively small to get an idea of the process.
To Make the Quilt Wider
- Cut two strips of the same fabric and sew them together for each row
To Make the Quilt Longer:
- Add more strips.
LET’S GET STARTED
We highly recommend that you watch the video above first before going through the written instructions.
Note that we will be using a quarter-inch seam allowance throughout this quilting project.
1. Cutting the Quilt Strips
There is no hard and fast rule for cutting the strips.
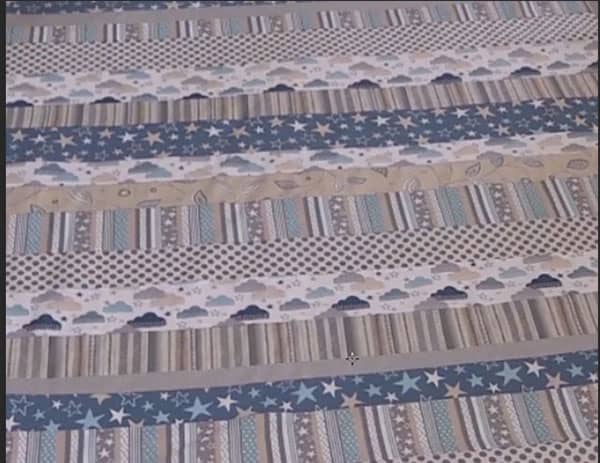
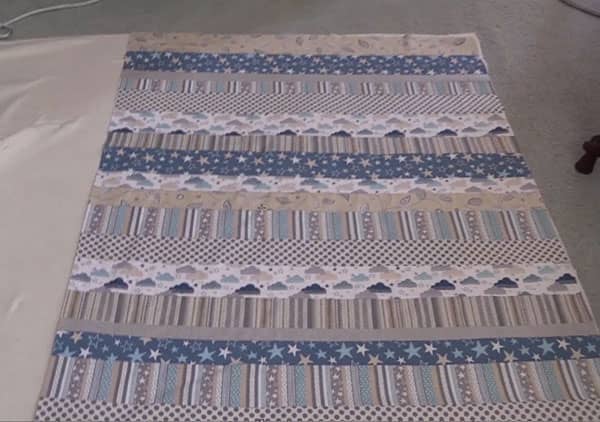
For the quilt in the video we cut the strips in a variety of sizes – 2″, 3″ and 4″ but you can cut them to whatever size suits you. Just as long as you cut enough strips for the finished length of your quilt.
We cut the strips the width of the fabric. So essentially each strip measures approximately 42″ in length.
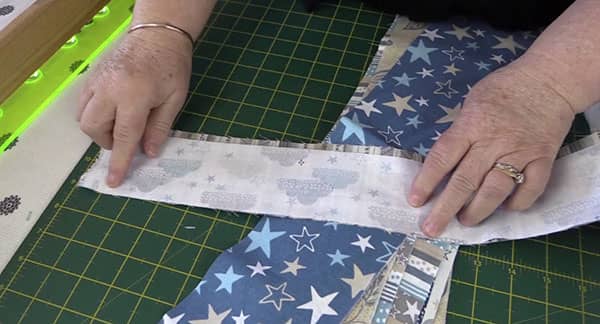
- Lay your strips out and decide how you want the finished quilt to look.
- Stack your strips so that they are in order.
2. Sewing the Quilt Strips
- Take the first two strips and lay them down with right sides together.
- Sew them together with a ¼” seam.
- Press the seams to one side, generally towards the darker fabric so they don’t show through if you have a light strip next to a dark one.
- TIP: To minimize warping we suggest that you sew your first strip in one direction. and add the next strip sewing it on in the opposite direction. If you sew all the strips in one direction the quilt may warp.
- Add the next strip to the previous one.
- Sew them together with a ¼” seam.
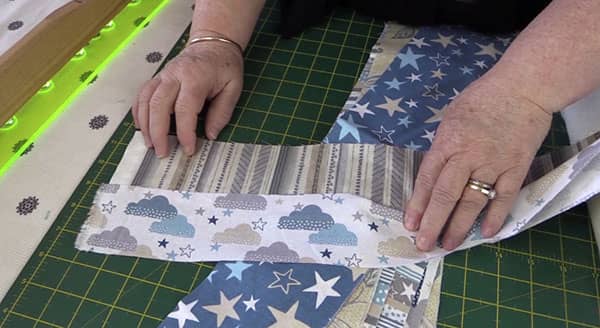
- Keep doing this until all the strips are sewn together.
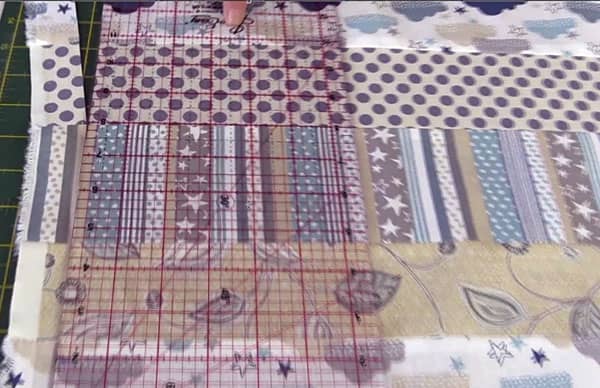
3. Squaring up the Quilt
- Take your quilting ruler.
- Lay it straight on your fabric.
- Line up one of the lines on your ruler along one of your seam lines. Make sure it lines up in a few places.
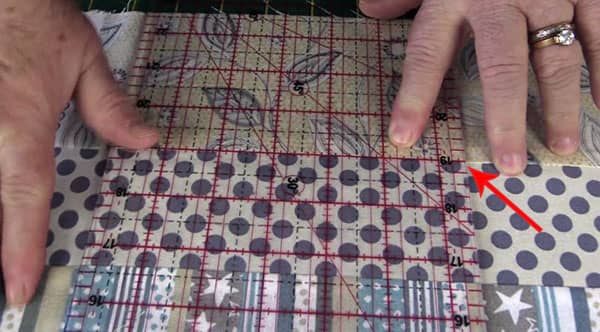
- Some of the selvedges on my fabric are quite wide. So I am going to come in about 1½” from the edge of the quilt.
- Cut off the excess with your rotary cutter or scissors.
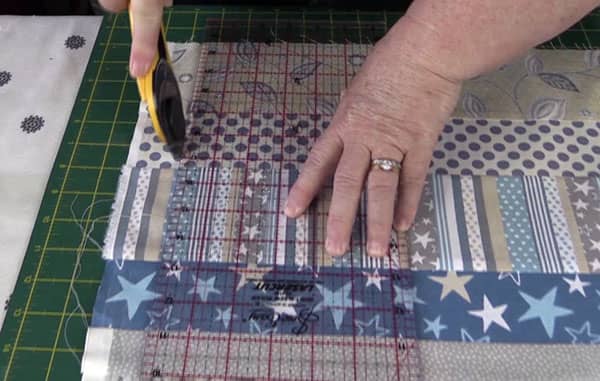
- When you come to the end of your ruler, move it up the quilt.
- Line up a line on your ruler with seam lines on the quilt.
- Continue to cut.
- Repeat on the other side of the quilt.
4. Constructing the Quilt
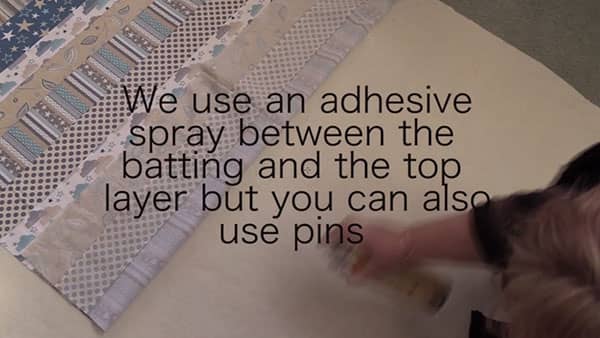
- Lay the batting down on the floor or a large workspace.

- Lay the quilt top on top of the batting.
- Roll the quilt top back and apply adhesive spray on the batting. The adhesive spray should cover all of the batting. You don’t need need to spray too heavily.
- Place the top piece over the batting and smooth down removing any bubbles or creases. It’s important to iron both the top and backing pieces to ensure smooth, wrinkle-free fabric.
- It also helps to pin the two together as well.
- Use the adhesive spray and/or pin really, really well before taking the quilt layers to the sewing machine
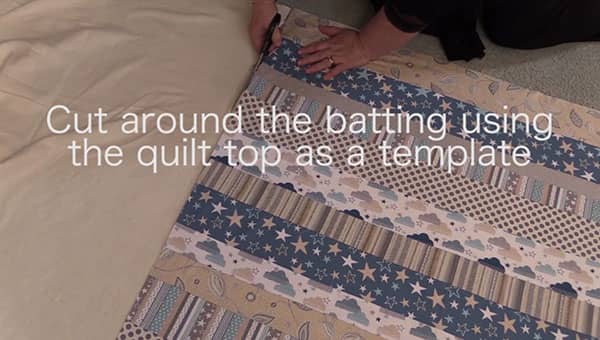
- Using the top layer as a template, cut around the batting.
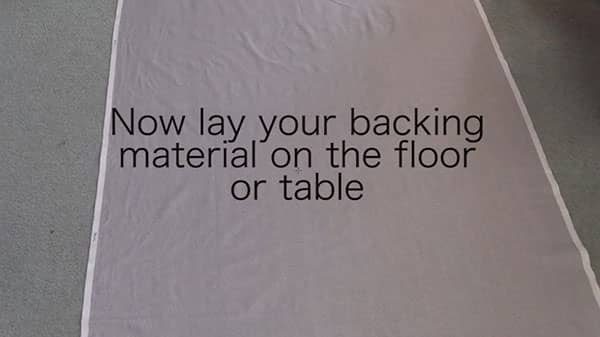
- Lay your backing material on the floor or table, right side facing up.
- You can trim the selvages off first. My lap quilt is going to fit between the selvedges so I haven’t done that.
- Now lay the batting/quilt top face down on top of the backing.
- The backing and the quilt top will be right sides together.
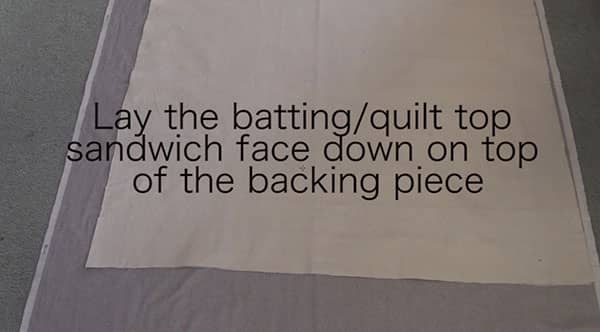
- Cut around the backing using the batting/quilt top as the template.
- You will now have three pieces of fabric all measuring the same width and height. Those 3 layers are called the quilt sandwich.
- Now we need to baste the quilt. This is just a quilters term for pinning all three layers together so that they all say in place before we move on to the next step. You will need some safety pins, pins or preferably quilter’s pins to do this. Make sure you use lots and lots of quilting pins or safety pins to keep everything in place.
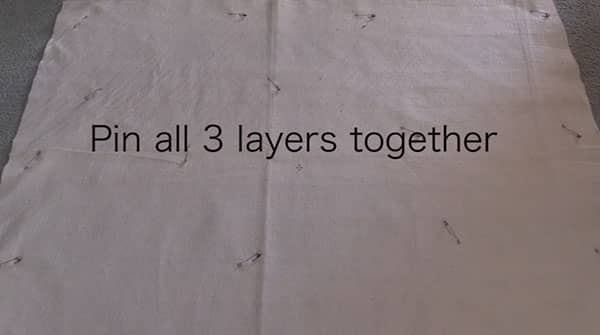
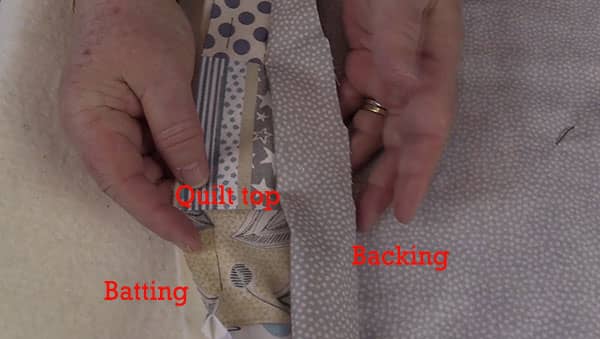
- Just do a final check that everything is in the right order before sewing.
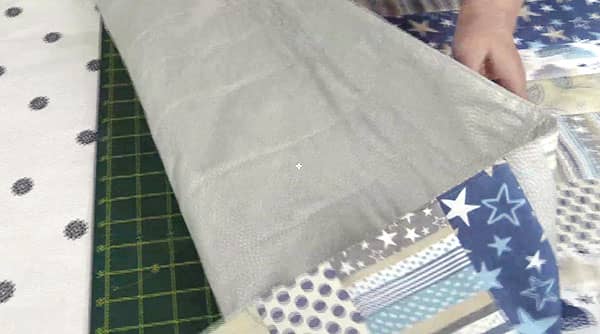
- The backing and the top of the quilt are facing right sides together, and the batting is on the back of the top of the quilt. ( I hope that makes sense) see the photo below.
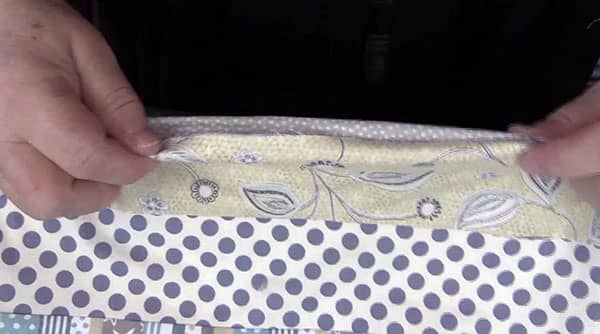
- Mark approx a 6″ – 8″ opening to turn the quilt through.
- Use a fabric pen or a Frixion pen. DO NOT use a regular pen.
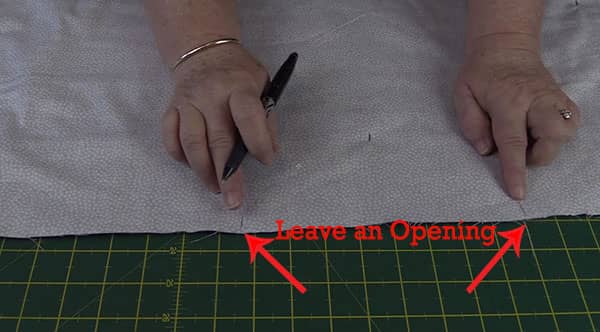
- Start with a backstitch at one of the marks.
- Sew around the edge using a ½” seam.
- Stop when you come to the second mark.
- Backstitch.
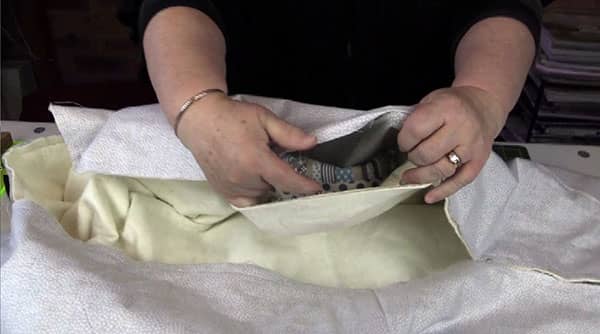
- You now have an opening to turn the quilt through.
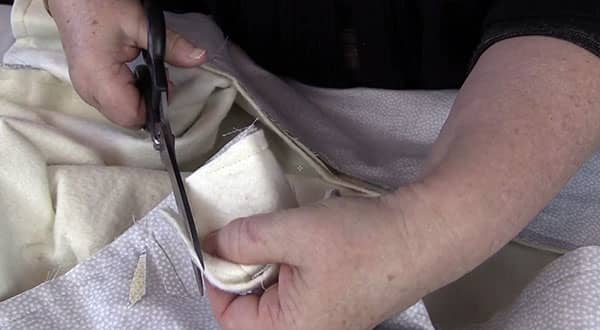
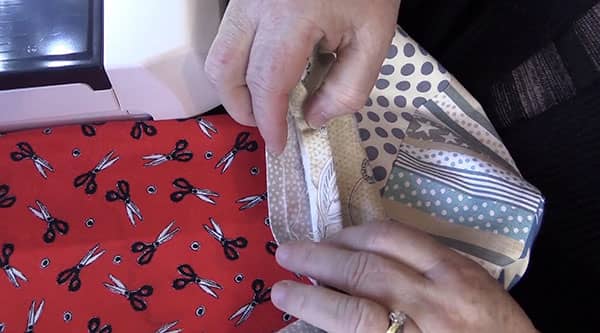
- Before turning the quilt through, trim the corners.
- Take care not to cut your stitching.
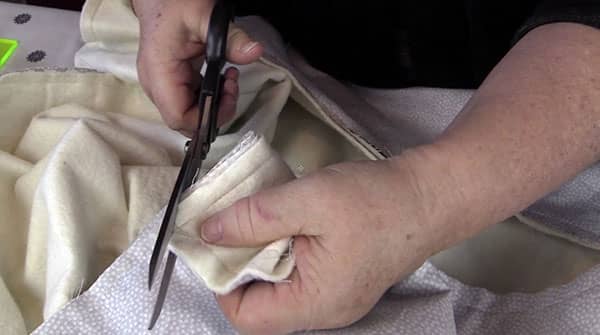
- Trim some of the bulk away from the corners
- Trim on an angle from the corner out to the edge.
- Take care not to cut any of your stitching.
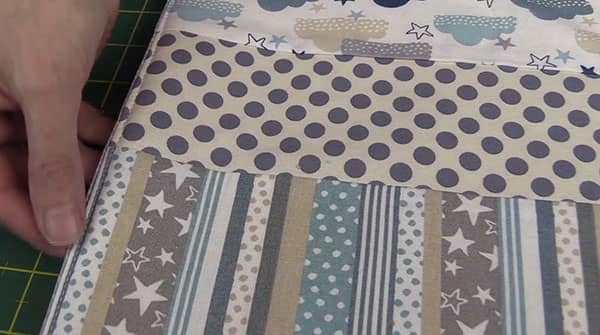
- Turn the quilt through to the right side.
- Push the corners out. I use a wooden skewer for this. If you use scissors, be careful not to push too hard. You don’t want to tear the fabric.
- Fold in the seam allowance at the opening.
- Give the quilt a press.
- Press the opening so that it sits nice and flat.
- I like to pin the opening pieces together before topstitching.
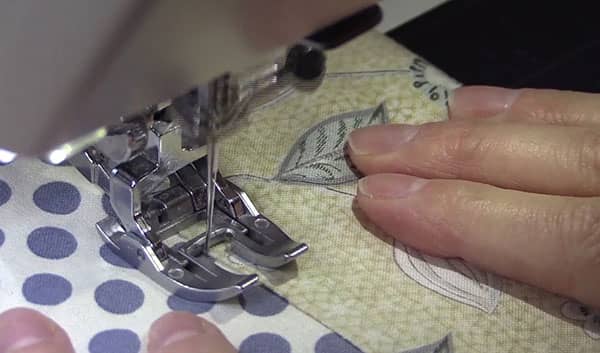
- Topstitch all around the edge of the quilt. I use either 1/16″ or 1/8″.
- The topstitching closes the opening and gives a nice finish to the edge of the quilt.
5. DITCH STITCHIN’
- Now it’s time to quilt. This is what holds all the three layers together. We are going to ditch stitch but you can quilt however you like.
- Stitching in the ditch is sewing down the seam lines.
- We are going to sew down the seam line where each set of stripes meet.
- An open-toe walking foot will help you to see where you are stitching. It also helps to keep the layers in place as you sew. A walking foot will really help here as it is made to keep all of the layers together as you sew so you don’t end up with bunching up of the fabric at the ends.
- At the beginning and end of each line of stitching just do a small backstitch so that the thread doesn’t unravel.
- Go slow and smooth the layers our to the side as you sew. This will help to make sure there is no bunching of the layers when you get to the end of the row.
- And there you have it, a completed quilt in no time at all. With no binding to worry about.
- You can see the ditch stitching lines on the back of the quilt.
- All nice and neatly finished.
Check out how the Frixion pens are used for quilting here.
You might also be interested in another beginner quilting project here – The Easiest Quilt V2
We also have a ton of other simple and easy quilting projects on our blog – Easy Quilting Projects


DanniK says
This is a nice simple quilt! I love the soft colors in the fabric and am wondering where it can be purchased. Any help you could give would be appreciated. Thanks.
Alanda says
We bought these fabrics from our local Spotlight store here in Australia. We thought the colours went together nicely.
fabric.com have a lovely range of fabrics in the US and they ship internationally http://www.fabric.com, so you may be able to find something similar from them. Good luck.
Brenda Gentle says
How to get motivating to quilt againBrenda Gentle
Alanda Craft says
Life gets in the way and we fall by the wayside with our crafts, and often it just takes one thing to resonate to get us going. So I hope that we have something that will get you motivated again Brenda. Being a quilter in the past, you know how satisfying and fulfilling quilting is 😊.
Caroline Sears says
I really enjoyed making 2 of these for my daughters for Christmas. However, this was my first quilting experience, as well as my first blankets. I made a lot of mistakes, beginning with choosing the wrong fabric. Your video states cotton is great, so I purchase 2 beautiful 8 piece patterns off of Amazon. I didn’t realize, because it’s not stated, how wide the strips should be. So, the patterns I purchased were not as wide as the backing, and I had to sew pieces together to make them wide enough. The length was not an issue, but I had to purchase the fabric 3x in order to have enough material. I also figured out the material I purchased was too thin and frayed/ripped quite a bit. I made it through with some flaws, but I feel like your video and directions were more advanced than for a true beginner like me. I also don’t have a fancy machine, but it is computerized with some advantages. It would be appreciated if your video and post was updated to walk through those of us who were really struggling in parts. A person who has quilted some might understand the directions as they stand, but it would have been nice to know how wide the strips should be and not to use too thin of cotton material. It would also help to know what type of thread to use and to just break things down a bit more., and even include instructions if your machine is simple. I am truly a beginner quilter with no training or grandma to show me how. Lol. Thank you for what you did do, as I was able to make my quilts. It just wasn’t in an afternoon., it was weeks.
Alanda Craft says
Hi Caroline, sorry to hear you had so many problems. We use quilting cotton for our quilting projects and although you don’t need to use quilting cotton, we find it gives good results.. The thread is mentioned in the section “tools used in this video’, we use Gutermanns sew all thread. The strips can be as wide or as narrow as you want them to be. In the instructions we mention that we used a mix of 2″, 3″ and 4” wide strips. It can be made on just about any home sewing machine, you don’t need anything fancy to make this quilt as it is all straight stitching.
Alanda says
Thank you Janet. We are just a couple of down to earth women – one Kiwi, one Aussie and we just try to be ourselves when making these videos. Nice to know it works.
Melinda Hopkins says
Hi ladies – What a beautiful and simple quilt this is …. I just love it!! Thank you ladies for sharing this gorgeous project and the way you have described the making of the quilt is just sooo easy to follow and very easy to understand. My only question is “do you need to use a walking foot when sewing the batting, front and back of the quilt together and also when you are stitching in the ditch?” . Thank you once again for delivering such a very simple yet informative tutorial. Best Regards Melinda
Alanda says
Thank your for your lovely comment Melinda. We tend to use the walking foot for most of our projects but there is no reason why you can’t use the normal foot. Of course, the walking foot does make things easier to manage as it stops the layers moving around and it’s a dream for stitching in the ditch. I don’t have a walking foot for my machine but Paula does and it’s her machine that we use in the videos.
Melinda Hopkins says
Thank you ladies so very much for your response re walking foot and once again for your informative tutorial. Regards Melinda
June Hill says
Very muchly agree
Judith Glynn says
hi just found you guys and love your site judy
Alanda says
Thanks so much for visiting Judith!
Sherrie says
Thank You SO much for giving me hope for making a quilt, I watched your video on youtube, just stumbled upon it, I am ever so Thank ful I did, I did leave a thumbs up and a comment, I am going to male this quilt and show you all pictures!!
Alanda says
That’s awesome Sherrie. This really is an easy quilt to make and very forgiving as you don’t need to line up squares or shapes. And the fact that you don’t need a binding is what I love.
Jennifer says
Greetings from Alaska!
I just came across your tutorial and now I know what I will be doing this weekend! Thank you so much for such a thorough tutorial.
Have a blessed day’
Alanda Craft says
Now that’s a place I want to visit one day. Always wanted to do an Alaskan cruise.
Hope the quilt works out for you Jennifer. You can share your results here if you like: /submit-your-project/
carolyn says
Thank u for making quilting easy for us first timers
Alanda says
Thank you for your lovely comment Carolyn
Lynn says
Great tutorial! Thanks so much for sharing it! I have hope for my second quilt now! The first one with binding may have been too much to tackle but like you said, no one will notice (but me!)! I am sure I will enjoy #2 much more!
Alanda says
Thank you Lynn. You will be really happy with how quickly and easily this quilt comes together. And they look great when finished. Don’t forget to share photos of your finished quilt on our readers projects page /submit-your-project. We love seeing our readers projects, they are all so unique.
Georgia says
Was searching for a beginners project and loved this. Clear instructions, no time wasted watching you sew seams for 1 minute or two in silence. TY. I have bookmarked both your blog and subscribed on You Tube. Will definitely be visiting often !!
zelinda says
Can you use fat quarters for the quilt top and cut them in strips?
Alanda says
You could but you would have to sew two strips together to make it long enough for a row. A fat quarter measures at most 21″ and the quilt when finished measures about 37″. So you would have to sew two strips together for each row in order for it to be wide enough.
Linda says
Gr. Great video?
Donna Ballotta says
like this and how it was explained
can’t wait to make one
new to quilting and have been trying new blocks so this is a good tutorial
thank you
Alanda says
Thank you for your nice comment Donna. This is a great quilt to start, it’s a good confidence builder and it comes together easily. We have lots of other quick and easy quilt patterns for you to try out once you finish this one. Happy quilting 🙂
Denise says
Great tutorial for this quilt. Excited to make one.
Alanda says
You will love how quickly this comes together Denise. 🙂
Rae Siclari says
I am new to the quilting world. I started out feeling overwhelmed about all the different aspects of quilting. I am now working on a quilt on the go quilt. I found your website and on youtube and am using it to do my quilt. The way you explain things is so easy for me to follow. I just watched one about making a strip quilt in one day. I have a couple of quilts that I want to make for gifts for Christmas and this looks so easy and something I can handle especially after I watched your video.
Thank you so much for your videos. I couldn’t do quilting without you!!!!!
Alanda says
Well first off let me say welcome to the world of quilting Rae. I do have to warn you, it is very addictive. There is nothing quite like taking scraps of fabric and turning them into works of art. Thank you so much for your kind comments, it is always a nice feeling to get such lovely feedback. We have quite a few beginners quilts, in fact most of our tutorials are suitable for those starting out. I hope you have fun making your new creations and that you will share some photos on our Readers Projects page at some stage. Happy quilting 🙂
Cheryl says
This looks so good. I will try it. Thank you.
Alanda says
Excellent Cheryl. I think you will like how easily it comes together. 🙂
Jeanette Crouch says
If I wanted to make this quilt to fit a twin bed, how much fabric will I need? Thanks
Alanda says
You would start by measuring the bed to work out what size you want for your quilt. Some people like a quilt that overlaps over the sides quite a lot and some don’t. And some like it long enough to cover the pillow at the top and hang over the edge at the bottom. So get your measurements first based on the size you want.
For our quilt, it was only one strip of fabric per row but for yours, you would have to sew two or more strips together to make up one row based on what you want the width of your quilt to be. The same would apply to the length of the quilt. Just keep sewing the rows together until you have reached the length of the quilt.
Debbie Stevens says
Just to say that I am near to finishing this quilt. Thank you so much for such easy instructions to follow. I love the option of not having to bind every quilt that I may make in the future ……and I do plan on doing more !
I started quilting last year on a beginners class [that’s what they called it anyway] making a sampler quilt. Talk about ‘throwing yourself in the deep end’ . I learnt very quickly as I was having to make all sorts of blocks with names I had never heard of. I still haven’t finished it !
Anyway, I look forward to discovering more of your videos.
Thanks again,
Debbie [UK]
Alanda says
I agree Debbie. I love being able to run up a quick quilt and not have to bind it. 🙂 We have a number of quilt block tutorials that may help with finishing off your other quilt, if you are looking for some quick and easy quilt blocks. Here is a link to those tutorials /category/quilting/quilting-blocks. And we do have lots more easy quilt tutorials on the website as well. Maybe you could share some photos of you finished quilt with us on our readers project page. We love seeing how creative our readers are. /submit-your-project/
mary v says
i want to pin my top to batting. Do I put the pins with the top facing up or the batting facing up? then I can pin the top facing the right side of backing and pin again before I sew the 3 pieice together?
Alanda says
You can go with what works for you Mary. If you find it easier to pin a different way then by all means do it.
June says
Ladies, thank you so much for this video/tutorial. Your instructions are clear and easy to follow. I found your site quite by chance and am so happy I did. I am new to patchwork and quilting (to any machine sewing to be honest) but having watched the video, I think this is a great project to start. I have all the tools and now I have the know how. (I hope). Thanks again.
Alanda says
Excellent, so good to hear June.
Cindy says
Wow. I guess you don’t like us Americans very much. ?
Mary says
great Video – will love to read more very comprehensive.
Alanda Craft says
Thank you Mary 🙂
Cathy says
Great idea for a new quilter like me and my daughter, thanks so much for the video ?
Cricket Smith says
I see that you are using the quiltersslidelock for cutting your strips with. My father Earl Williams and his wife Sharon are the ones who make those tools.
Alanda Craft says
We purchased both the large and the small one a few years ago, and as you can see in our videos we use them a lot. We did a video demonstration on the quilters slidelock – /2014/08/16/quilters-slidelock-demonstration/. Your parents certainly came up with a winner of an idea, the quilters slidelock is an excellent tool for all quilters and we definitely recommend getting one to our readers and YouTube followers.
Debbie says
I have a question when it comes to stitching in the ditch with this type of quilt. At the end of each stitch line do you backstitch to keep it from unraveling and if so, does this look messy on the back? I am assuming you stop and start over at the beginning of each stitch line so that is why I am asking this question. If I am incorrect, please let me know. Thank you so much!
Alanda Craft says
Yes we did a backstitch for this at both the start and finish of each line of stitching. You don’t notice it on either the front or back because essentially if you do it nicely, the stitch runs back over the previous stitch. It also helps to match the thread in the bobbin to the colour of the fabric on the back of the quilt.
Brenda says
I really enjoy your videos!!!
Alanda Craft says
Thank you Brenda. So good to hear!
Laura Wagner says
I love this quilt! I like others above just found your site. I am going to put it in my favorites on my computer and keep coming back for more!
Alanda Craft says
That’s lovely to hear Laura. I hope you find lots of quilting projects to keep you busy.
Sarina says
Love the quilt. I would love to make a simple Christmas quilt or an easy table runner.
Alanda Craft says
We have a number of easy table runner tutorials. Here’s a simple Christmas one to start with – CLICK HERE
Or just type ‘table runner’ in the search field in the side bar and you will see quite a few.
Mercedes says
Hey, I must be missing something. I cannot locate the video on this page. PLEASE help!! Thanks
Alanda Craft says
It might take a few seconds to load. If you scroll down and then back up again, it should appear.
Terri says
Hello Ladies,
I hope you are surviving this pandemic we are going through. I too am new to the quilting world. I have tried making a quilt or 2 but had a lot of errors. Thank you for the step by step directions as the video would not play when I found this. This one looks so simple that I feel I can try it. Can’t wait to see how it turns out.
Alanda Craft says
The video is on the page Terri but it can take a few seconds to load. If you scroll down and then back up again, it should appear.
Regina Hutchinson says
.Great video. Very easy to understand.
Thank You
Gina
June says
Thank you for posting the video to go with the written instructions. As a beginner, just following written instructions makes for slower learning. When you can follow the video too it makes things much easier to understand. I can check what I’ve done and compare my work with the video. It helps boost confidence too. Your instructions on the video are very clear, so thanks, I will look forward to other projects you may post here too.
Alanda Craft says
Thank you, June. And I agree about the videos, they really do help to clarify things.
Stephanie says
I made this quilt and it was so easy. The problem that I ran into was when I wasn’t sewing the stitch in the ditch. At the end of each row I had a lot of bulk that I had to roll under on the end ? I’m not sure what I did wrong. Help!!!
Alanda Craft says
The quilt needs to be smoothed out and pinned really, really well before you take it to the machine to sew. 505 Adhesive spray helps to keep everything in place as well as pinning. Then when you are ditch stitching, go slow and smooth the fabric out at sides as you sew, so that you don’t end up with any bulk at the end. I hope this helps, Stephanie, and I’m sorry to hear you had problems with the quilt.
Linda Gundros says
Dear Ladies
Thank you so much for this tutorial! It’s the easiest one to follow that I’ve seen. I’ve done many tacked quilts over the years but I like how you do the ditch stitching on this one to keep it intact.
I have wanted to make a Christmas quilt for years for a white antique iron bed that was a gift from my Mother . You’ve given me hope !
During these times of Covid I need projects to work on.
God bless you
From the USA🇺🇸
Alanda Craft says
That’s so good to hear Linda. We love getting comments like these. It keeps us working hard to make more tutorials.
Karen says
Is it just me or how can we turn it right side out if it’s all pinned together? I don’t have spray adhesive so was going to use pin method. Or is it a given that we remove the pins to turn right side out. But then won’t the layers shift when I begin to wrangle through the machine to quilt it together? I am a total beginner got my top and back looking great but kinda stuck with the rest of it. Got discouraged with the making and doing binding so w hen I saw this I was like this is for me. I’m not super sharp with this sewing stuff kinda getting too old for it all maybe but really wanted to give it a try.
Alanda Craft says
You will remove the pins before turning through and because you have sewn the three layers together the batting will stay in place. However, before quilting everything together you can iron the quilt and then pin again to hold the three layers together.
Julia says
Thank you for the tutorial, lve been looking for as easy pattern for my first quilt. You’re given me confidence to have a go, so next I’m off to spotlight to collect my supplies
Anna says
Thanks so much for your tutorial. I have never made a quilt before and this makes it look like something I could do. Would you recommend Fat Quarters for this project?
Alanda Craft says
You could do it Anna, but I wouldn’t recommend it because fat quarters only measure approx 22″ so you will have to sew them together to make each strip. Using meterage gives you a width of approx 40″ to 42″ of fabric. So there won’t be a seam in the middle of the strip. Hope this helps.
Lovie Smith says
[email protected].I thought the video was easy to follow. It gave me courage to make a quilt.I loved it. Thanks a lot
Alanda Craft says
Excellent Lovie. You will love how easily this one comes together. It’s an ideal beginner’s quilt.
Charlotte says
A walking foot is almost nessesary to quilt the quilt. I have made several quilts this way. Charlotte.
Tina Potts says
Thank you so much for this video. It’s so easy to follow! I’m getting ready to start quilting for Christmas gifts!
Megan Ashley says
Hi what “size” quilt does this make? A throw size, a twin, full?
Alanda Craft says
This quilt measures 37″ x 50″ so for a twin/single you would probably want to add a couple of strips to make it longer. This is more a toddler size quilt.
Judy Schnackenberg says
Will your quilt making method work for a larger quilt top too??? I think I would have to make the opening larger in order to be able to turn the quilt right side out. Thanks!!!
Alanda Craft says
Yes you can Judy. We made the smaller version to make it easy for those who are new to quilting. Making this as a larger quilt makes it a little more challenging, but won’t be a problem it you have some experience with quilting. And yes I would definitely leave a larger opening to turn the quilt through. Cheers
Cynthia says
Do you recommend pre washing the fabric? I ask because I intend to use these and not hang them on a wall. Experience has taught me that anything that comes into contact with kids has to be washable.
If you washed the strips, would a lingerie bag be a good way to keep them together?
Alanda Craft says
We don’t pre-wash our fabric Cynthia. If you are concerned that your fabric is going to shrink or run then you may wish to pre-wash. I wouldn’t wash strips as they may fray. Choosing to pre-wash is a personal preference so there is no hard or fast rule.
June Richetts says
Thank you so much for making this video. I wish I had found it when I made my first quilt for my first grandchild. I used a pre-printed panel, but was very anxious while I was doing it, and actually did the steps backwards (quilting first, then trying to sew the edges)!
Now, for my second quilt and my second grandchild, I am going to use this method. Now I can’t wait to get started!
Alanda Craft says
Excellent June! These are fun to make.
Marsha H Garmon says
I am so glad to find your directions for this quilt! I made one by this pattern a couple of years ago, and it turned out great, I needed to go over the directions again but couldn’t find your directions. Your directions are very different from the jelly roll patterns. Your directions are very clear. Since I don’t know much about quilting, I really appreciate your version!
Loonsong says
Hello! I came across your wonderful video on Pinterest and it was exactly what I was looking for! I intend to learn how to bind a quilt, but for this project (a play mat for my new grandchild) I wanted something simple. And I wanted to avoid any frustrations so I could truly enjoy the project. 🙂 Thank you for your great instructions and showing each step along the way. Question: Is there any reason why I couldn’t quilt-as-I-go with each strip being attached to the batting, as in another of your videos, and THEN do the pillowcase method adding the back and turning? Thanks.
Alanda Craft says
Yes you can make it like that. Just remember that you will still need to do some quilting to hold all three layers together, otherwise the backing piece will be loose and floppy. So it does need to be attached to the top piece that has the batting attached. We have an easy binding method for when you are ready to move onto binding. Here is the link /2015/09/16/how-to-machine-bind-a-quilt/
Rainy Road says
LOVE this video, however, I was extremely careful in all of my steps (first baby quilt) and my quilt top is not square. Is there anything that can be done? A video on fixing a crooked quilt top? With it having a striped pattern on both ends, it’s pretty obvious that it’s crooked. I would hate to have all of this work for nothing. 🙁 Thanks for any help you can give.
Alanda Craft says
I’m sorry to hear that you have had a problem with your quilt. It’s a bit difficult to advise you on how to fix it without seeing it. Can you send some photos through using this link /submit-your-project/ Thephotos won’t be published, it will just help me to see if anything can be done to help you.
Linda says
I really enjoyed this video! It was so helpful and learned an easier way of doing things. It was just great!
Thank you,
Linda
Cynthia Causbie says
Love this quilt. Your video and instructions are so well done. Thank you! I have made the quilt to your instructions, and would like to add a binder. I watched your video, Machine Binding a Quilt binder it was so well done that it gave me confidence. Can I still add a binder with no issue? Will it be too bulky with the 1/8 inch top stitch around the edge? Again, thank, the quilt came out beautiful – expecting my first grandchild in July.
Alanda Craft says
Without testing it out ourselves, I can’t give a definitive answer but it should be okay with adding the binding as it will be covering the 1/8 stitch line. And it should give a fullness to the binding.
Barbara Haas says
Good morning from Western New York. I have found your website before for my brother cut and scan and now, with the encouragement from my BFF I am now sewing. I love your site for new beginner sewing ideas. Both my friend and I are graduating to starting to quilting. You can only have so much many totes and fabric baskets for friends and family. I was wondering about how many jelly rolls does it take to make this. I am trying not to go back to the local fabric store til the fall. I just did an inventory and yeah, getting to hoarding status. Thanks again for an awesome site. Now I will be checking in more for new sewing ideas
Alanda Craft says
Hi Barbara, we are so happy to hear that you and your friend are starting to quilt 😊. It’s fun to do although it can be a tad frustrating at times. We have lots of tips, hints and quilts just for beginners. This particular quilt wasn’t made using jelly roll strips, it is just random strips of different sizes. Just check the tutorial and you will see the size of the strips that I used.
If you do want to make a jelly roll quilt here is a link to that tutorial /2015/08/21/jelly-roll-quilt-top-tutorial-quilting-for-beginners/, and here is a link to a jelly roll quilt made from fabric scraps in your stash. /2017/08/19/the-scrappy-stash-jelly-roll-race-quilt-variation/. These are a lot of fun to make and you are never quite sure of the effect you are going to get.
Happy quilting. And although your stash is going to grow, don’t throw anything away. Small pieces can be turned into crumb quilting, but that’s something you can look into later. We have a tutorial for that as well 😊. Cheers Wanda.
Deanna says
Hi, I don’t have any ad blockers and I still can’t get the video. Is there some other way to get the video, please? Thank you!
Alanda Craft says
Here is a direct link to the YouTube video https://youtu.be/Z7b-1HX2hqc
Sandy says
When you seam the strips together, do you press the seams open or do you press to one side?
Thanks,
Sandy
Alanda Craft says
Hi Sandy, I press my seams to one side, and I like to press them towards the darker coloured strip.
Judith says
Thank you for the helpful video. I was worried about finishing my first quilt until I watched your video. Your step by step instructions gave me the confidence to finish my Great Grand Babies quilt 🙂.
Alanda Craft says
That’s so good to hear Judith. We have a few other beginner quilts you can try as well. Just click the Quilting option from the top menu and you will see an option for Quilting Tutorials.
Veronica D says
Hi Alanda, thank you for such a simple quilting idea heading to Arizona for the winter and want to do some quilting while I’m there.
Also like the color scheme
Thank you again
Alanda Craft says
Thank you Veronica 😊. I’m happy to hear you like this quilt tutorial.
Alsy says
This is the first I’ve seen your tutorials. I do have some sewing experience, it did seem like it would be good for those without any, if they’re a little familiar with their sewing machine. One question I have is whether the 60 mm rotary cutter would be the best (aka most practical) for anyone looking to do some more complicated quilting projects as we become more proficient.
Alanda Craft says
Most people use the 45mm rotary cutter for most applications and use the 60mm for cutting lots of layers or thicker fabrics. We use the 60mm for everything but that it just a personal preference.
Linda says
Hi…A great tutorial! A fun way to vary the pattern a bit – After the top is pieced, cut a several inch wide strip several inches in down thru the quilt a quarter of the width in. Reverse the cut out strip and sew it back in. Was hoping to be able to add a photo. Would make it easier to. visualise.
Alanda Craft says
What a great idea for changing up the look of the quilt Linda. If you have done this and have a photo you can submit it through the ‘Submit your Project’ page. Here is the link /submit-your-project/.
It’s a similar concept to our placemat project but that has 2 cuts /2017/10/13/quick-easy-strip-placemat-tutorial-using-jelly-roll-strips/.
I really like the your idea 😊.