One of the biggest problems we faced when we started using our ScanNCut was trying to get a perfect cut. This is understandable since there are many factors to consider like blade depth, blade quality, pressure setting, cut speed, and even the quality of the mat that can affect the cut.
It can be tricky when you first start out, so much so that you may even cut through your mat the first time you use it.
If you have a DX version of the ScanNCut, then you are less likely to see this problem since the machine is automated and senses how deep it should cut.
But if you have a CM machine, which is an older version, then cutting through the mat can happen. We have even done this ourselves on a couple of occasions when we have forgotten to change the blade depth on our ScanNCut 2.
TIP: If you have cut through your mat, then here’s a tip for you. Just take a piece of tape and apply it to the cut on the back of the mat. Most tape will work, just don’t choose anything too thick.
So what’s involved with getting a perfect cut?
1. Blade Quality
I’ve put this one first because this is the most common cause of bad cuts. If you have been cutting successfully for quite a while and suddenly things don’t go so well, it is most likely the blade that is causing the issue. The blade will dull over time just like your scissors or rotary cutter.
 So, if you do a lot of cutting, try to have a couple of extra blades on hand at any one time. If a cut is going badly, then you can swap it out with a new blade to see if that is the issue.
We often get asked how long a blade lasts but it’s like asking how long is a piece of string. It’s almost impossible to answer as it will depend on how often you use it and what you are cutting.
We tend to cut sporadically so we might use it for a couple of hours every day for a week and then we might have two weeks where we don’t use it at all. So figuring out how often we need to replace it can be a difficult one to answer.
The beauty of the ScanNCut (and similar electronic machines) is that you don’t have to pay for those expensive dies. So really your only major costs are replacement blades and mats.
TIP: Here’s a tip that might help to get your blades to last a little longer. If you are cutting both paper and fabric then it is worth having one blade for paper and another for fabric. I think most quilters will agree that you don’t use your good fabric scissors for cutting paper. You have a separate pair for that. So this applies to the ScanNCut blades. You could even have a different blade holder for each so you don’t have to change the blades each time. All you need to do is change the holder instead.
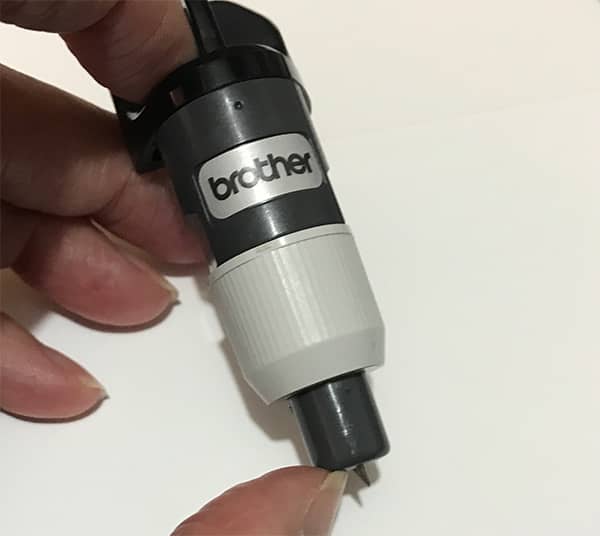
2. Blade depth
Blade depth is the most important part of making a cut. This is the actual length of the blade as it comes out of the blade holder. On a ScanNCut CM machine, the blade holder itself has numbers that indicate the depth of the blade and you manually adjust the blade depth by twisting the cap.
On a DX machine, there are no numbers because you don’t need to manually change the blade depth, the machine does it for you.
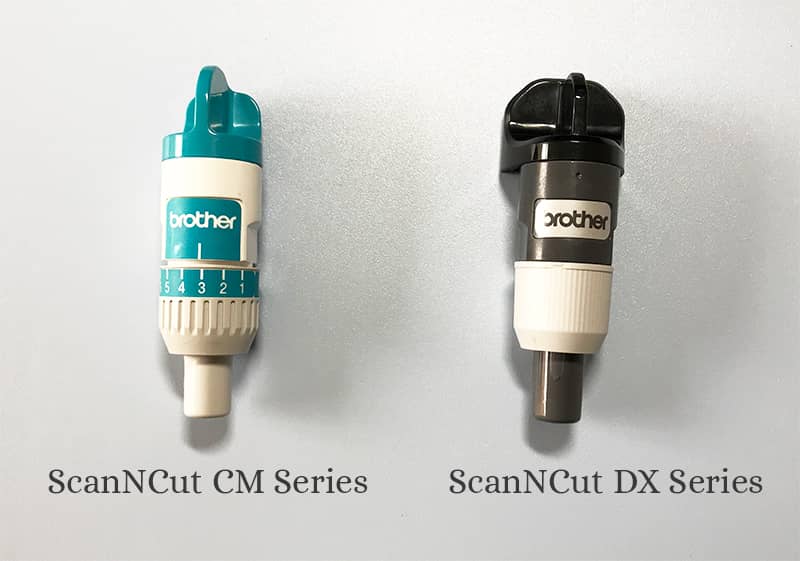
So on a CM series machine, the higher the number you set the blade, the greater the depth. If you set the number to 12 for example and cut some scrapbooking paper, you would slice not only through the scrapbooking paper but also through your mat. If you set the blade at 1 and tried to cut through felt you would find that it didn’t cut at all. In fact, you would probably find that it didn’t make a mark on the felt at all.
So it depends on what you are cutting as to what number the blade should be set at. The thicker the paper or fabric you are using, the higher the number you should set the blade.
Examples of some of our blade settings on our CM machines:
We tend to cut the same things over and over again. They are scrapbooking paper, card stock and quilting fabric.
- For scrapbooking paper we usually set the blade at 2.
- For card stock we set it at 4.
- For quilting fabric we set it at 4.
These are our go-to settings but if we buy a different brand of scrapbooking paper for example or a different fabric than usual, then we might do a test cut first to make sure that our blade setting still applies.
Bear in mind, that it’s not just the blade depth that can affect the cut. The blade pressure can also be a factor, so let’s take a look at that next.
3. Cut Pressure
The ‘cut pressure’, as the name suggests, is the amount of pressure placed on the blade as it cuts.
If you’ve ever used a craft knife to cut around a pattern, you will know that the amount of pressure placed on the blade can make a difference to the cut.
If you were manually cutting scrapbooking paper or cardstock with a craft knife, how much pressure would you place on the knife compared to say if you were cutting template plastic, felt or fabric? Intuitively, you probably know that you would place different amounts of pressure on each of these – less so for the scrapbooking paper, maybe slightly more for the cardstock but for the template plastic and fabric you would use a lot more pressure.
Examples of Some of Our Pressure Settings
We tend to not mess around too much with the Pressure setting on the DX machine we have. DX machines tend to be pretty good at automatically determining the best way to cut whatever happens to be on your mat.
However, for the ScanNCut 2 and earlier machine, we tend to leave the pressure at the default setting of zero for scrapbooking and card stock.
For example:
- If we are cutting quilting fabric using a Fabric Support Sheet then we leave the pressure at zero.
- If we are cutting quilting fabric with an applique adhesive on the back and we use a Fabric Support Sheet then we will use a pressure setting of zero.
- If we are cutting quilting fabric with an applique adhesive on the back and we are NOT using a Fabric Support Sheet then we will use a pressure setting of 4.
Where can you find the Pressure Setting?
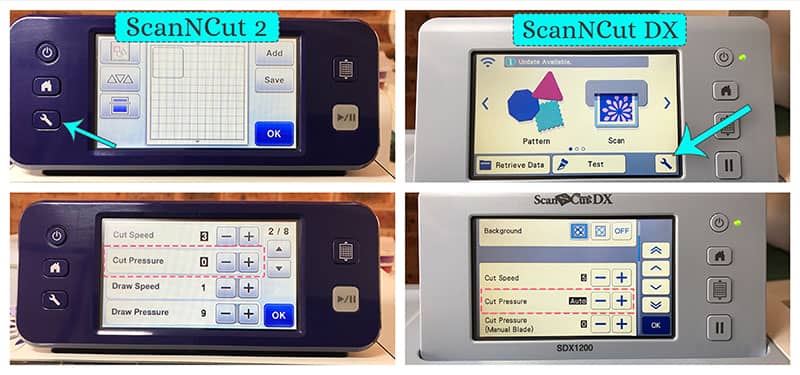
To change the Blade Pressure you need to go to the SETTINGS section of the machine as shown in the image below.
On the left is the ScanNCut 2 (which is part of the CM series of machines ) and you can see that the Settings can be accessed by clicking the little wrench button on the front of the display panel and then you just scroll through until you see the Cut Pressure option.
On the right is the ScanNCut DX machine, and you can access the settings from the link on the screen as indicated by the arrow. You then scroll through until you see the Cut Pressure section.
4. Cut Speed
The Cut Speed is the speed at which the machine will cut. It’s not often that we change the Cut Speed, but it can help in certain situations, particularly for intricate cuts. In this case, we will usually slow down the speed.
You can access the Cut Speed from the SETTINGS section of the machine in the same way that we accessed the Cut Pressure in the image above.
5. Your Mat
You may not think that your mat could affect your cut but I have found that it can, particularly so if it has been well used.
I found this out when cutting a particular pattern. It just wasn’t cutting well at all. I cut a few shapes on that mat at the same time but this one shape just would not cut properly. It wasn’t too intricate so it should have cut cleanly. I tried it a few times by changing to a new blade and increasing the pressure thinking that might have been the issue but no luck. It was only when I moved the shape to a different part of the mat that it worked.
What I had been doing was cutting the shape over a part of the mat that had so many things cut on it over time that it was affecting the cut.
These mats can last a long time – we have some that are over two years old, but at some point, you just gotta let them go.
A FINAL TIP: When a cut is complete, before removing the mat, check to see if it has been successful. Sometimes when you are working with thicker materials you may notice that the cut has not gone all the way though. Leave the material in place, do not move it, and press the cut button. This is called Double Cutting. The machine will cut exactly along the same lines that were cut previously so the second cut should go all the way through the material. You do need to make absolutely certain that you don’t move the material at all, before making the second cut.


CherryB says
Absolutely spot on.. Thank you so very much. I have workshops and have taught a few beginner classes and this has been the hardes points to get across.
Esther says
omg! Thank you so much, I bought my scanncut back @ 5yrs ago and hadn’t use it much.
because I didn’t any of this. I tried and I look on utube but at no success. Maybe i ought to try it again. I bought to cut fabric to make quilts and templets. Thank you so much, Still a beginner. I hoping to be good at it. If any more lessons keep in mind there are some old folks that are willing to learn.
Thank you again & God bless you for sharing.
I will look into the training academy you have.
Alanda Craft says
It’s worth giving it another go Esther. We have plenty of free videos that you can watch on our Youtube channel for your machine plus we have online training courses that you can purchase. Here’s the links to those:
– Free YouTube videos are here: https://www.youtube.com/playlist?list=PLp1N6F-V-Q21qOFi-4p2bbjmBkJk_zJkI
– Our Training Courses are here: https://www.alandaonline.com/product-category/brother-scanncut/
Carol says
Love to learn look forward on your tips for scan n cut
Yvonne Jinks says
Great post. As an owner and paper crafter of a DX machine, I still change the blade pressure from auto. Yes auto is great but sometimes it really marks up your mat and thus the mat needs to be replaced more often. I will test on a -6 for cardstock and work up until I get a perfect cut.. I use my machine daily, often for many hours so I now know exactly what pressure is ideal for which specific (brand and weight) cardstock. The weight and the quality of the cardstock makes a major difference to the cutting. I test every new package of cardstock I open and mark it on the package. Interestingly to note is that in the hot humid summers we have here in SW Ontario, Canada, the cardstock is more difficult to cut and may need a different number. My first mat that I used “auto” quickly became marked. and unusable the second mat I have used since the beginning of the pandemic, still looks great. I do have a couple of mats ready to use but they remain in their packaging. If you want to preserve your mat, it is very important to ensure that you cut in different places, not just the left hand corner and if you are cutting multiple larger items, stop after a couple and change the place you are cutting.. As always thank you for all the support you provide to all the Scan N Cut user around the world
Alanda Craft says
Excellent tips Yvonne!!
Ronda Green says
This has been a most interesting article and I would like to see more like it
Ronda
Stephanie says
This was very informative. When I bought my CM650 I didn’t understand the depth and pressure settings. It just seems sometimes that you are supposed to know this. I now have have a DX. I unfortunately have not used it much. I am glad I came across this information. I will be retiring soon and hope to have more time to be creative. Thank you for the excellent information.
Mary says
Thank you, a lot of very good information. I love my DX machine and use it regularly. The first thing I will do is change my blade it’s been awhile. Than you again.
Linda Willcocks says
Great tips. Thank you.
Joan says
While I have discovered how important it is to have a good blade for a clean cut I never thought of slowing the cutting rate, thank you for that tip.
Phil says
Hi.
Is 1 or 5 the slow speed please n thanks ?
Alanda Craft says
1 is slow, 5 is fast.
Lisa Marshall says
I bought the scan and cut DX for cutting fabric and have found the mat has lost its stickiness. I covered it with the Fabric sheet but found this just fractured and split over time. Is there a sticky mat you could recommend that is a little less expensive than the one supplied by brother.. or a way to make my original mat sticky again? It’s only couple of months old. Thank you
Alanda Craft says
We have some tips for getting the sticky back in your mat (see links at the end of this comment). And we personally don’t use the Fabric Sheet – I hate the thing. But as for alternatives to the Brother brand, the only one I know of is by Artistix Direct. Bear in mind, we have never tried them but others have given them good reviews.
Here’s some relevant links:
Getting the Sticky Back
What we use instead of the fabric support sheet
Artistix Direct
Rita DeCook says
What you have stated are all things that I have learned over the years since acquiring my CM550 machine (2015/2016). The only thing I can add is to the last “hint”. Don’t remove the mat if you note that the material has not cut all the way. I take a pin/pick or something similar to lift the edge of the material. If it didn’t cut through, then I send it to cut again. That way you don’t take a chance of it not cutting in the same place. I let me machine eject my project and found that it needed to cut again. When I re-loaded the mat, it didn’t cut in the same place.
Alanda Craft says
Actually, this is what I do too. I always check before unloading the mat so not sure why I worded that tip in that way. Thank you so much for bringing that up Rita. I am going to go change that part of the post.
Carol W says
This is super helpful…. I went back to my CM350 after trying an SDX125 (that I sent back since the “auto ‘ blade feature was more of a problem than it was worth for me!). Your tips and videos are very informative and easy to understand.
Thank you!!
Alanda Craft says
I’d love to know what problems you were having with the SDX Carol. I must admit I love the thing since I don’t have to adjust anything as it works pretty much every time. I am wondering whether you had a faulty machine.
Carol W says
Actually, I think I did!! I bought a “, bundle” on Amazon for Christmas and tried it for a few weeks. It just never cut cleanly even with new blades. And, the things I was trying to cut, cut just fine on the CM!!! (Plus it was the same cardstock I’ve used since I got it). I even contacted Brother and they kept offering different suggestions, but every time it was something else. I sent it back to get a refund, which had a time limit. Right now I’m just getting back to the CM and see how it goes. If this one dies I’ll consider another SDX.
Thank you for your interest and the helpful information,
Carol W