If you’ve been following along with our laser engraving adventures, you may have seen our previous xTool F1 video which we did during their Kickstarter campaign. We didn’t have the F1 at the time but the engraver looked so awesome we agreed to do a video review when it arrived. The machine sounded like it was going to be a great tool for crafters, so we were really looking forward to getting one and putting it through it’s paces.
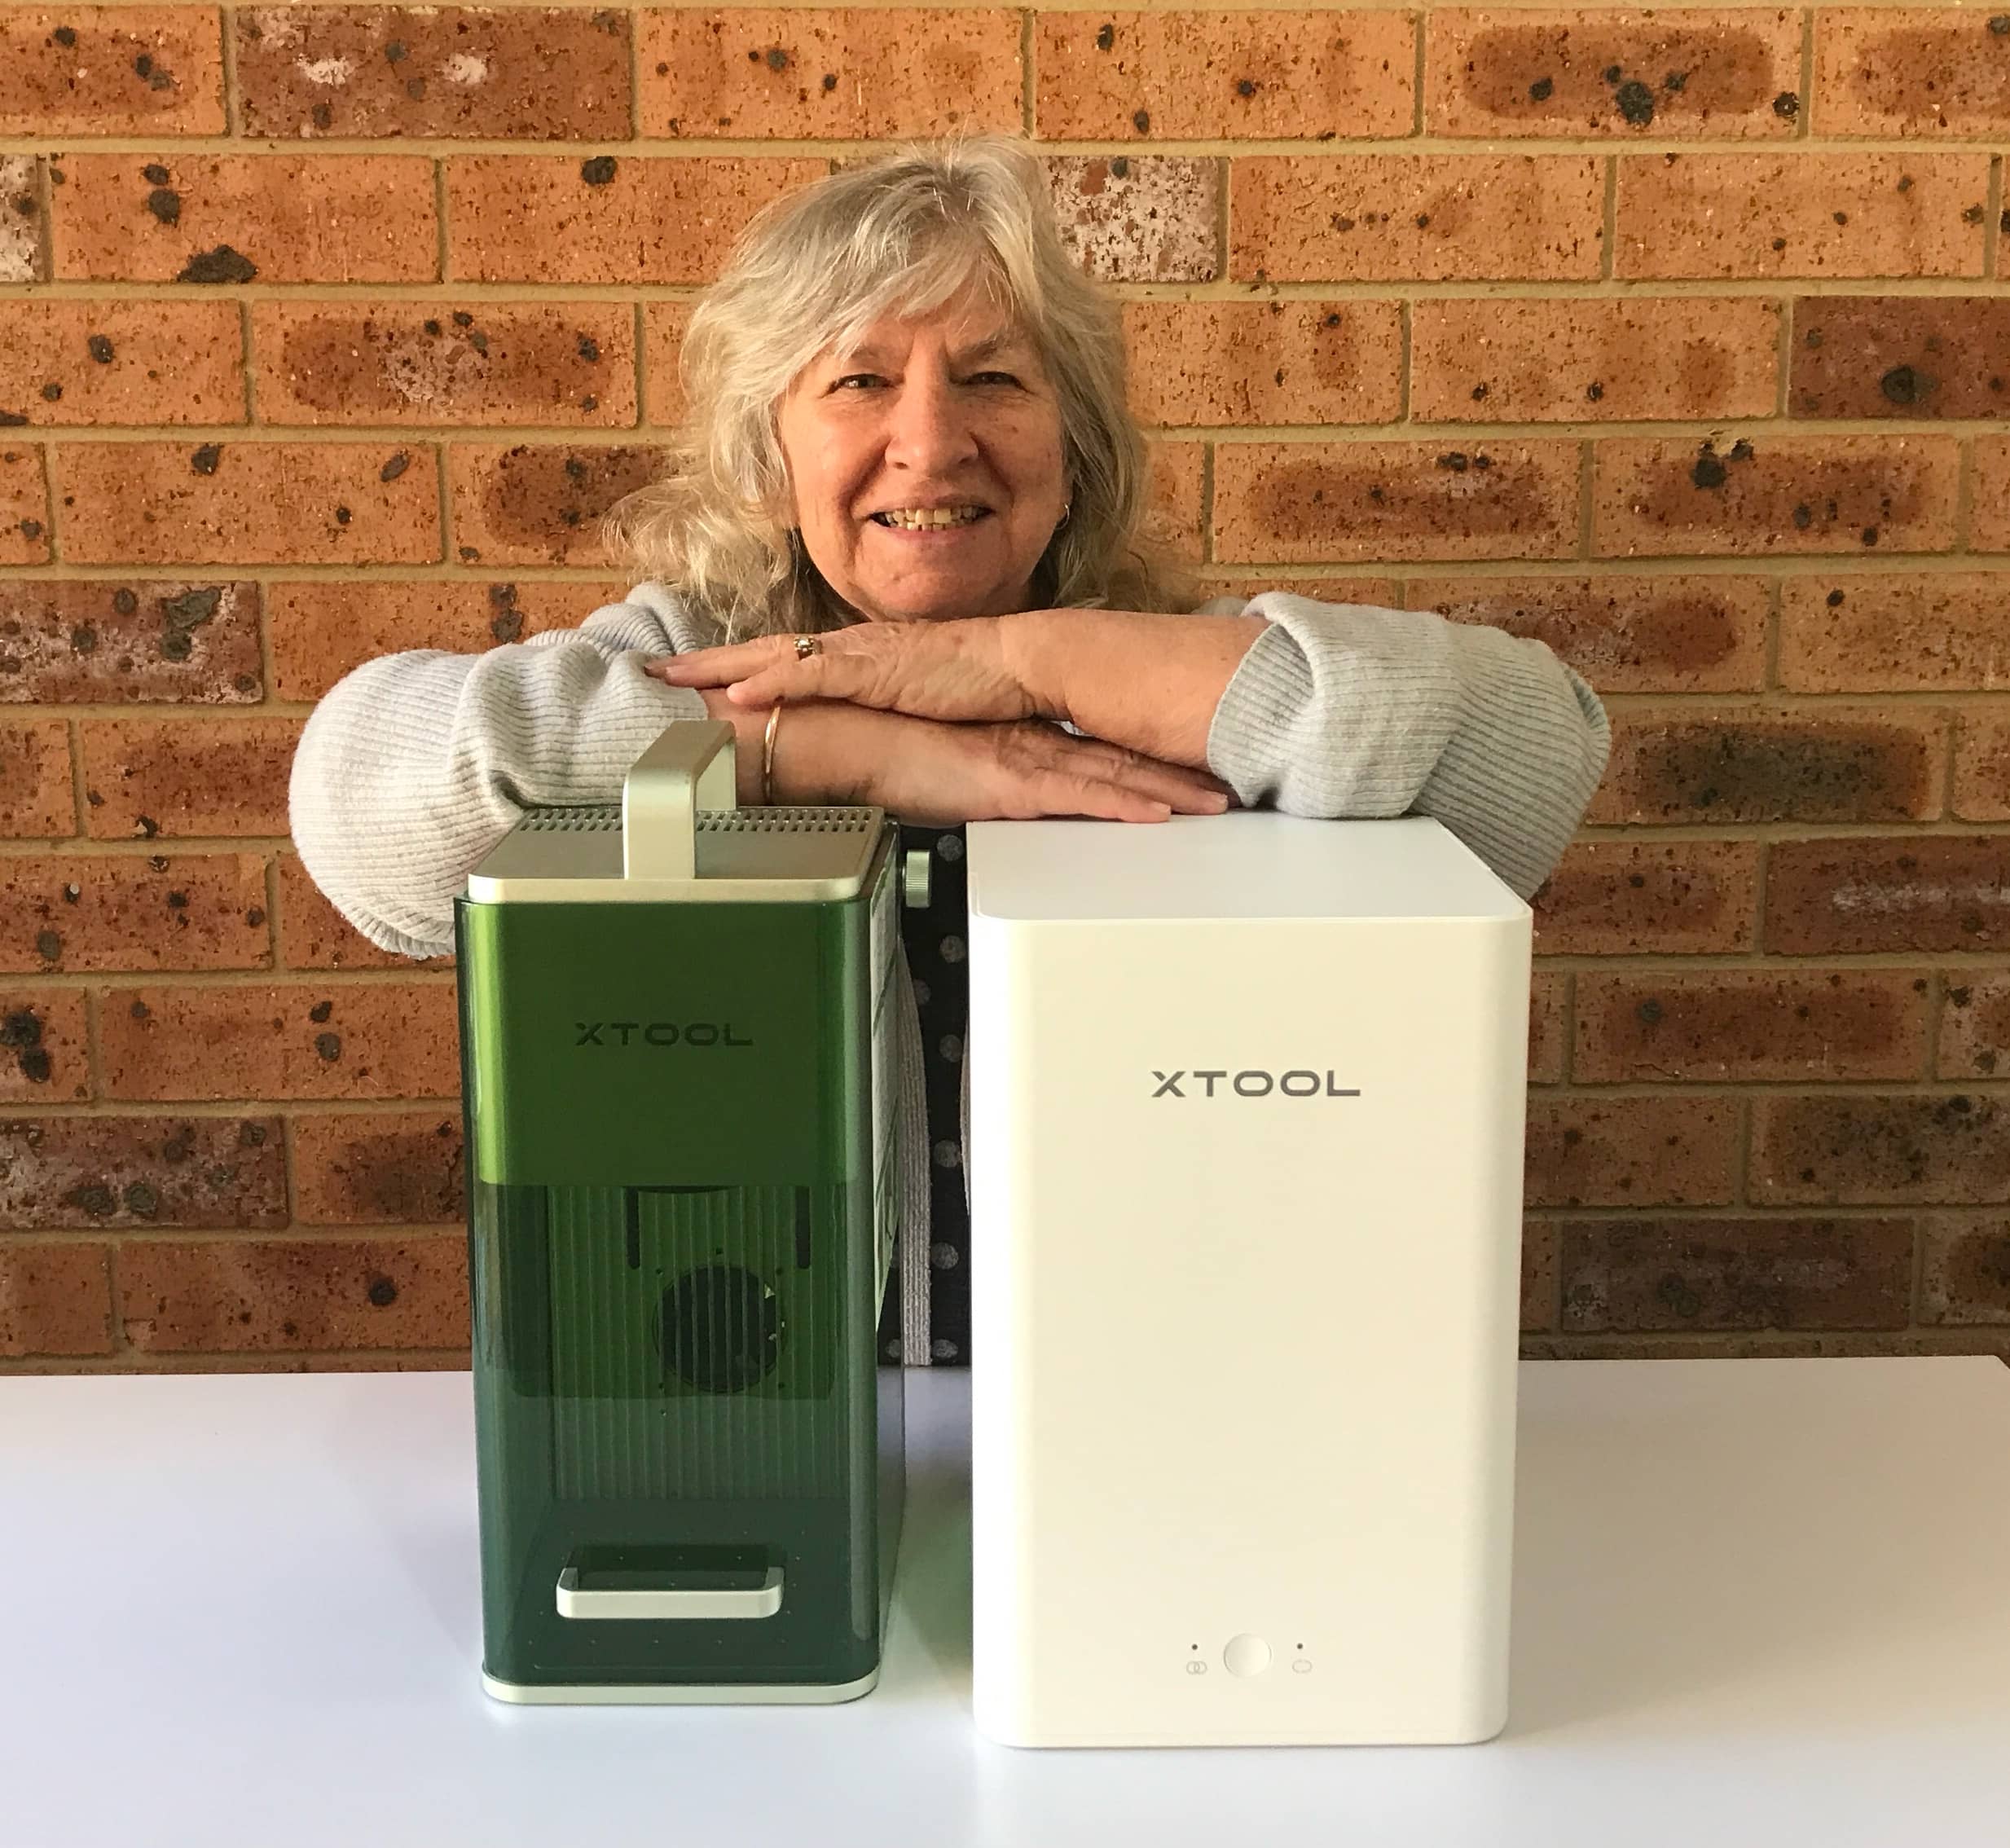
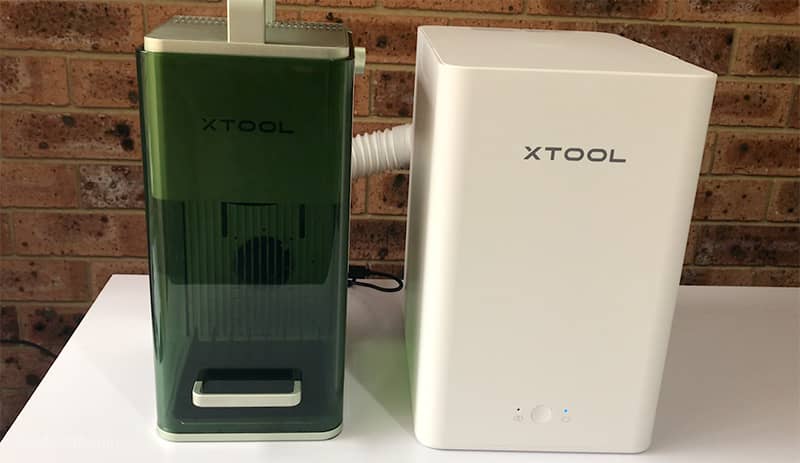
And then the day came, it arrived! But not only did xTool kindly send us the xTool F1 but also a matching air purifier…yay!!
We had a ball testing this machine out, so lets get on and see how the xTool F1 performs.
Watch the video below to see the xTool F1 in action
(Can’t see the video? You may have an ad blocker installed.)
BUYING LINKS FOR XTOOL F1 & ACCESSORIES
FILES USED IN PROJECTS
- Wood Coaster – More Coffee Please
- Rose Coaster
- Rolling Pin – Just Roll with It
- MDF Coaster – OMG My Mother Was Right
- Tin Container – Honey Bee
- Birthday Card – Happy Birthday
- Fine Flower
- Route 66 Keychain – File available in Project Center in Creative Space (search for ‘acrylic’).
- Dog Photo – we were given access to this file by xTool
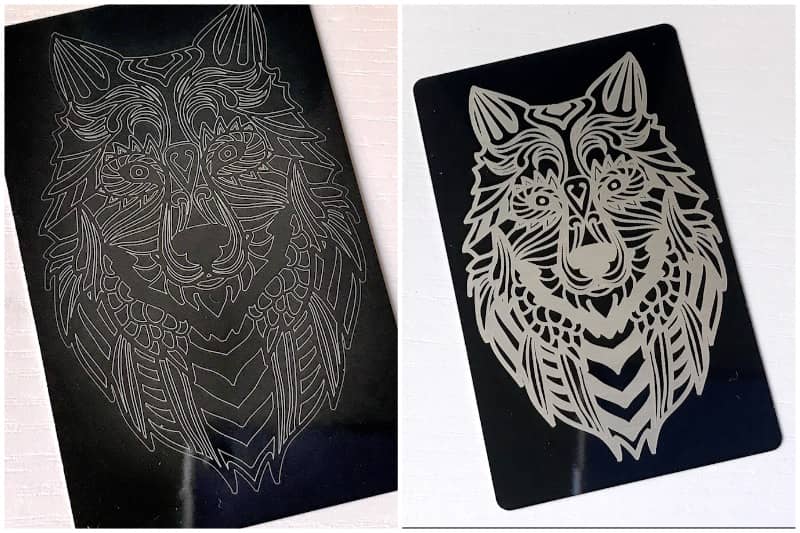
- Wolf – we were given access to this file by xTool
Firstly I want to say that the xTool F1 is portable and super fast and not only is it absolutely awesome for Etsy sellers, I can see this being a great too for those who sell at markets as you can create personalized engravings and cut out items on the spot. You could even take this to weddings or parties and engrave personalized items for guests.
I can see this being an awesome money maker for crafters. There is an L-shaped positioning piece that is great for when you are doing a lot of batch work and you want to line each piece up in exactly the same place.
Now, xTool do say that this is the fastest portable dual infrared and diode laser machine on the market right now and that it can engrave on over 300+ materials plus it can cut wood, acrylic, cardstock and more. Now we don’t have 300 plus materials to test on but we will give it our best shot.
Now you may have seen our other demos for different laser machines and as much as we love them we know that they can be fiddly to put together and a little technical to use. This one however is very different. Talk about quick and easy to set up.
Set Up
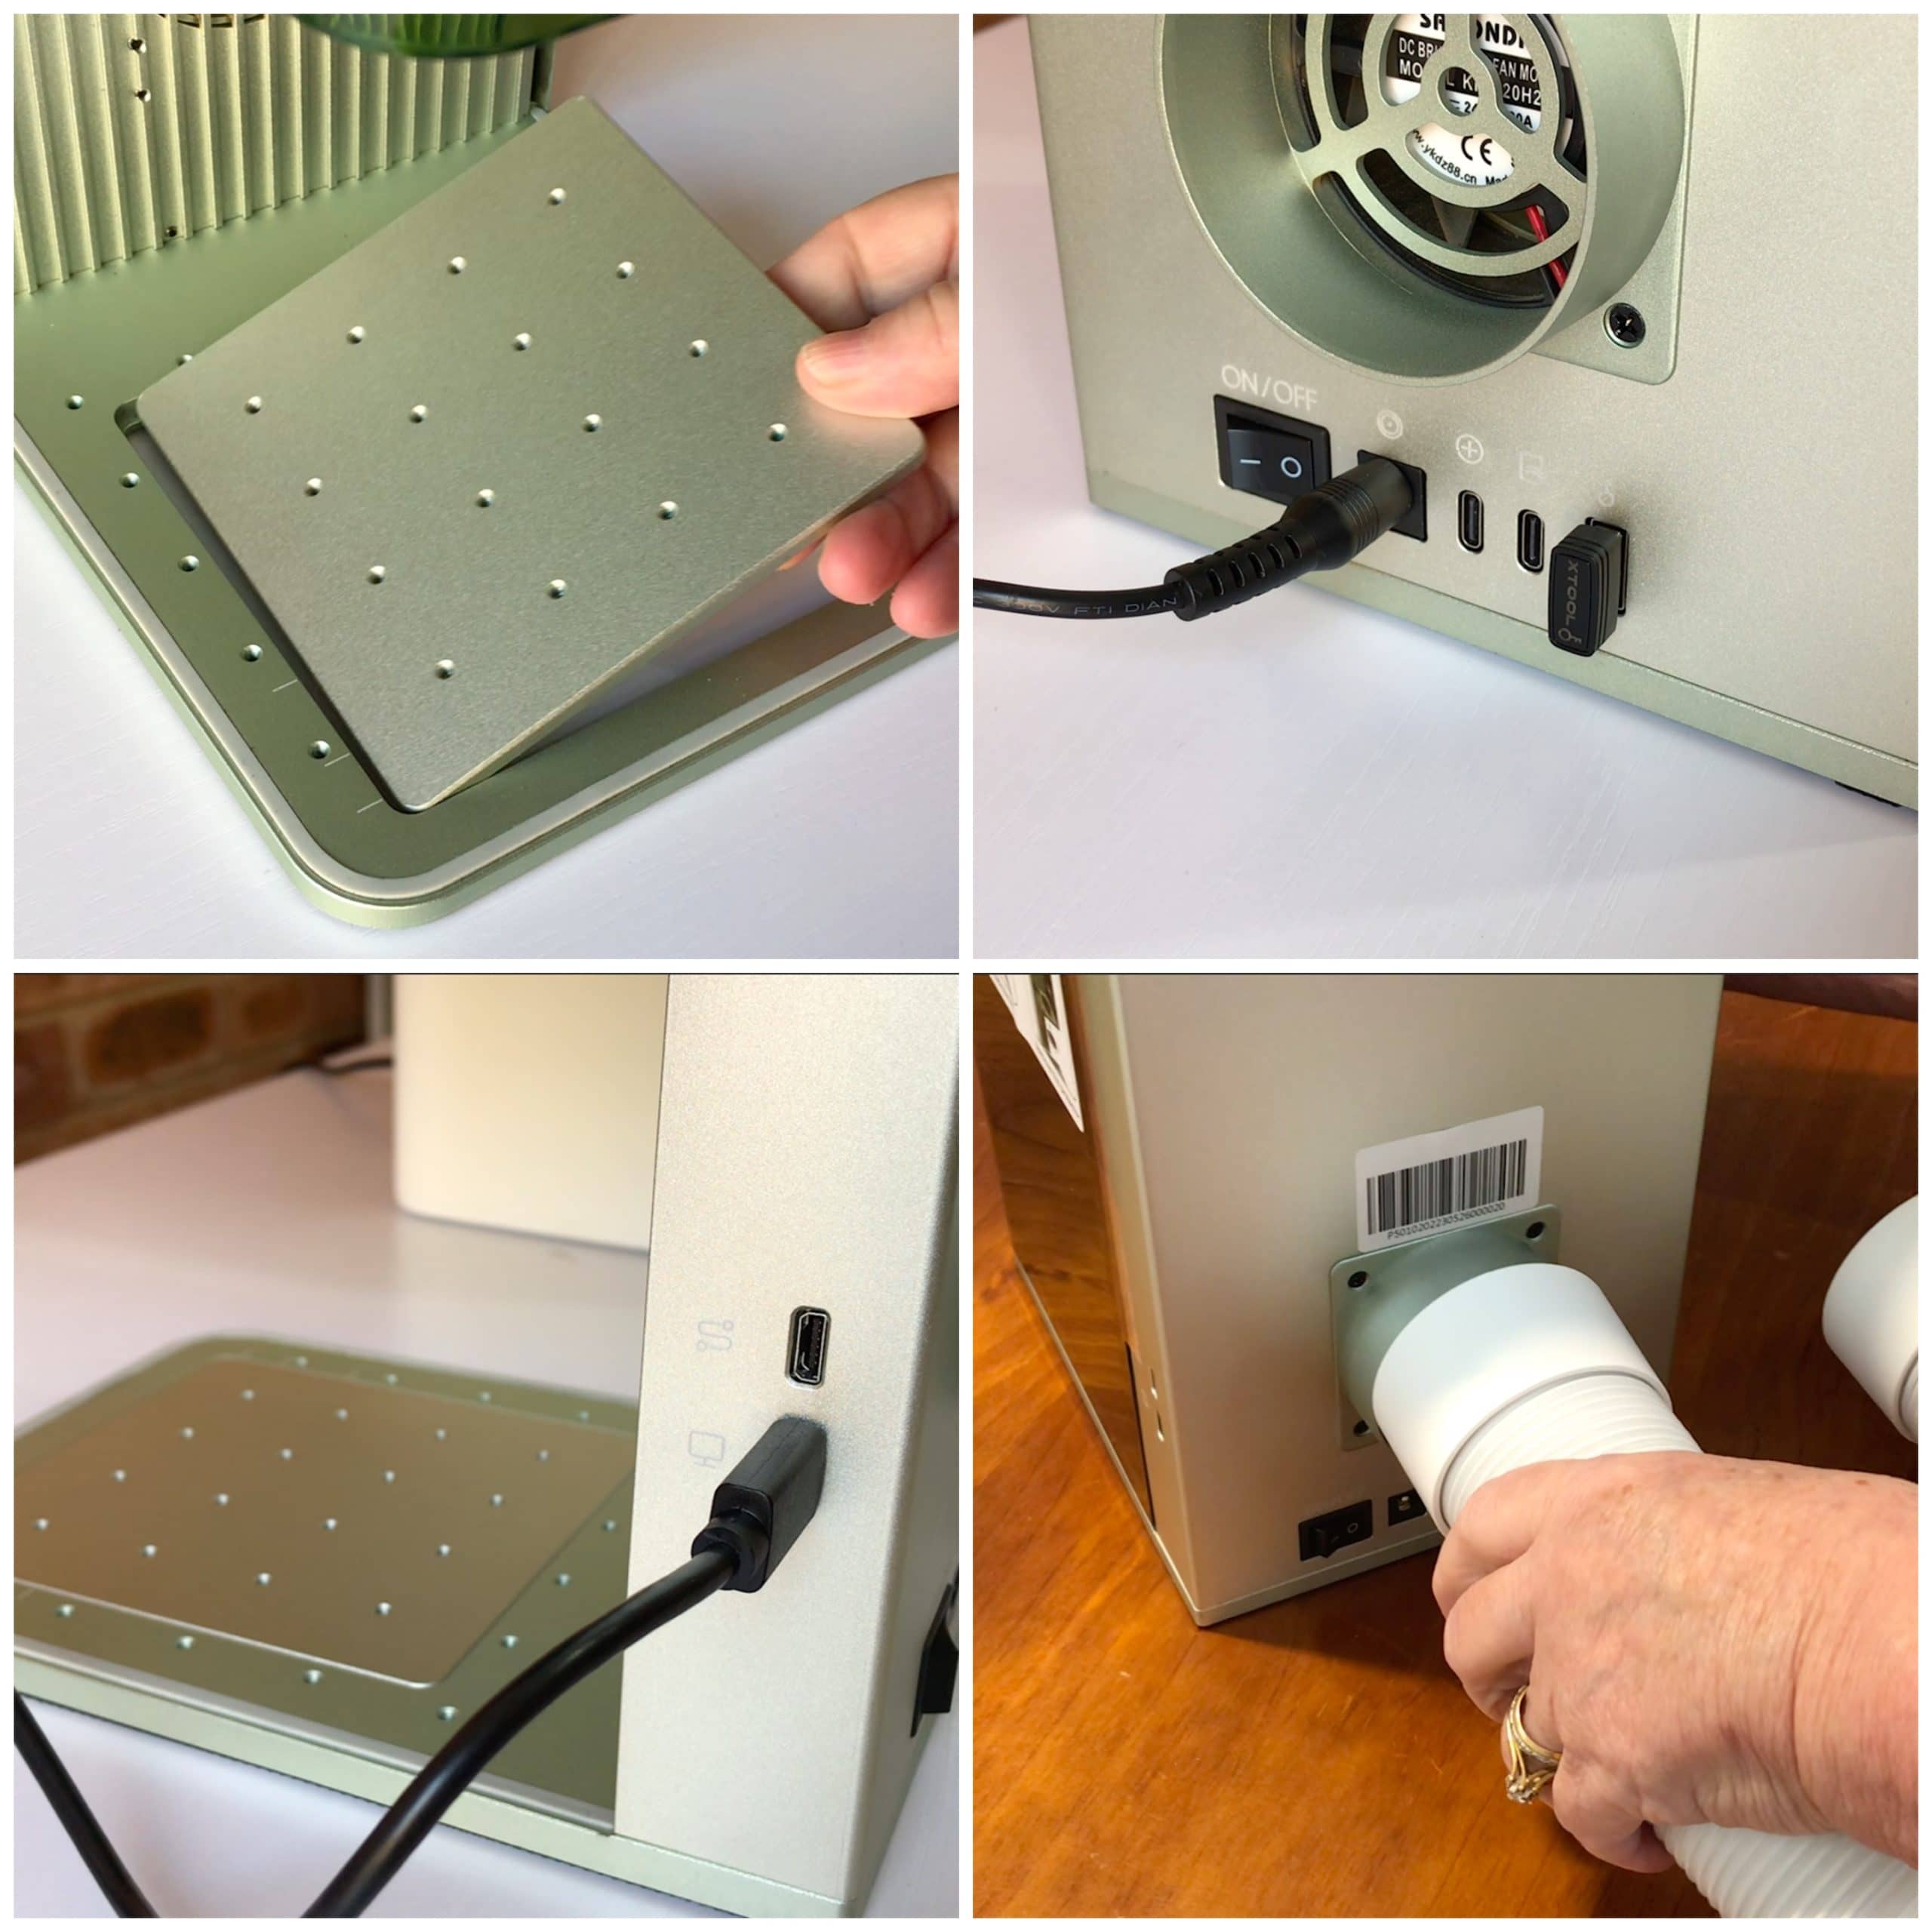
First impressions – we found it super easy to put together. I just had to place the work plate into the machine, plug in the power cable and then connect the USB from the side of the machine to my computer. Then it was just a matter of attaching the exhaust pipe to the back of the machine but other than that, that was all we needed to do get this machine up and running. (Watch the video above to see this in action). And by the way, it works with both a MAC or a PC.
Software
Now this machine does require software to run it, so I downloaded Creative Space from the xTool website but it’s pretty simple to use. If you’ve ever used Cricut Design Space or ScanNCut Canvas, it’s a bit like that only easier to use.
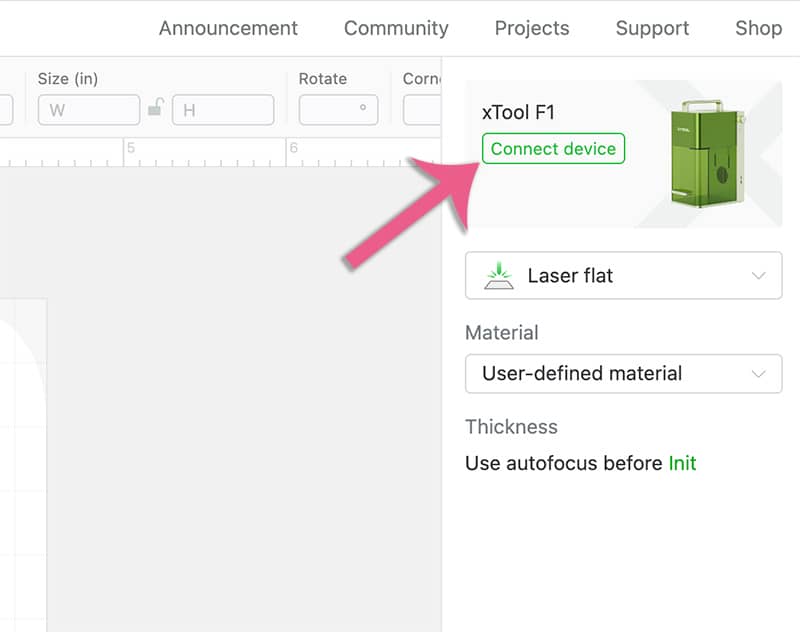
In the software, I had to connect the machine, but it’s simple to do, just click on the ‘Connect Device’ option and your machine will show up in the sidebar, so you just need to click on the machine name and you are good to go.
And that is all you need to setup the machine.
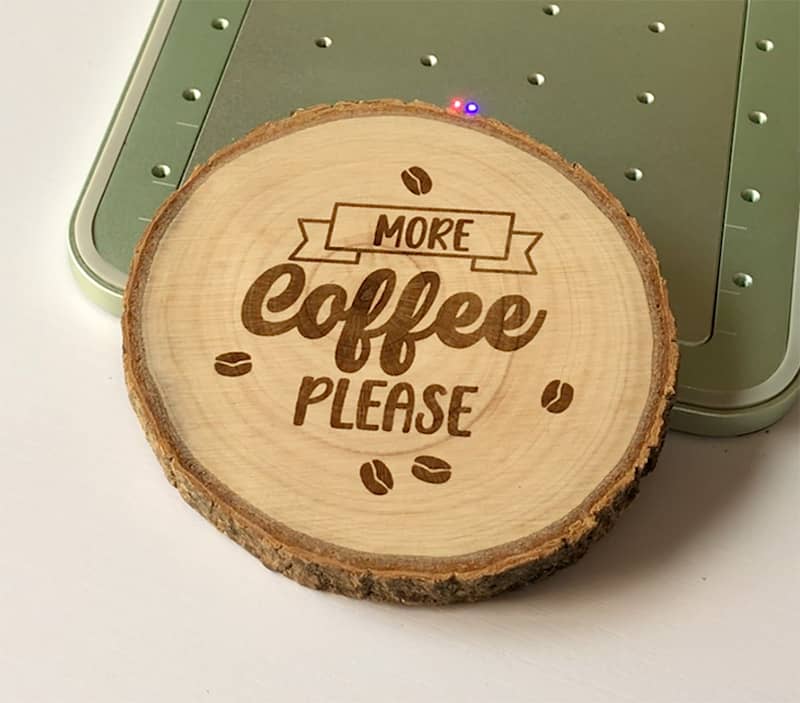
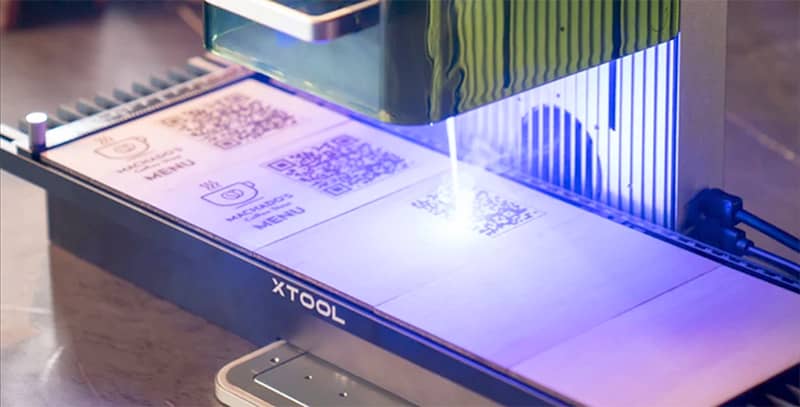
Once it was set up we were ready to start engraving, and the first thing I wanted to do was engrave on a wood coaster.
BASIC RUN THROUGH OF MACHINE USING WOOD COASTER
FOCUSING
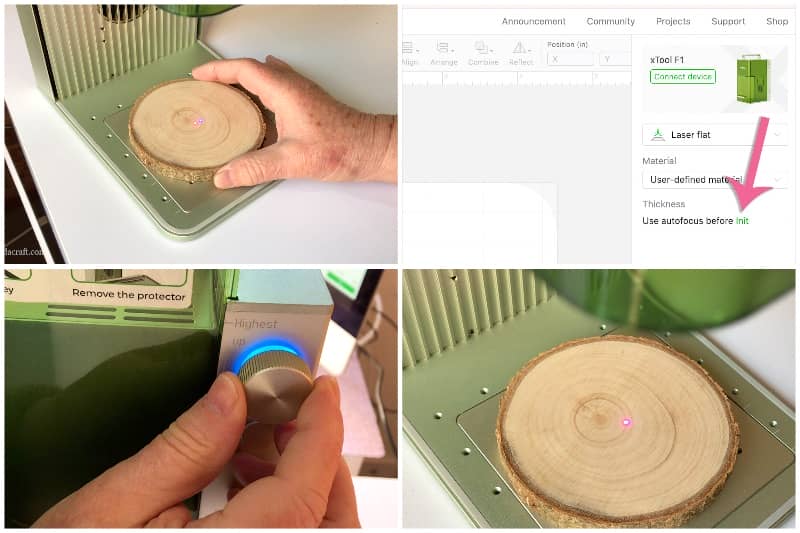
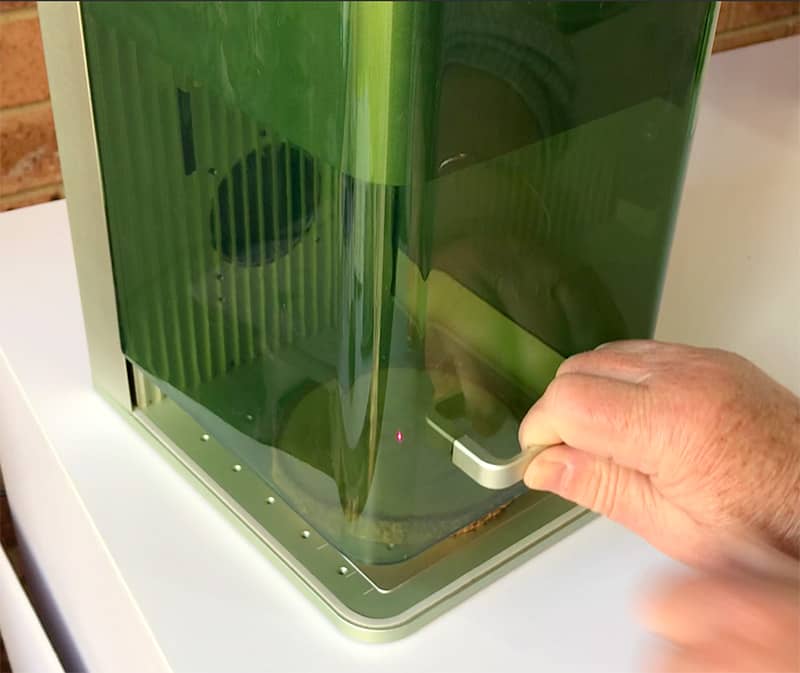
I placed the coaster in the machine and and as you can see in the image below, there are two dots on the coaster. The goal is to merge these two dots so that you create the correct focus. And you do this each time you use the machine to adjust for different thicknesses of material you might be using.
This is really simple to do. You can either manually turn the focus wheel on the side of the machine or you can let the machine do it automatically for you by clicking an option in the software.
When you do this the two dots merge with each other and at that point the machine is focused and ready to go.
Choosing Settings in Creative Space
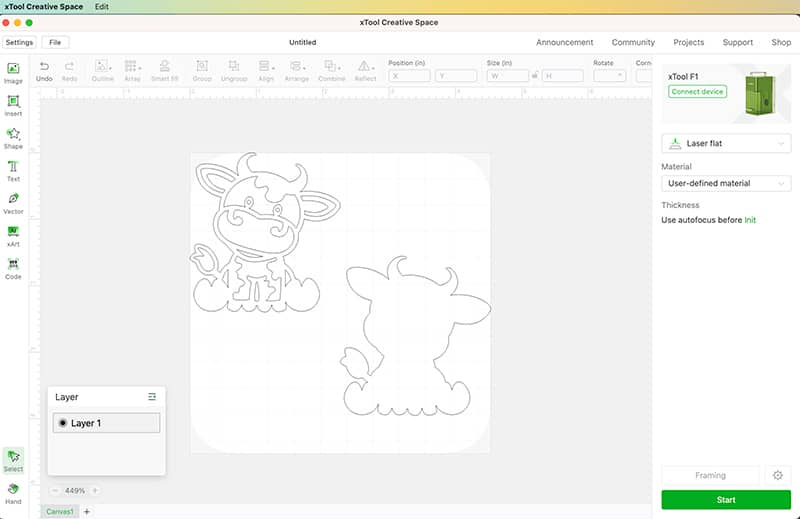
Once focused, I opened up an SVG file I downloaded from Creative Fabrica and I resized it to fit the coaster.
I just needed to select the settings for the coaster and xTool have provided some default settings for different materials which is super helpful. So I just went with the WOOD COASTER setting from the drop-down.
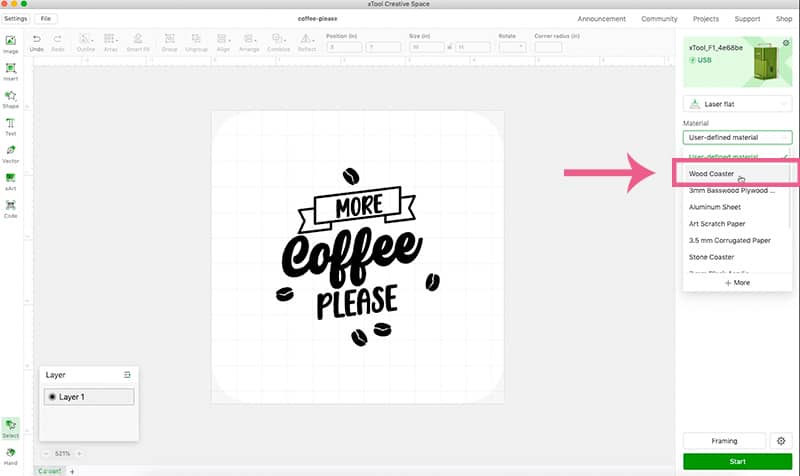
Then I clicked on my image and when you do that you get a number of different settings that appear on the right hand side of the Creative Space.
Now at this point, it’s a good idea to check the settings and make any adjustments that you may want to make. I didn’t make any adjustments and just went with the settings provided.
Settings
- Speed – 250
- Power – 100%
- Mode – Engrave
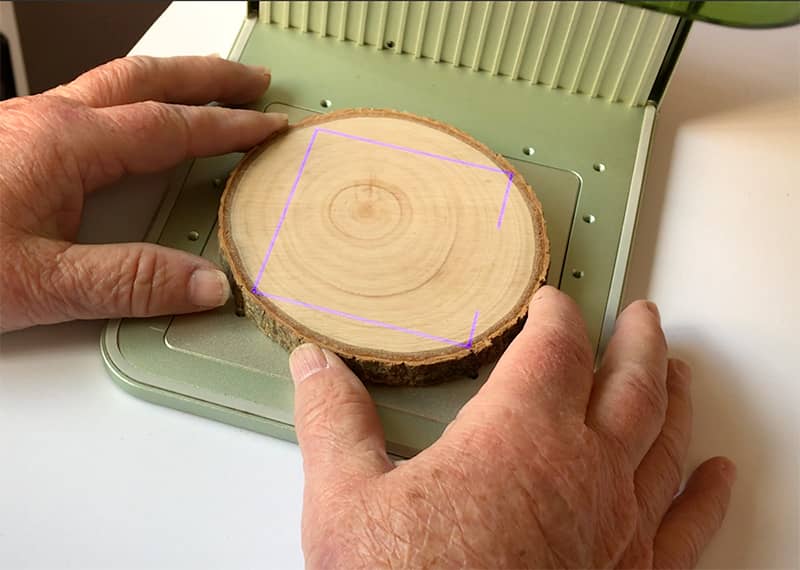
Framing
Now that you have your settings set, all you need to do is come down to the FRAMING option, and I have to say that the FRAMING on this machine is pretty awesome.
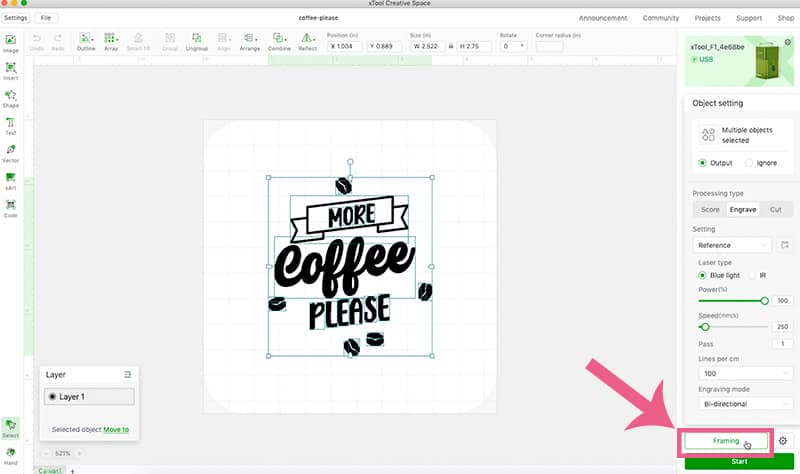
What it does is show where the engraving is going to appear on the coaster and I was able to move the coaster around to line it up perfectly. Once I’m happy with the position, I can turn off the FRAME option.
CLOSE COVER ON MACHINE AND PRESS START AND START
Now it’s just a matter of closing the protective cover on the machine. In the video, you will see that I have left the cover open for most projects, for filming purposes. However, I made sure to wear protective glasses whenever the cover was open. Usually the protective cover will be closed.
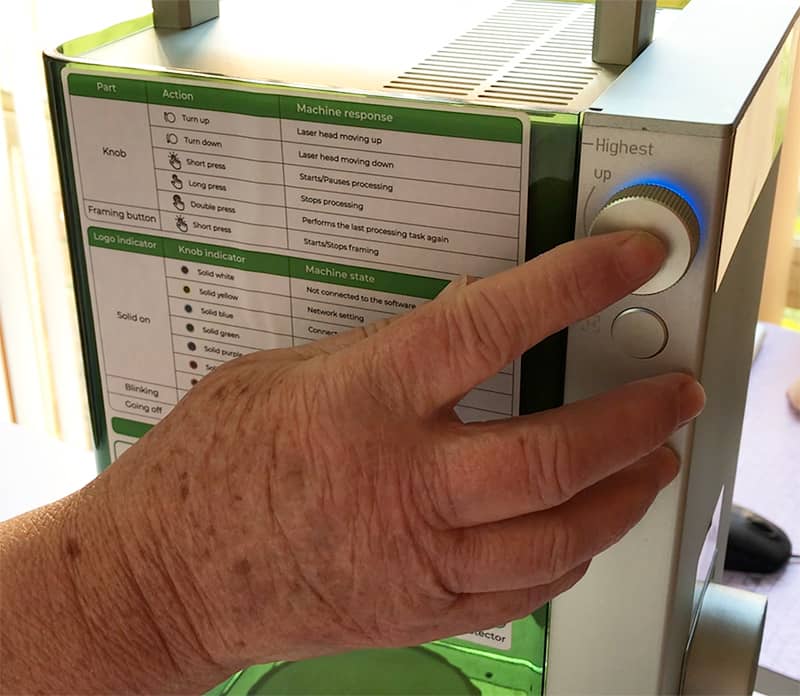
Back in the software I just press START, and then START again. Now when I am ready to cut or engrave, I press the button on the side of the machine.
And away it goes!
Now this is actually the second attempt at this as when we did it the first time we didn’t realize that there was a ‘Wood Coaster’ option and we had selected a general plywood setting and the design was quite light. I wanted it to be more intense so we checked again and we found the Wood Coaster option and you can see that the on the second run, it has come out a lot darker.
I was very happy with the outcome.
Speed
Scoring
The next thing we wanted to test was the speed. xTool states that this machine can engrave at speeds of up to 4000mm/sec which is lighting fast.
So we started with a metal business card (which comes in the box) and in the software we selected the SCORE option.
This only took 12 seconds to complete (watch the video to see it in action). You can get the speed down even further, however we wanted a more intense outline.
Engrave
We like the design so much we decided to engrave as well, so I selected the ENGRAVE option in the software and this creates a more filled-in engraving. This one came out great. It did take longer but engraving will always take longer than scoring.
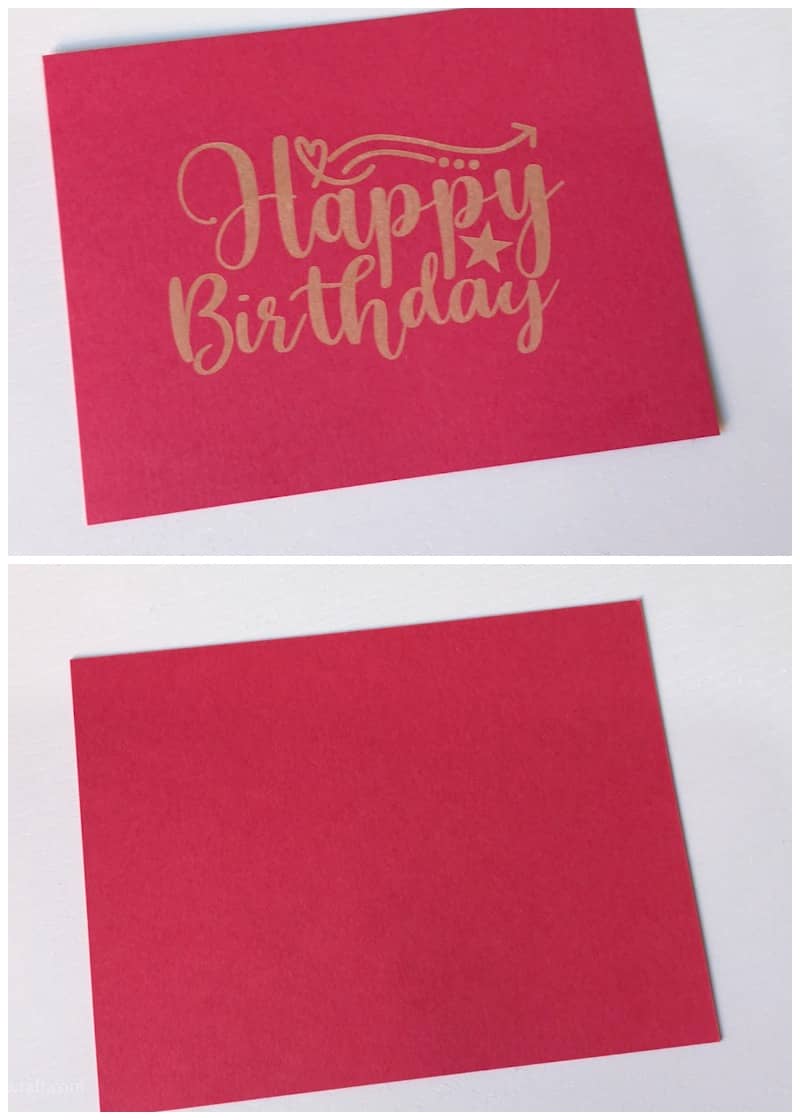
Cardstock – Engraving
Birthday Card
The next thing we tried was a piece of card stock and we engraved a birthday greeting. This was a more complex design but still only took a little over a minute. Now , in the video, it looks like the cardstock is burning but it’s not and the design turned out beautifully. When we flip the card over there is no burning on the other side.
Please Note: You get the best results on darker coloured card stock.
Settings
- Speed – 2400
- Power – 90%
- Mode – Blue Light Diode – Engrave
- Time – 48s
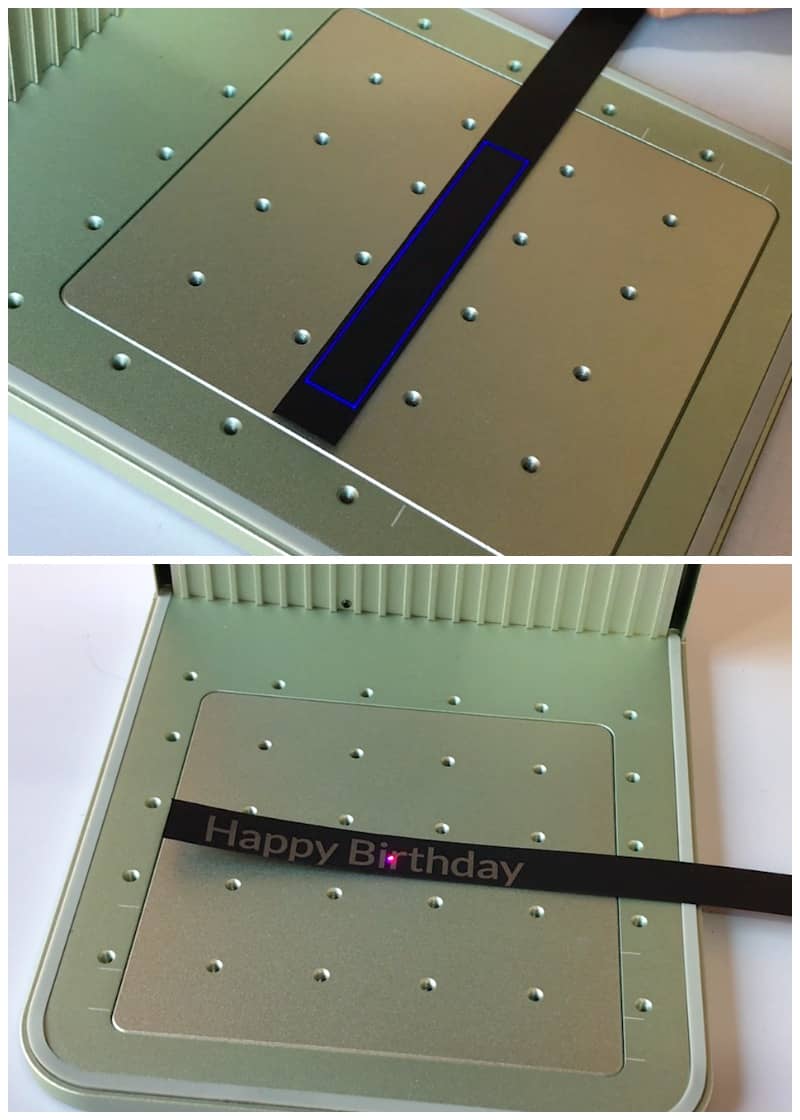
Sentiment Strips
Because this laser can engrave a font size down to .3mm we decided to try few Happy Birthday sentiment strips and these came out great. Being able to have the machine engrave a small font size is ideal for doing this type of work.
Bear in mind, that when engraving on card stock it really only works well on darker colours. We did try some light colors but they weren’t very successful, the dark colors however, are brilliant.
Settings
- Speed – 2400
- Power – 90%
- Mode – Blue Light Diode – Engrave
Photos
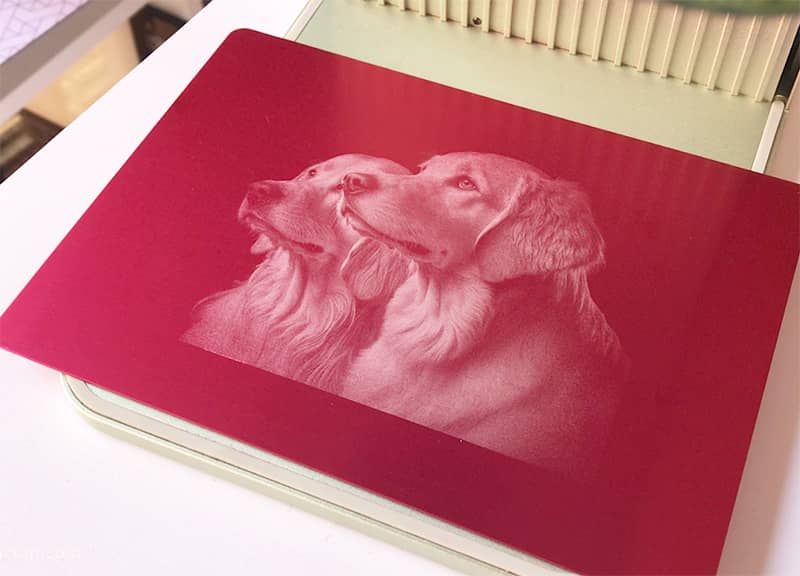
You will be blown away with how you can engrave photos with this machine. We used one of the metal business cards that came in the box and you can see how amazing this came out in the image below.
I loved it so much, I decided to engrave on a larger piece that I had in my stash.
Settings
These were the settings for the business card. Lovely result.
- Power – 70%
- Mode – IR Laser – Engrave
- Dot Duration – 50
- Bitmap Mode – Jarvis
For the larger piece of aluminum sheet shown below we used the same settings but increased the power to 80%
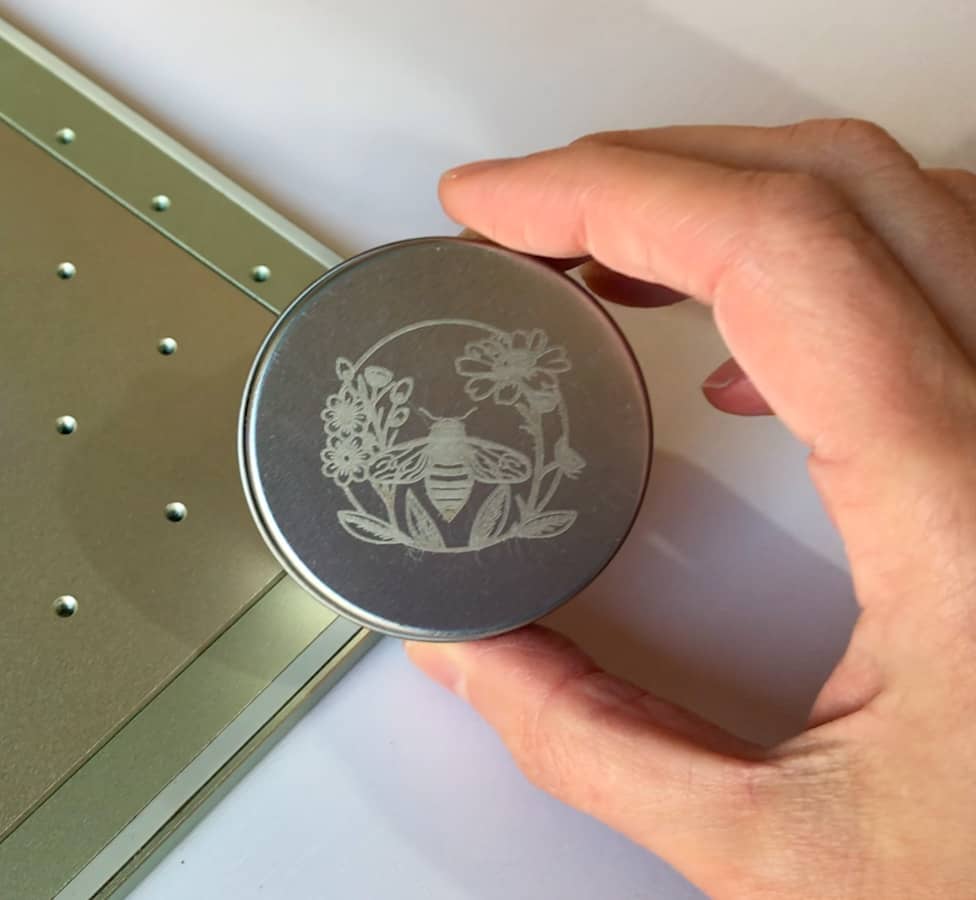
Metal Tin
I then thought I might try engraving on a small metal tin container that we had in our stash. Now I could have just as easily removed the lid to engrave on it, but it worked fine with the lid on. It was simply a matter of adjusting the focus.
This came out great and only took 32 seconds to complete the engraving.
Settings
- Speed – 600
- Power – 100%
- Mode – IR Laser
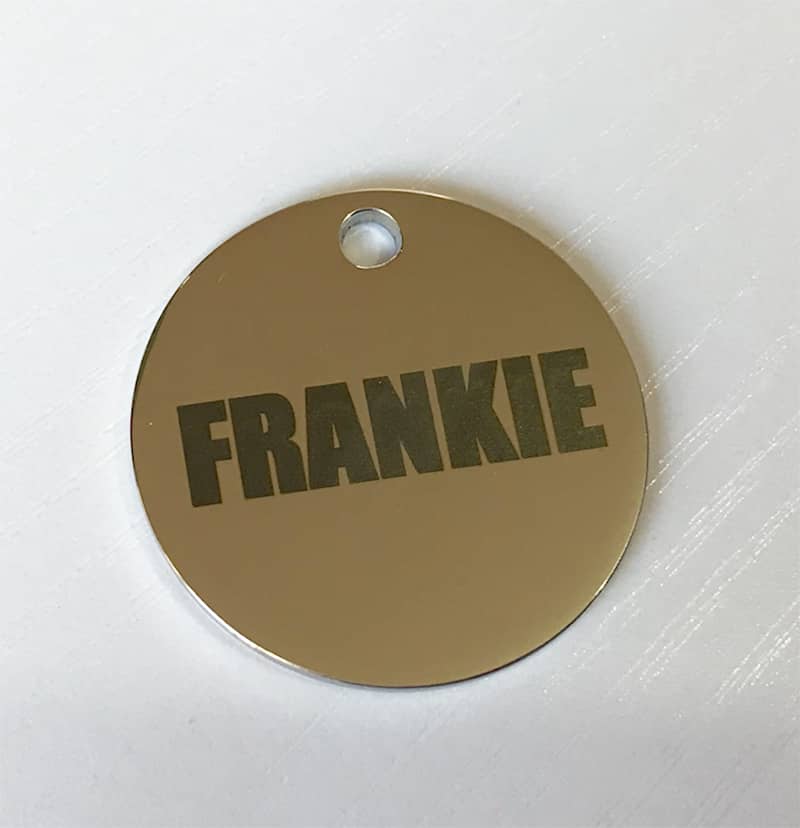
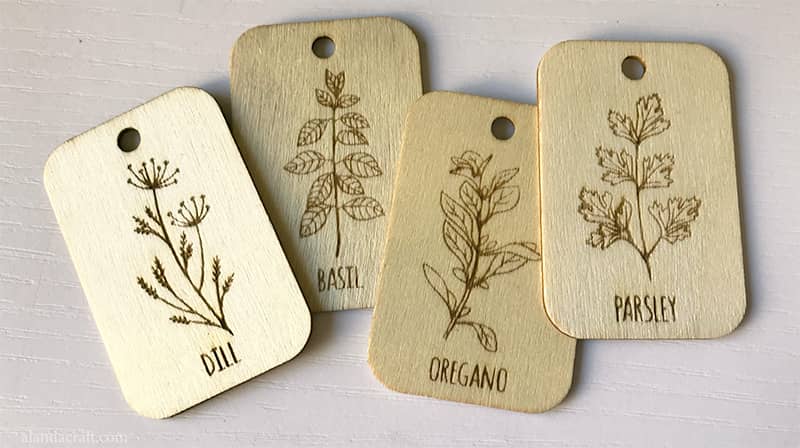
Dog Tags
Now in the box, you also get a few dog tags in different shapes to play with and what you are seeing here is actually our second attempt.
On our first attempt, we didn’t realise there was a setting in the machine specifically for dog tags and it came out a little light. However with the correct setting this one came out great as you can see in the image below.
Settings
- Speed – 400
- Power – 100%
- Mode – IR Laser
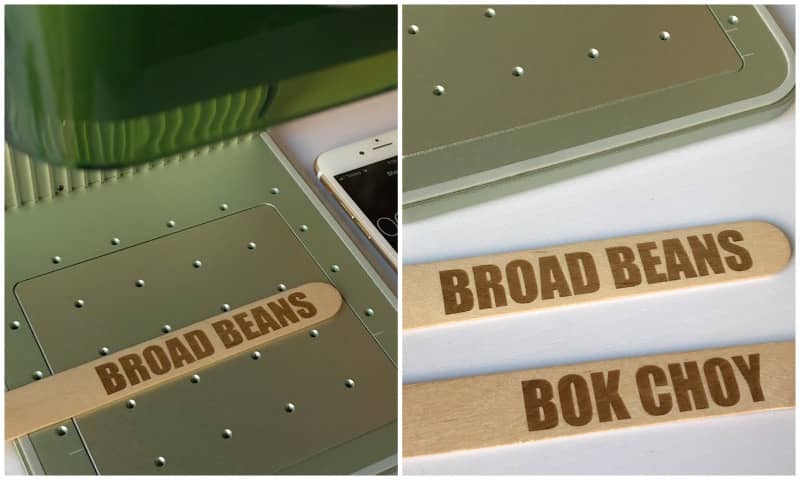
Wooden Planter Tags
I have recently started working in my garden getting it ready for spring planting. We are currently in winter so that’s way off yet, however, I do have broad beans and bok choy in the garden, so we thought we might try some planter sticks.
I engraved the words onto popsicle sticks and it worked a treat. I will do a lot more of these for when I am ready to plant out in spring.
Settings
I used the xTool setting for plywood and the project took around 40secs.
- Speed – 300
- Power – 100%
- Mode – Blue Light Diode – Engrave
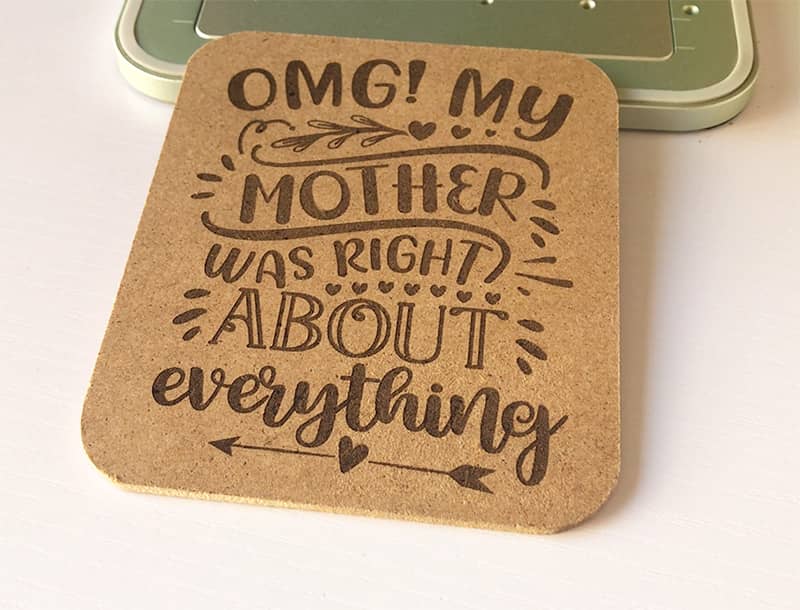
MDF Coaster
We had some MDF Coasters in our stash that we got from our local Bunnings store here in Australia and we have found that all our lasers engrave well on MDF. The xTool F1 is no exception, it did a lovely job.
We found a cute SVG file from Creative Fabrica and it only took 2min 55s to engrave.
Settings
- Speed – 300
- Power – 100%
- Mode – Blue Light Diode
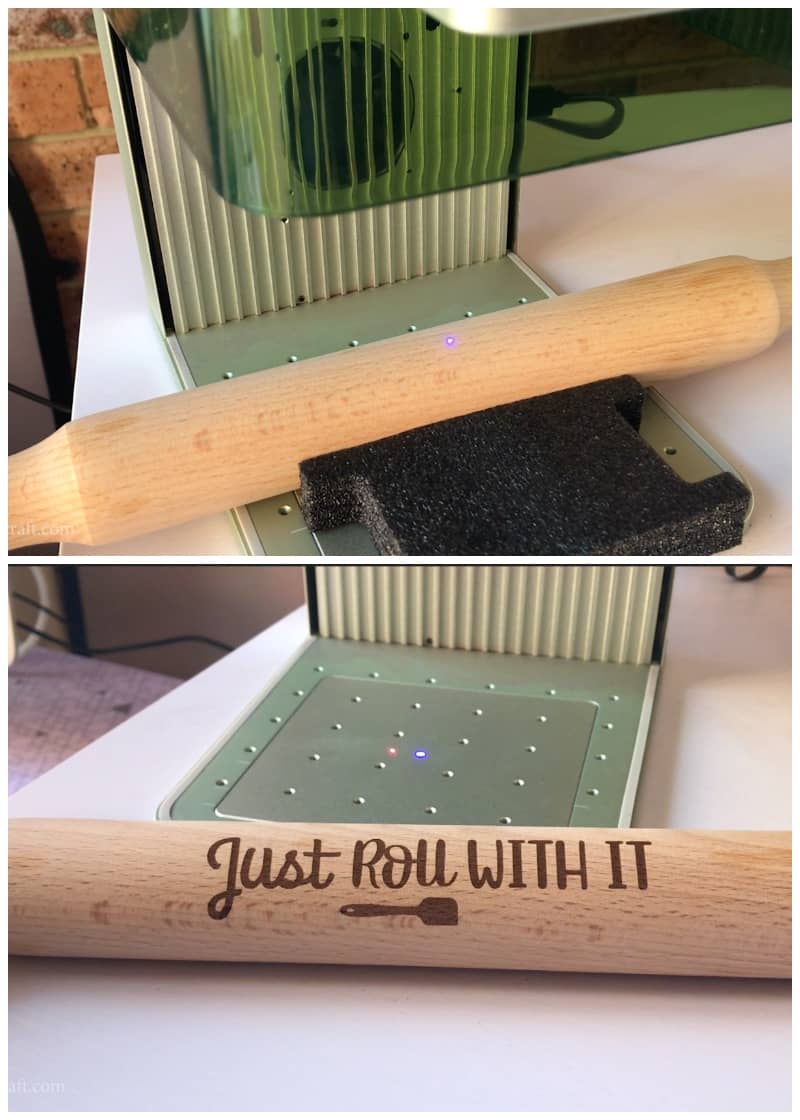
Rolling Pin
The next thing I wanted to try was a rolling pin. Now I don’t have the rotary tool, so as you can see I have used a piece of foam from the packaging to hold the rolling pin in place so that it didn’t roll around. You can purchase a rotary tool as an optional accessory that is specifically made for round objects like glassware, tumblers, mugs and so on. But you can see how great this design turned out without using the rotary tool and it only took approx 40 secs.
Settings
- Speed – 300
- Power – 100%
- Mode – Blue Light Diode – Engrave
Wood Herb Tags
Next, I thought I would try engraving on some small tags that I had in my stash. I thought these might look good attached with string to the herbs I dehydrate and store in mason jars. I haven’t actually attached them yet as I’m not sure whether its going to be one of those things that is good in theory but no so great in practice. Either way, they do look good.
These are the types of things that can be used successfully in paper crafts. You can attach them as a side decoration or simply pop them into pockets in your journals.
Settings
- Speed – 200
- Power – 100%
- Mode – Blue Light Diode – Engrave
Laser Cutting
Now this machine not only engraves, it also cuts up to 8mm for wood and 5mm for acrylic.
When cutting you do need to use the working panel. This protects the work surface and raises the material up from the base to prevent burning.
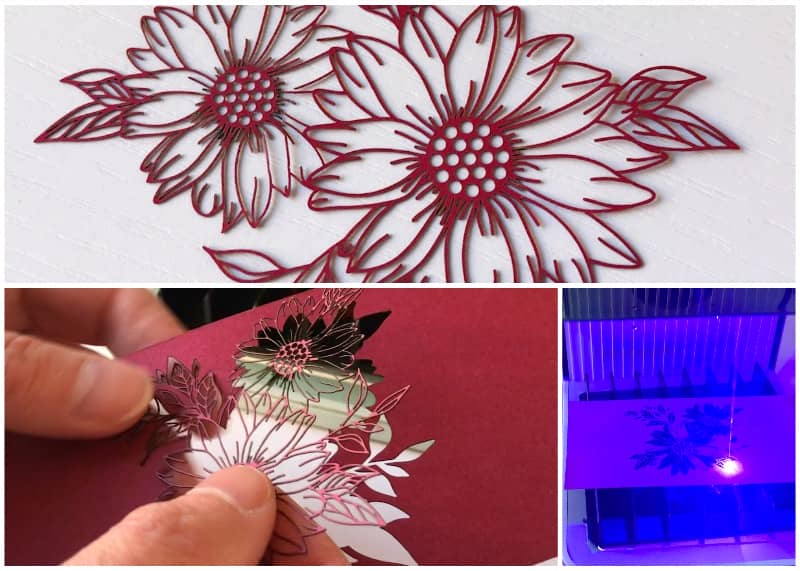
Cardstock
The first thing we thought we would try to cut out was a piece of card stock, and since there were no default settings in Creative Space, we had to come up with our own.
We really wanted to test it out and see how fine it would cut so we went with an SVG file that we have tested on another laser in the past only we made the image even smaller which would mean it would be even finer.
But take a look at the cut out in the image below. It is so fine and delicate and no burning at all. I am absolutely delighted with the result and can see a definite use for this fine work in my scrapbooking and card making.
Settings
- Speed – 20
- Power – 50% although we thought we could have even gone down to 45 power.
- Mode – Blue Diode Laser
- Time – 3min 30 sec
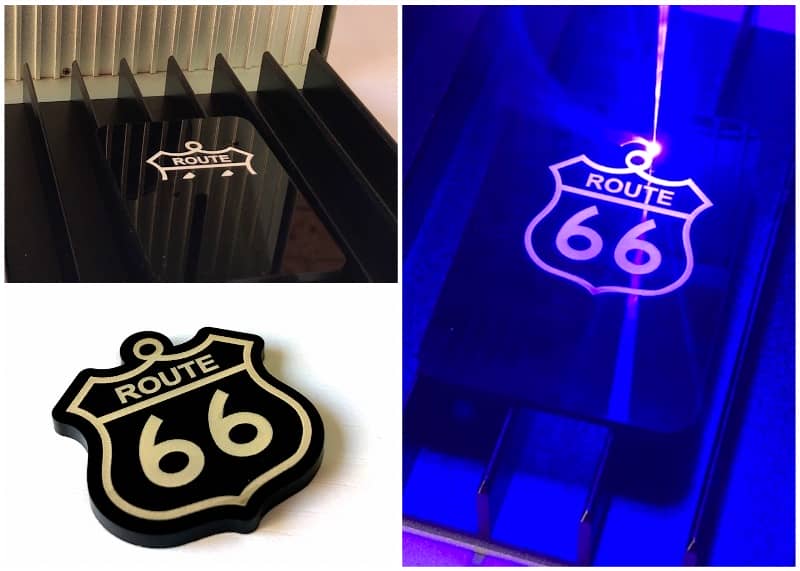
Acrylic Key Ring
There were a couple of pieces of acrylic in the box so we cut and engraved a key ring and it came out beautifully. I was really happy to have the Route 66 design.
A few years ago we went to the US and drove out to a town called Seligman on Route 66. This iconic town has been declare the birthplace of Route 66. The town is full of retro shops, diners and motels and definitely worth a visit. While I was there I bought lots of souvenirs but they were mainly of the town and I didn’t pick up anything with Route 66 on it. Now I have a lovely looking key ring to remind me of my visit.
Now the xTool F1 did the engraving first and then it cut the outline. It went through the acrylic like butter and took just under 6 minutes to complete. I am really happy with how well it cuts through acrylic and i am delighted with my key ring.
Settings
Engraved Design
- Speed – 2
- Power – 100%
- Mode – Blue Light Laser – Score
Cut Design
- Speed – 50
- Power – 100
- Mode – IR Laser – Cut
- Line per cm – 200
The project too a total of 5 min 55 secs to engrave and cut.
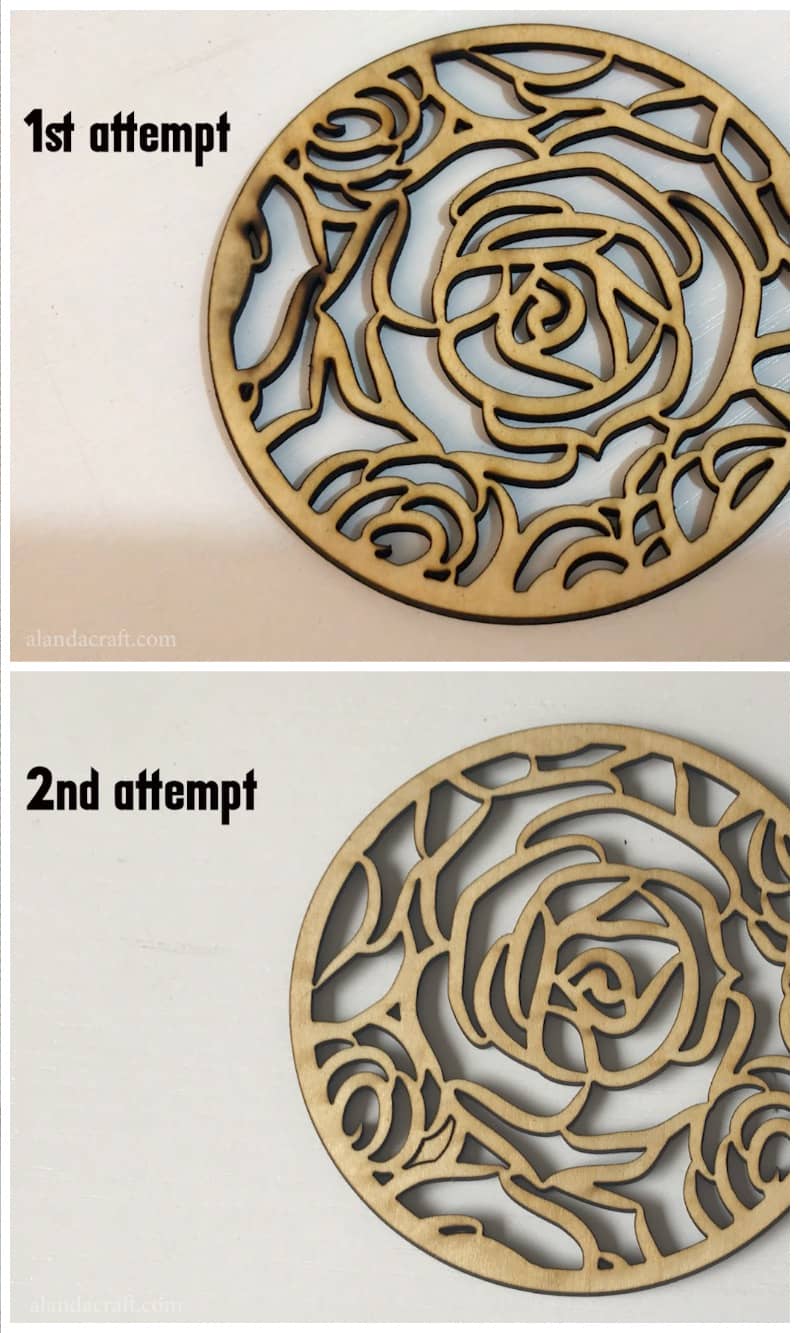
Wood Rose Coaster
Our final cut was on piece of plywood. For our first attempt, we chose a default setting in the software for 3mm plywood. It ended up being way too intense and then we realised that our piece of plywood was only 2mm. As a result, there was a lot of burning especially on the left side. This was entirely operator error and we needed to adjust the settings, but this is how you learn.
We did end up trying again and reduced the settings and the second attempt had much better result and the design looks great.
Settings
1st attempt – too intense for the 2mm plywood we used
- Speed – 3
- Power – 90%
- Mode – Cut
2nd attempt
- Speed – 6
- Power – 90%
- Mode – Cut
Air Purifier
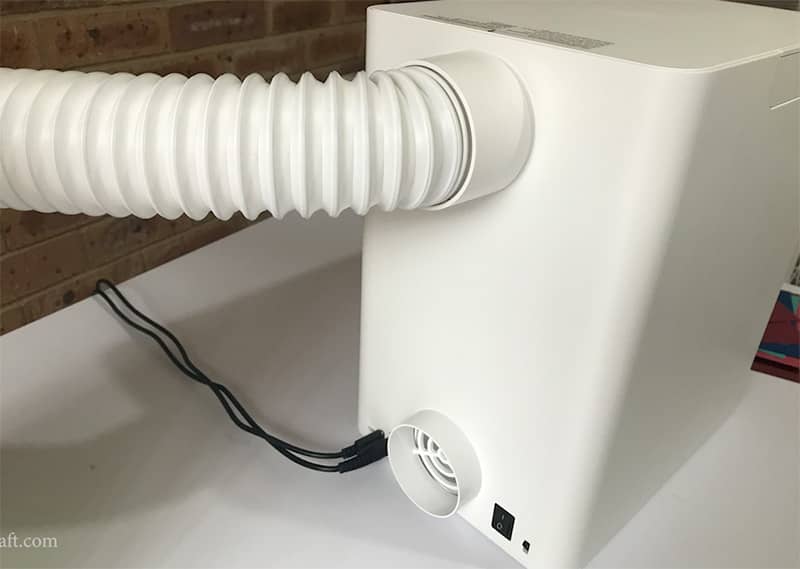
The machine has a protective slide cover and a built-in fan which extracts the air out through an exhaust pipe.
BUT, you can also purchase an optional Desktop Exhaust Purifier with a 3 layer filtration system which achieves a 99.9% purification rate. And it is super quiet.
Since we had the machine open for filming most of the time we didn’t have much of a chance to test the air purifier out properly, however we will be doing a video on our GoLaserGo YouTube channel that will include more information on this.
Slide Extension
Now you may be thinking that the work surface is a little small, but really it is absolutely ideal for small projects. If you want to do batch engraving or need a longer working surface, you can purchase a Slide Extension which will give you 4x the work area than the xTool F1 itself.
At the time of writing this review we didn’t have a Slide Extension. We now have one and you can read our reviews on How to set up the Slide Extension and How to Use Creative Space with the slide extension, on our laser channel GoLaserGo.


Lia says
Thank you so much..love that you have the settings mentioned also..
Alanda Craft says
You’re welcome Lia. Glad it was helpful.
Maxine Skingsley says
Hi can you tell me if for a hobby crafter you prefer the F1 model or the M1 as I am unsure which one to go for x
Alanda Craft says
What sorts of things are you intending to create Maxine?. These are two very different machines and knowing what you are wanting to create will help us to give you a more definitive response.
mp3 quack says
Great review! The xTool F1 sounds like an impressive and versatile tool for crafting. I love how portable it is, making it easy to use anywhere. Can’t wait to see more demos!