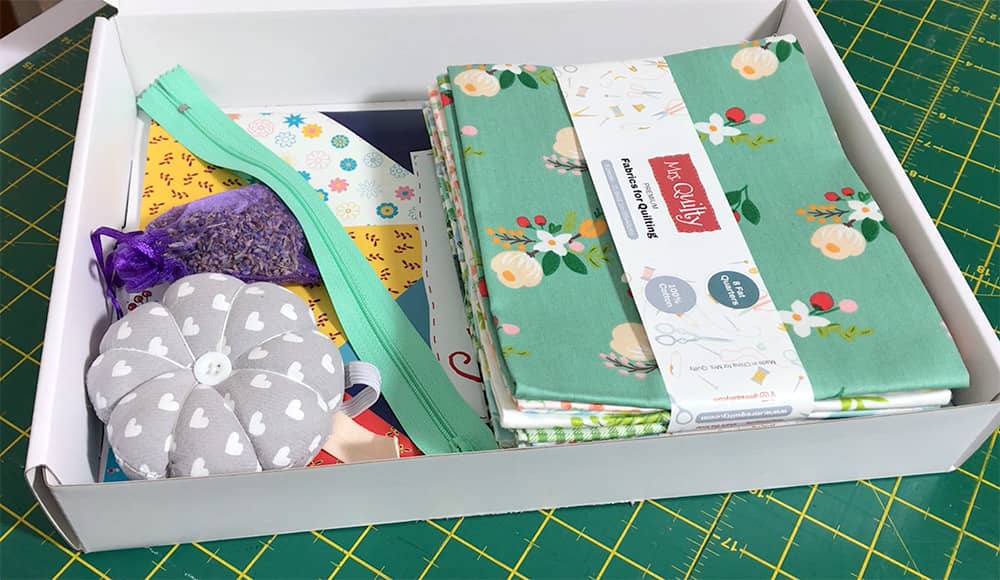
We recently received a box of fabric from Mrs Quilty to review which was really nice as we had never had an opportunity to see what one of these fabric subscription services were like. In the box were 16 lovely summery fat quarters. There were two packs with 8 fabrics and each pack had the same fabric, so there was plenty of fabric in each colour to make a nice project with.
What did we think of the fabric?
In terms of the quality of the fabric we thought it was quite good. In fact, we were really pleased with the feel of the fabric. One thing I did notice when we got into cutting and assembling the fabric was that it didn’t fray, now that’s a big plus for me. So many fabrics we have been using fray like crazy as you are using them. Now this isn’t high quality quilting fabric like Moda for example but it is on par with many of the cotton fabrics we have purchased in the past to make quilts and I would happily buy this type of fabric in the future.
A Little About Mrs Quilty & a Discount Code For You
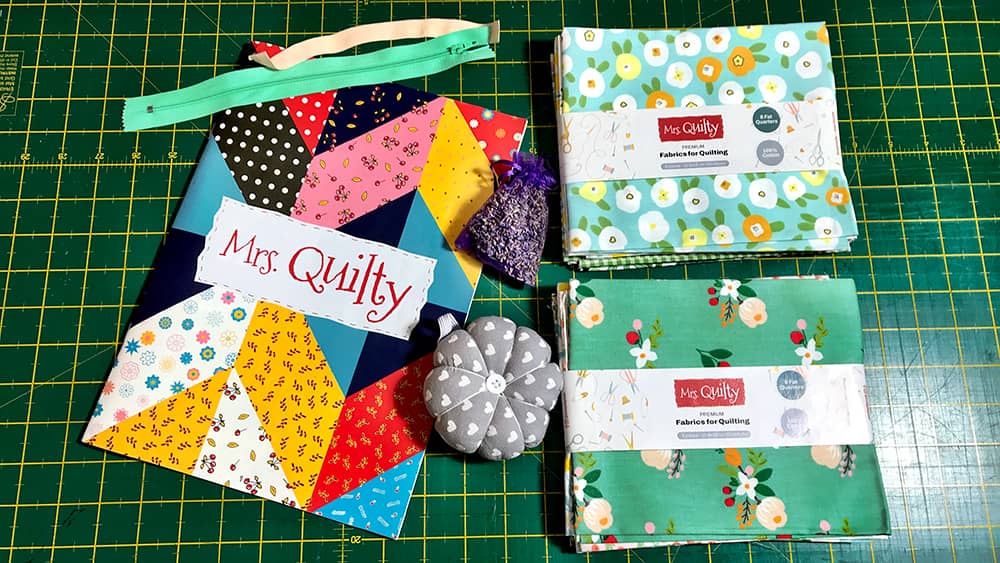
Mrs Quilty is a subscription service that provides you each month with a box of 16 fat quarters, a projects magazine, some small additions to help you make a project from the magazine, and a lovely thank you gift. In our box we received the fabric, a cute wrist pin cushion, a piece of elastic tape to make a headband, a small bag of lavender to make a lavender sachet and a zip to use when making the quilted box pouch.
This is such a great idea. The fabric is delivered to your door so you don’t have to go out to a fabric store and spend hours trying to mix and match colours and patterns, all the hard part is done. The fat quarters in the pack are picked to compliment each other. And the magazine that is included is really helpful in giving you ideas for using your fat quarters.
From what I hear, Mrs Quilty continues to make improvements to the contents of the boxes on a regular basis based on customer feedback which is good to know.
MRS QUILTY COUPON CODE
The Magazine
Along with the fabric, we received; as I’ve already mentioned, a comprehensive magazine that includes:-
- some hints and tips on quilting
- information about the fabric that you have received
- some suggested projects that you can make with the fabric. My magazine had 5 projects with cutting instructions, assembly instructions and all the information needed to make each project. Some projects need extra material that isn’t included in the pack but this information is included in the project instructions if required.
- and when it’s time for a break there’s even a recipe for Oatmeal Cookies….bonus!
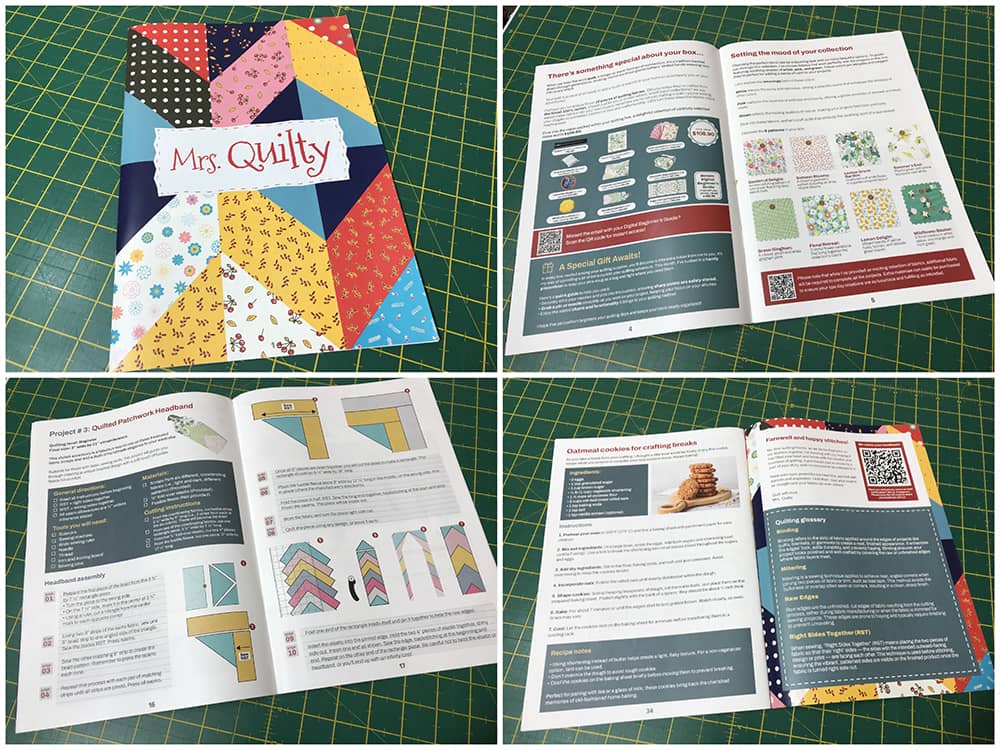
This pack included instructions for the following projects:
- A Quilt Block of the Month – Cozy Mosaic Block
- Lavender Sachet
- Quilted Patchwork Headband
- Quilted Box Pouch
- Yoga Mat Quilt
I have to say I like the idea of receiving 16 fat quarters and an ideas magazine each month. Especially as the fabrics coordinate nicely so the hardest part is done for you. I don’t know how many hours we’ve spent in fabric shops trying to find matching fabrics.
Watch the video tutorial below or scroll down for written instructions
(Can’t see the video? You may have an adblocker installed. (Click here to watch on YouTube)
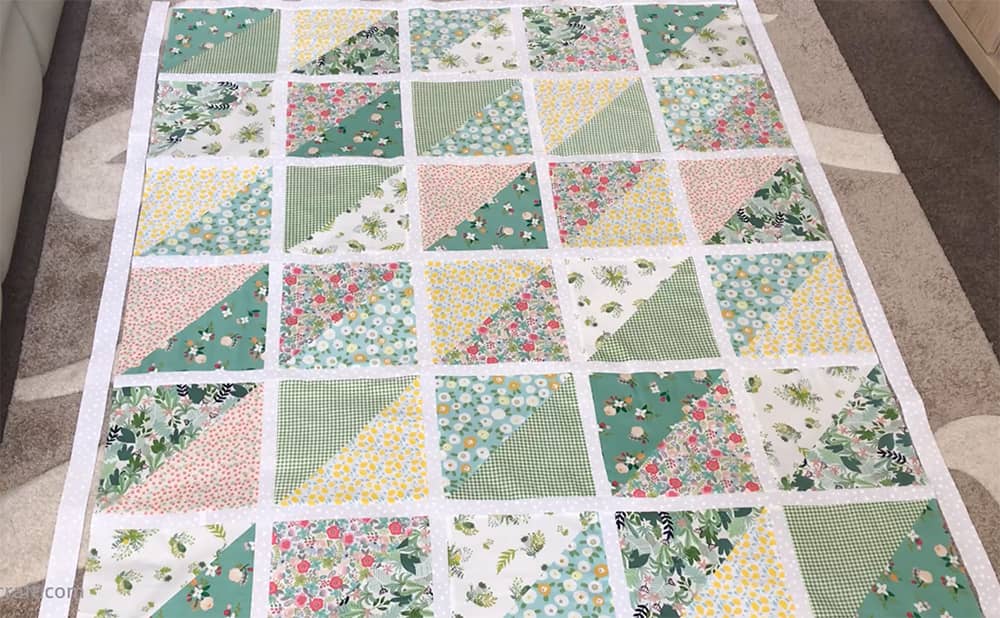
Half Square Triangle – Fat Quarter Quilt
Now I was going to make one of the projects in the magazine. However, it seemed a shame to cut the fat quarters down into small squares so we came up with a half square triangle quilt. Plus it’s a nice easy quilt to make if you are starting out.
The quilt measures approx 65″ x 75″
What You Need
- 15 fat quarters – We used the fat quarters from our Mrs Quilty Subscription box
- ¾” yard of contrasting fabric for sashing – we used white
- Matching thread – I used Gutermann’s Sew All thread in Cream
- Ruler – Creative Grids 6″ x 24″ Basic Ranger ( love this ruler)
- Rotary Cutter – Olfa 60mm
- FriXion Pen
Creating the Blocks
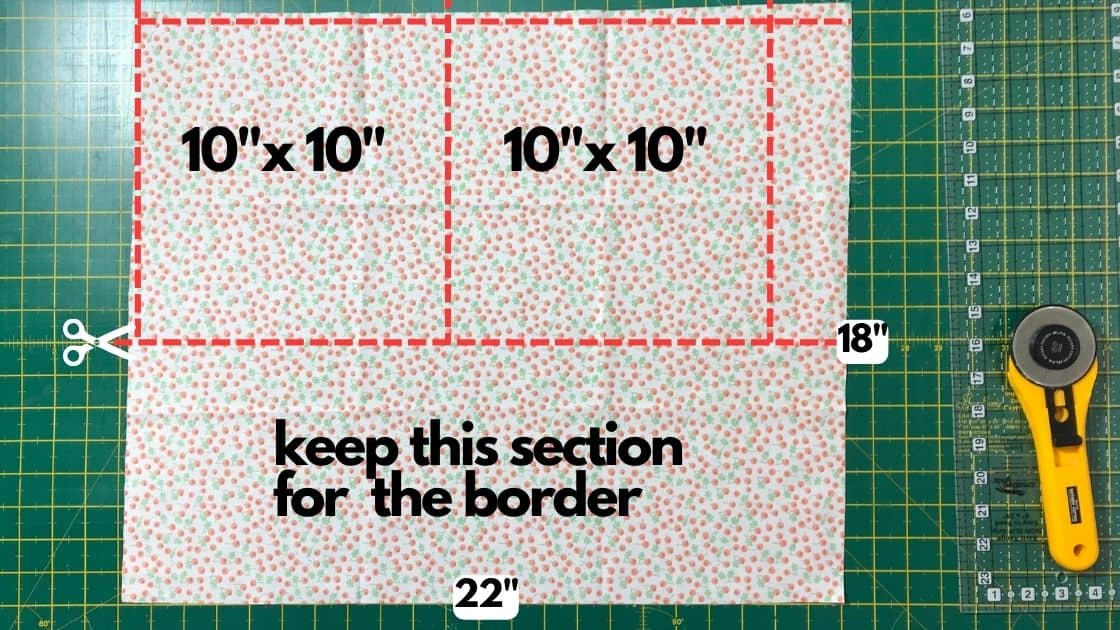
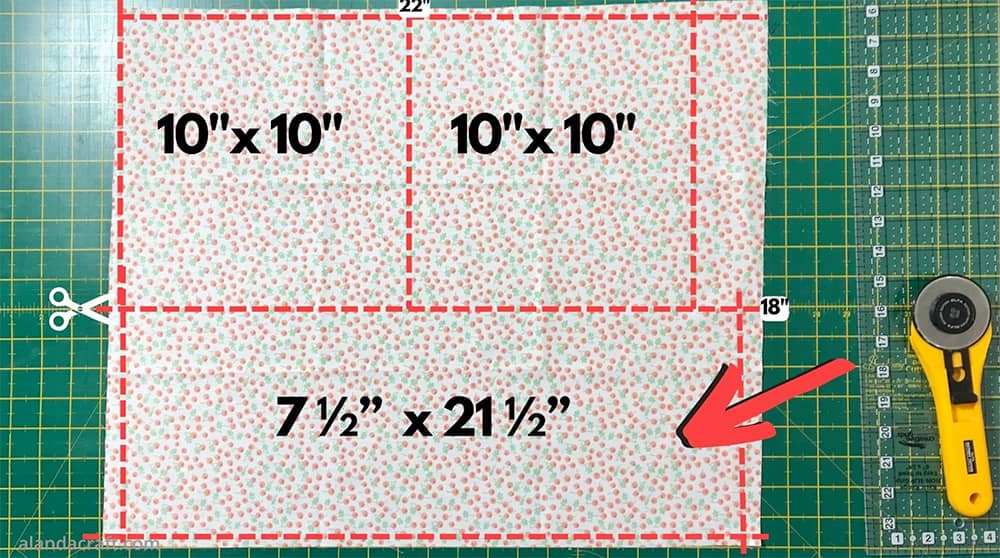
- Cut 30 squares measuring 10″ x 10 according to the image below
You will get two 10″ squares from each fat quarter. Cut the fat quarter length ways first, this will ensure that you do get two 10″ squares from each piece and have enough left over to use in the border.
Create half square triangles using the following method:
You can mix and match your fabric into pairs before you start or you can just pick up random pieces and sew them together.
Place one 10″ square on top of another 10″ square with right sides together.
- Make sure that the two pieces match up nicely around the edges.
- Draw a line across the diagonal
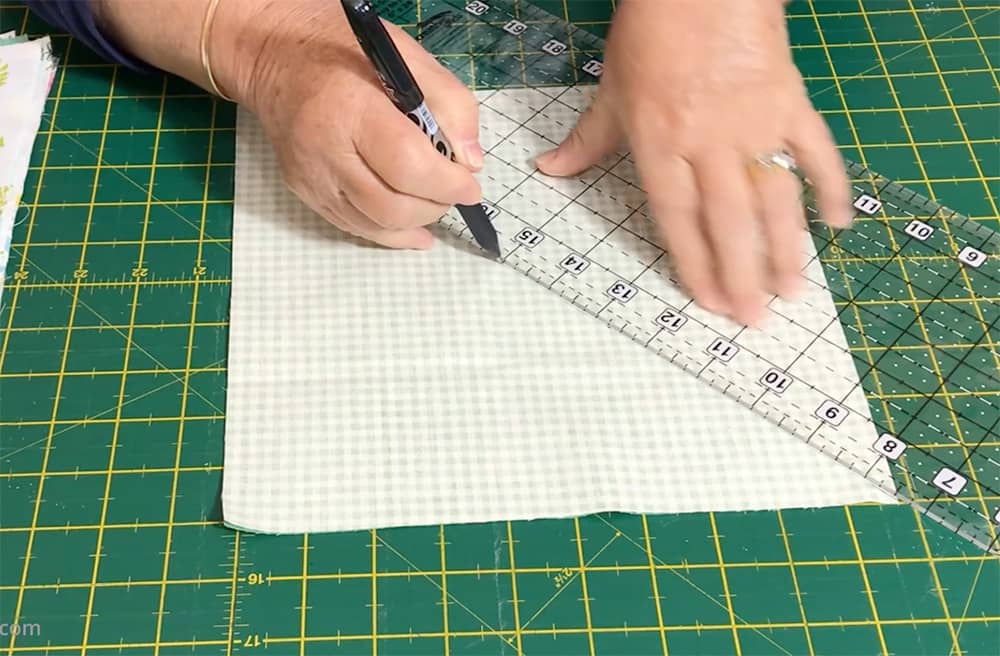
- Sew a seam ¼” on either side of the line you just drew.
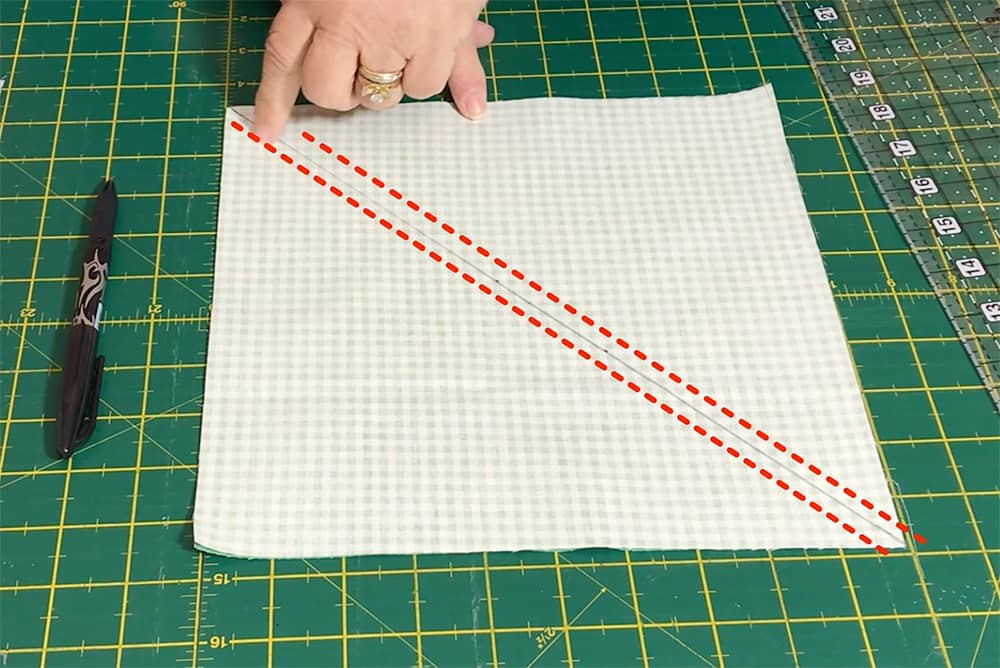
- Slice along the drawn line to create 2 half square triangles.
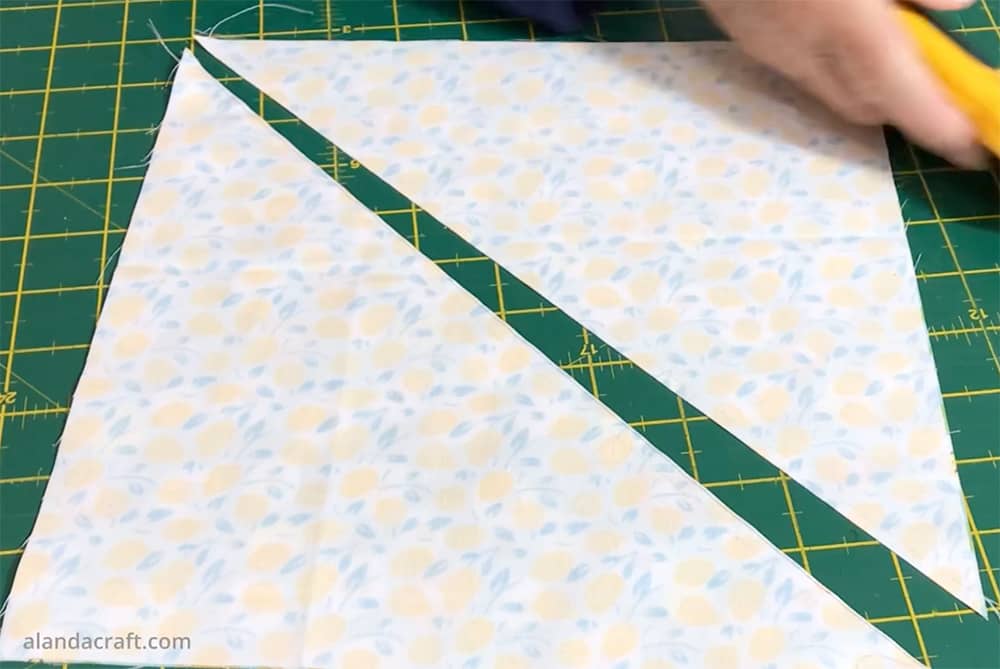
Trim each half square triangle back to 9½”. If you are not sure how to do this we do have a tutorial for you.

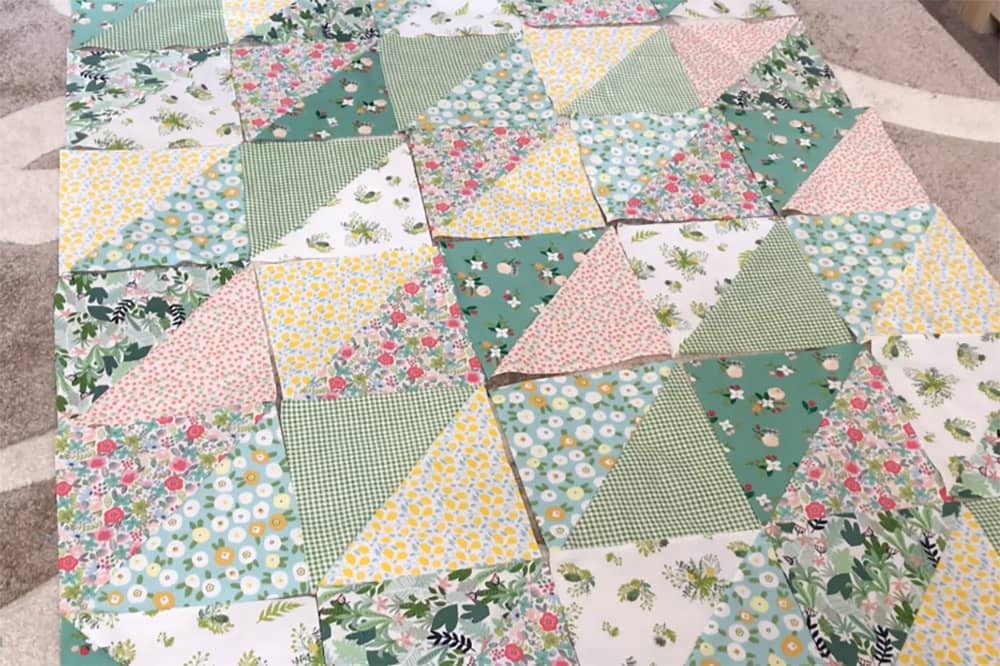
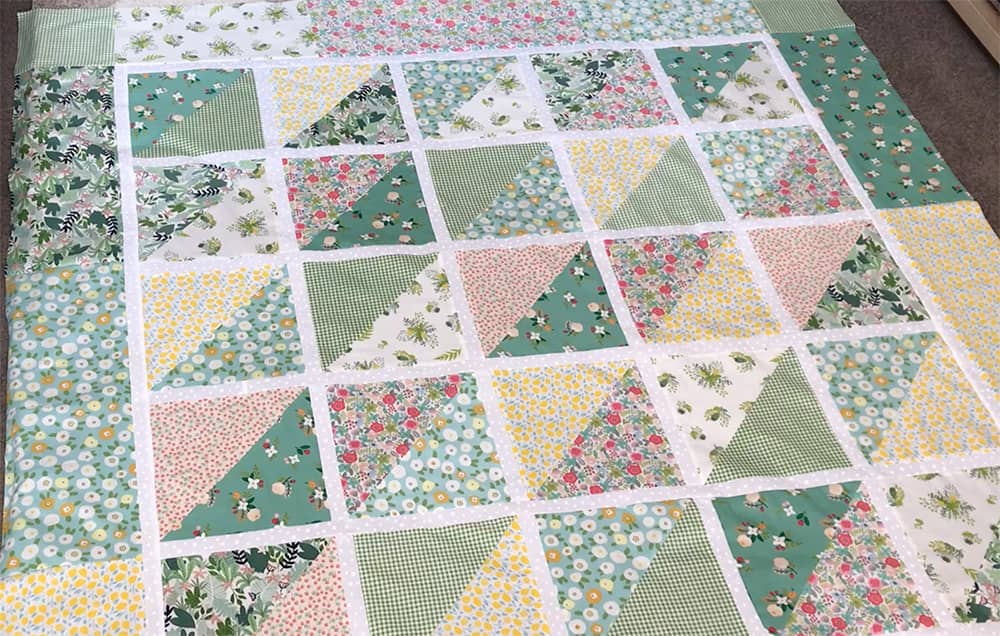
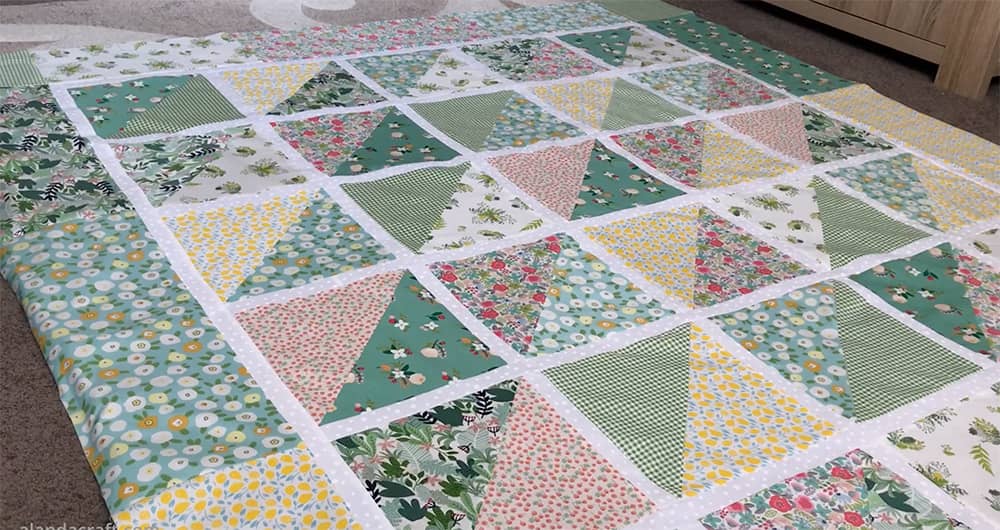
Now lay out the squares and arrange them how you like them. I generally just lay out my blocks on the floor. I like to do this as it gives me a nice perspective of what the quilt is going to look like and I can change the blocks around to how I like them. If you are lucky enough to have a large work surface then there’s no crawling around on the floor like I do.
At this point you can just sew the blocks together. This would make a pretty quilt, and it’s quick and easy to do.
However, I am going to add sashing to my quilt. So I still need to lay out my squares in a design that I like.
Adding the Sashing
You will need ¾” of a yard for the sashing. I am using a tone on tone white fabric that I purchased from our local Spotlight store here in Australia.
Sashing For the Blocks
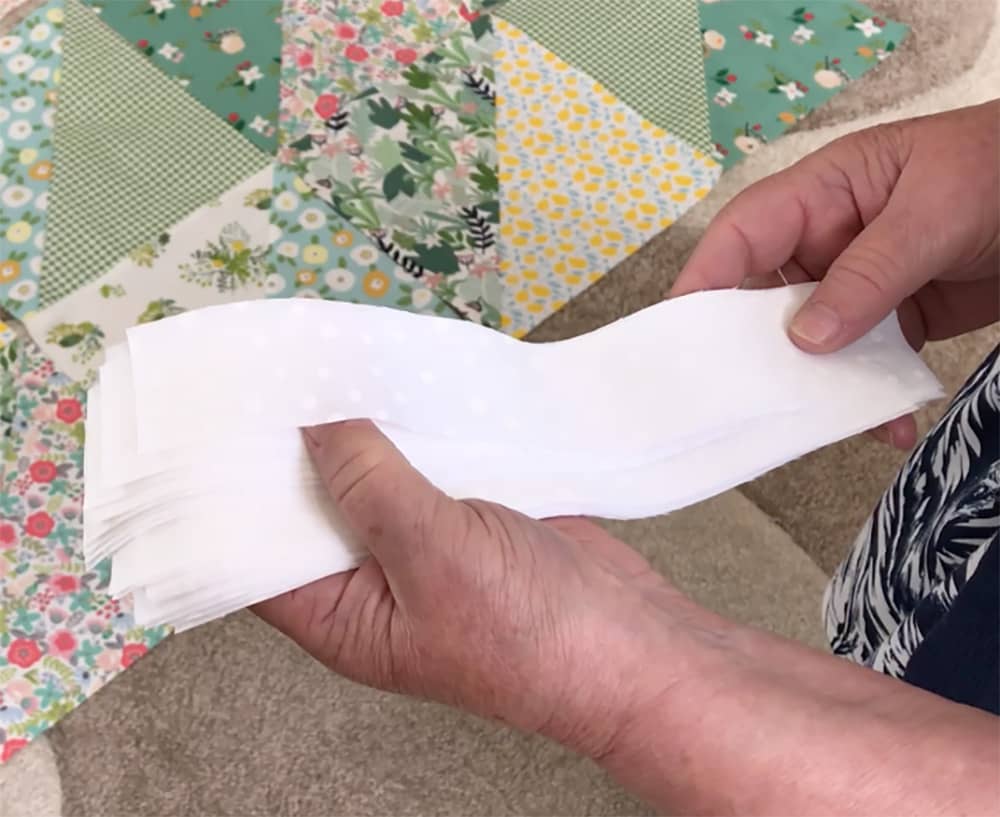
Cut 6 strips of fabric measuring 1½” by the width of fabric (wof). (You may need to get an extra strip depending on your width of fabric.)
- From those 6 strips, cut them into 24 strips each measuring 1½” x 9½”
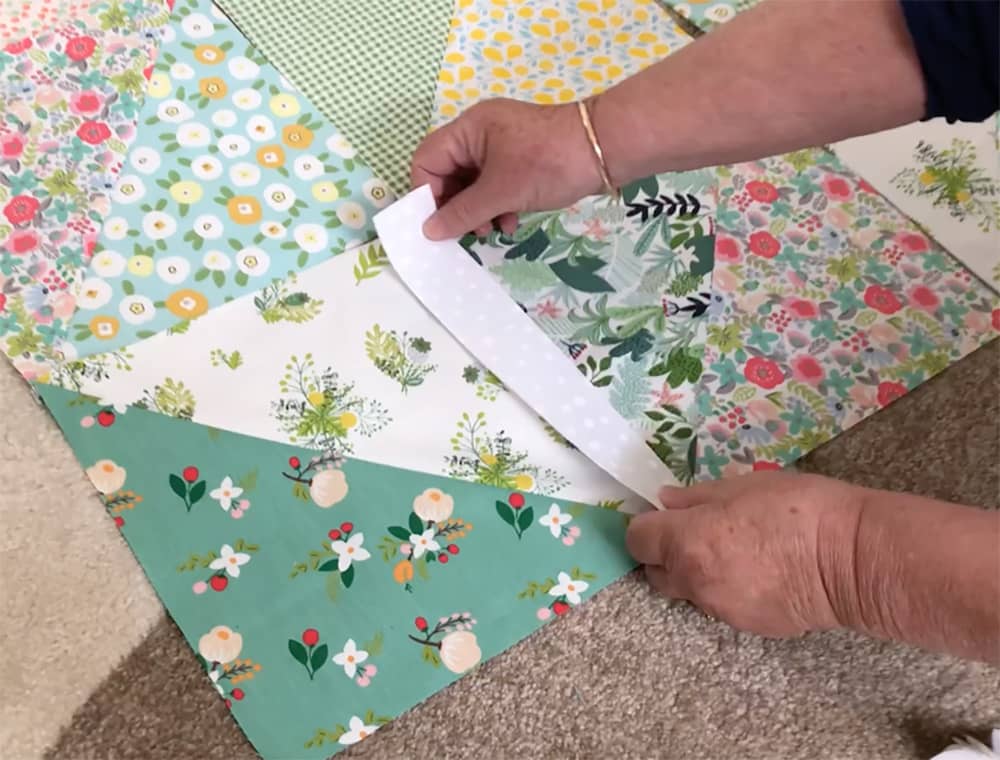
Lay a strip of sashing along each block with the right sides facing and sew with a ¼”. Do NOT add a sashing strip to the last block in each row. Only add to the first 4 blocks in each row.
Once you have attached the sashing to the blocks it’s time to sew the blocks together into a row using a 1/4″ seam. Take note:- you won’t have any sashing on either of the outside edges. We will be attaching long strips of sashing on each side. But more on this later.
Once the blocks are sewn together into rows we will add sashing between the rows.
Sashing For the Rows
Cut 9 strips of contrasting fabric measuring 1½” by the width of fabric (wof).
Technically, the sashing strips should measure 1½” x 49½”. However, it is advisable to measure the width of your rows first and cut your sashing accordingly. The width of our rows measured closer to 49¼” so we went with that.
You will need 7 pieces of sashing in total and you will need to sew 2 strips together to get the required width for each sashing piece.
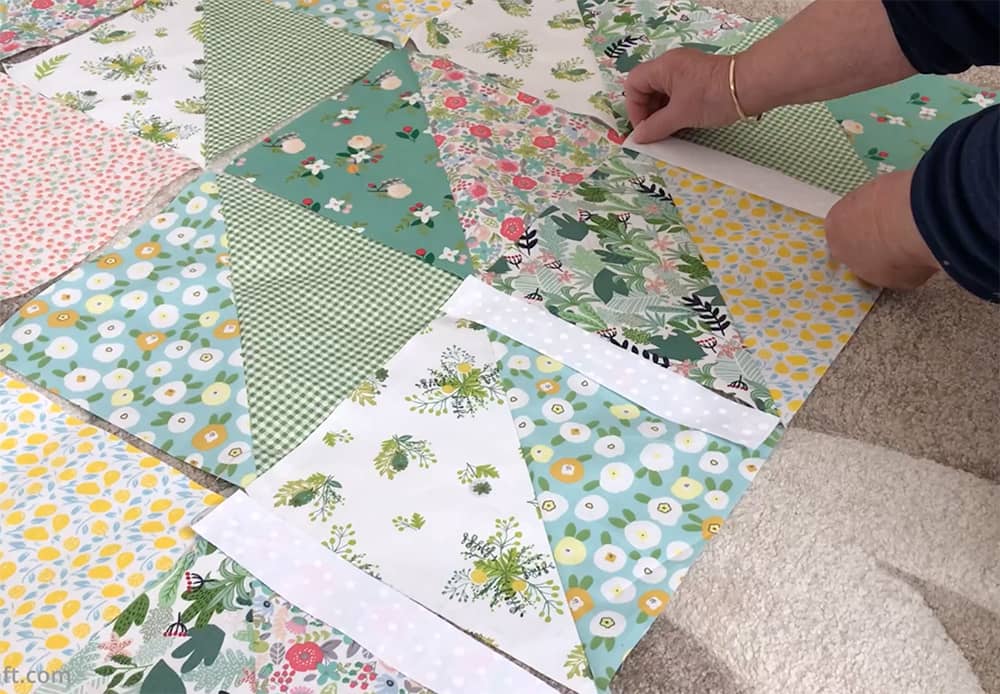
- Attach a piece of sashing to each row. Starting with the bottom row we add a piece of sashing to each side of the row and continued up the quilt finishing with sashing at the very top.

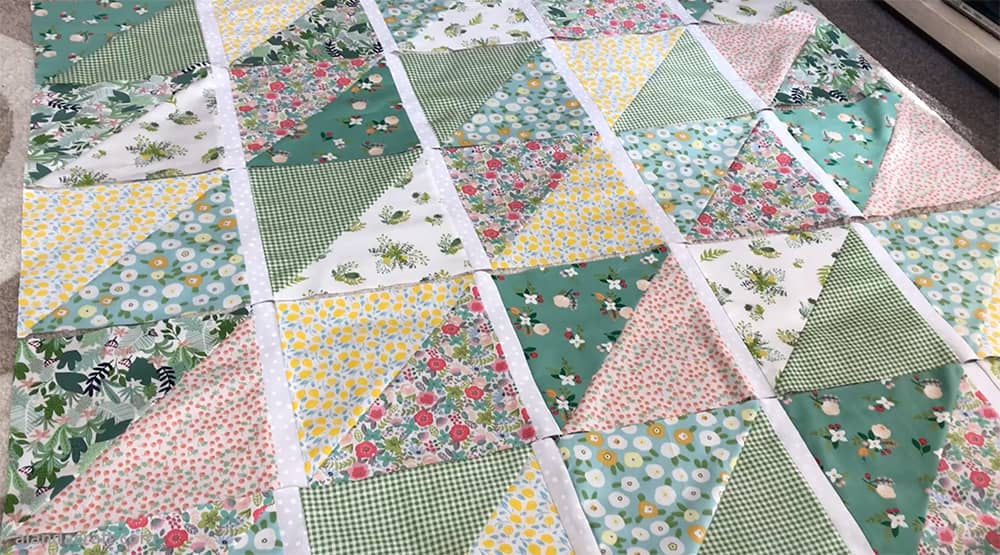
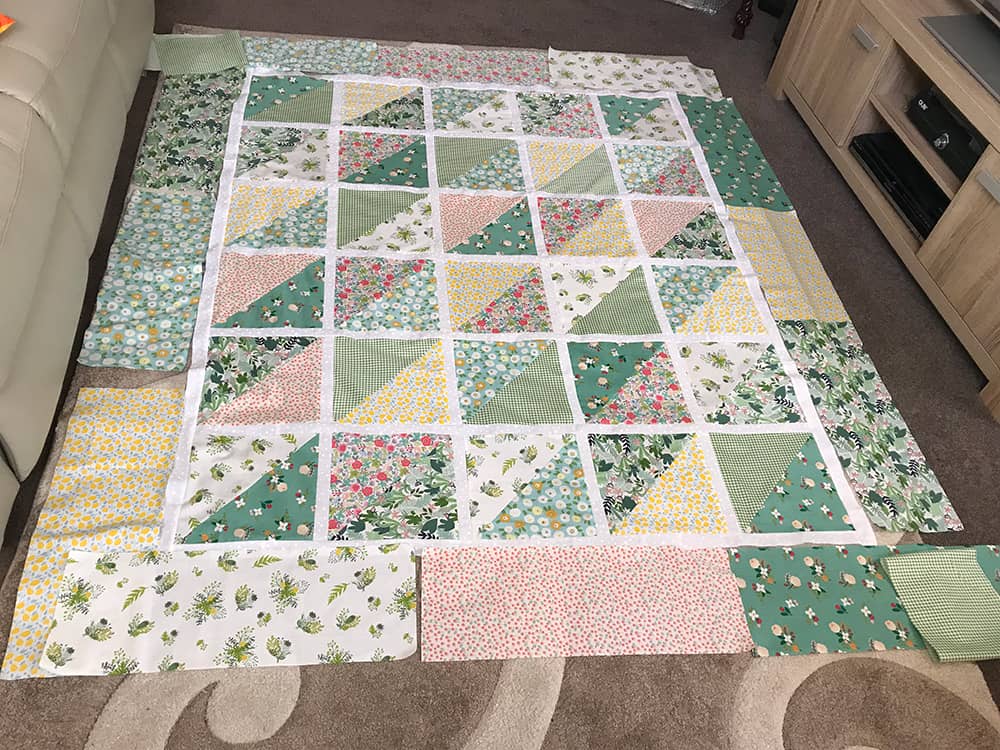
Sewing the Rows Together
Once the sashing has been attached between the rows, you can sew the rows together. You can see how that should look in the image below. (Note that the image also shows the long sashing waiting to be sewn on which is described in the next step.)
Sashing For the Long Outside Edges
Cut 3 strips of contrasting fabric measuring 1½” by the width of fabric (wof).
You will need to create two sashing strips – one for each side of the quilt. Those sashing strips should measure 61″ but measure you quilt first and cut your sashing accordingly.
You will need to sew 2 strips together to get the required length of 61″.
- Attach a piece of sashing to each of the long side edges of the quilt.
And that’s if for the centre of our quilt, now we just need to add the borders.
Borders
From your remaining fat quarter pieces, you will be able to create a border.
Select which of the fabric pieces you want in your border. We have 15 fat quarter pieces leftover but we only need 13 of those for the border. (Twelve will be used for the border and one will be used for the cornerstones.)
- Cut 12 pieces of your left over fat quarters @ 7½”x 21½”
- Cut 4 pieces of one left over fat quarter @ 7½”x 7½”. These four pieces will be the cornerstones of your border.
Lay those 12 pieces out around your quilt to see how they will look before you sew. You will notice that the border pieces that we cut are longer than the quilt width and length. However, we will be trimming them back to fit our quilt in the next step.
Top and Bottom Borders
Watch the video first before following these steps.
Before you sew your border pieces together, measure the width of your quilt. My quilt at this stage measures 51″ wide.
The reason we are doing this is that we are going to be trimming our border strips back to that size.

Now go ahead and sew the 3 pieces that make up the bottom border together. And do the same with the top border. DON’T SEW ON THE CORNERSTONES JUST YET.
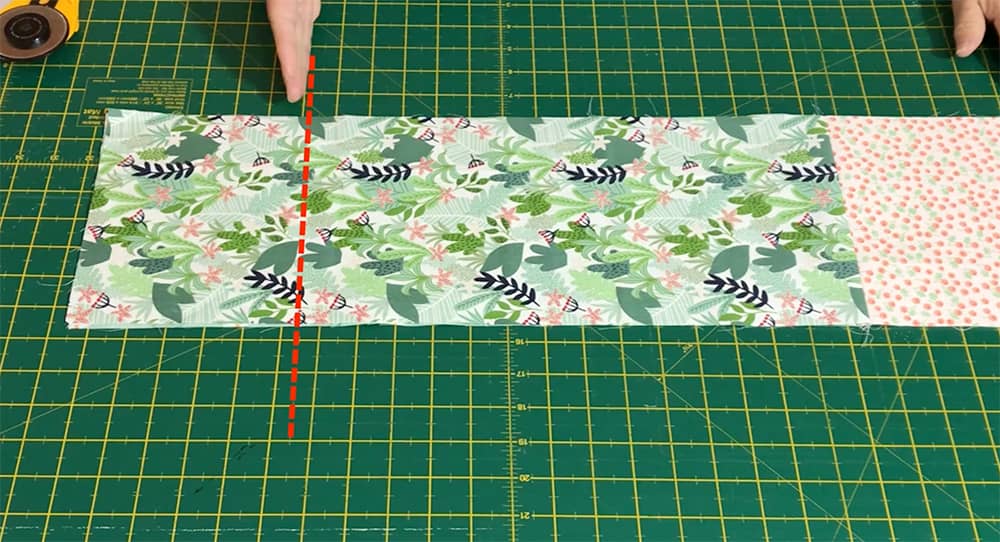
You can see in the image below that we have sewn the 3 bottom border pieces together. And now we need to trim them back to fit the width of our quilt which is 51″.
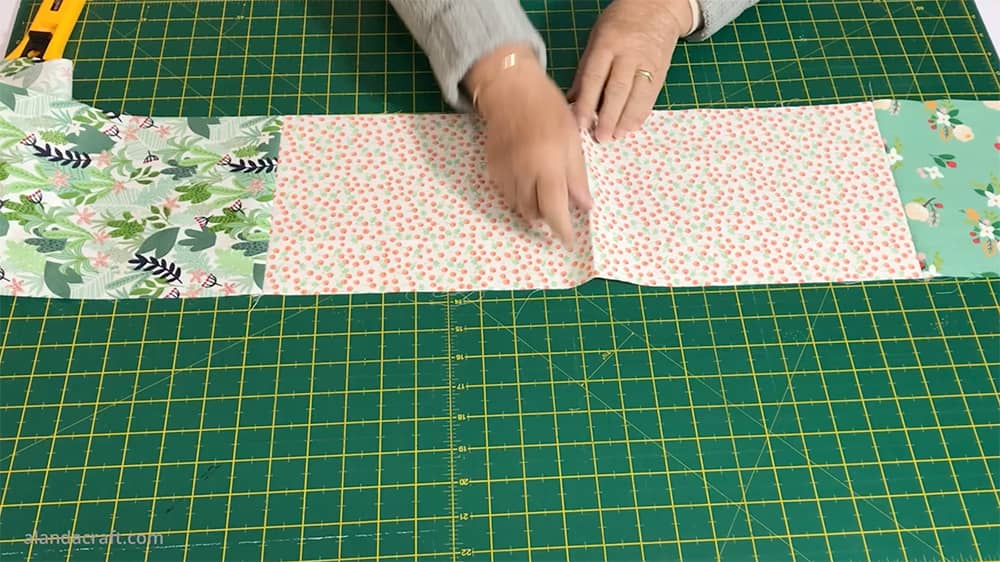
To trim back the border pieces, fold the piece in half and lay the folded edge along the zero line on your mat. We are going to cut the excess fabric from the raw edges not the folded edge.
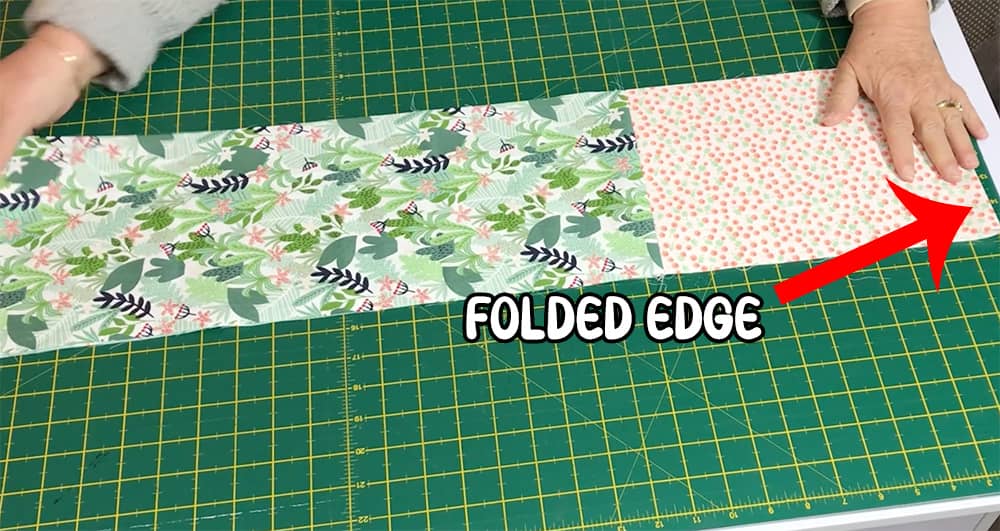
- Trim the excess off at the 25½” mark on your mat. This is half the width of my quilt of 51″. Do this for both the top and bottom border strips.
Your border pieces should now fit the width of your quilt. Now you can sew them onto the top and bottom of the quilt.

Side Border Strips
Watch the video first before following these steps.
Now we need to sew on the side border strips. These are made in the same way as the top and bottom border. In other words, we are going to sew the pieces together and then trim them back to fit the height of your quilt.
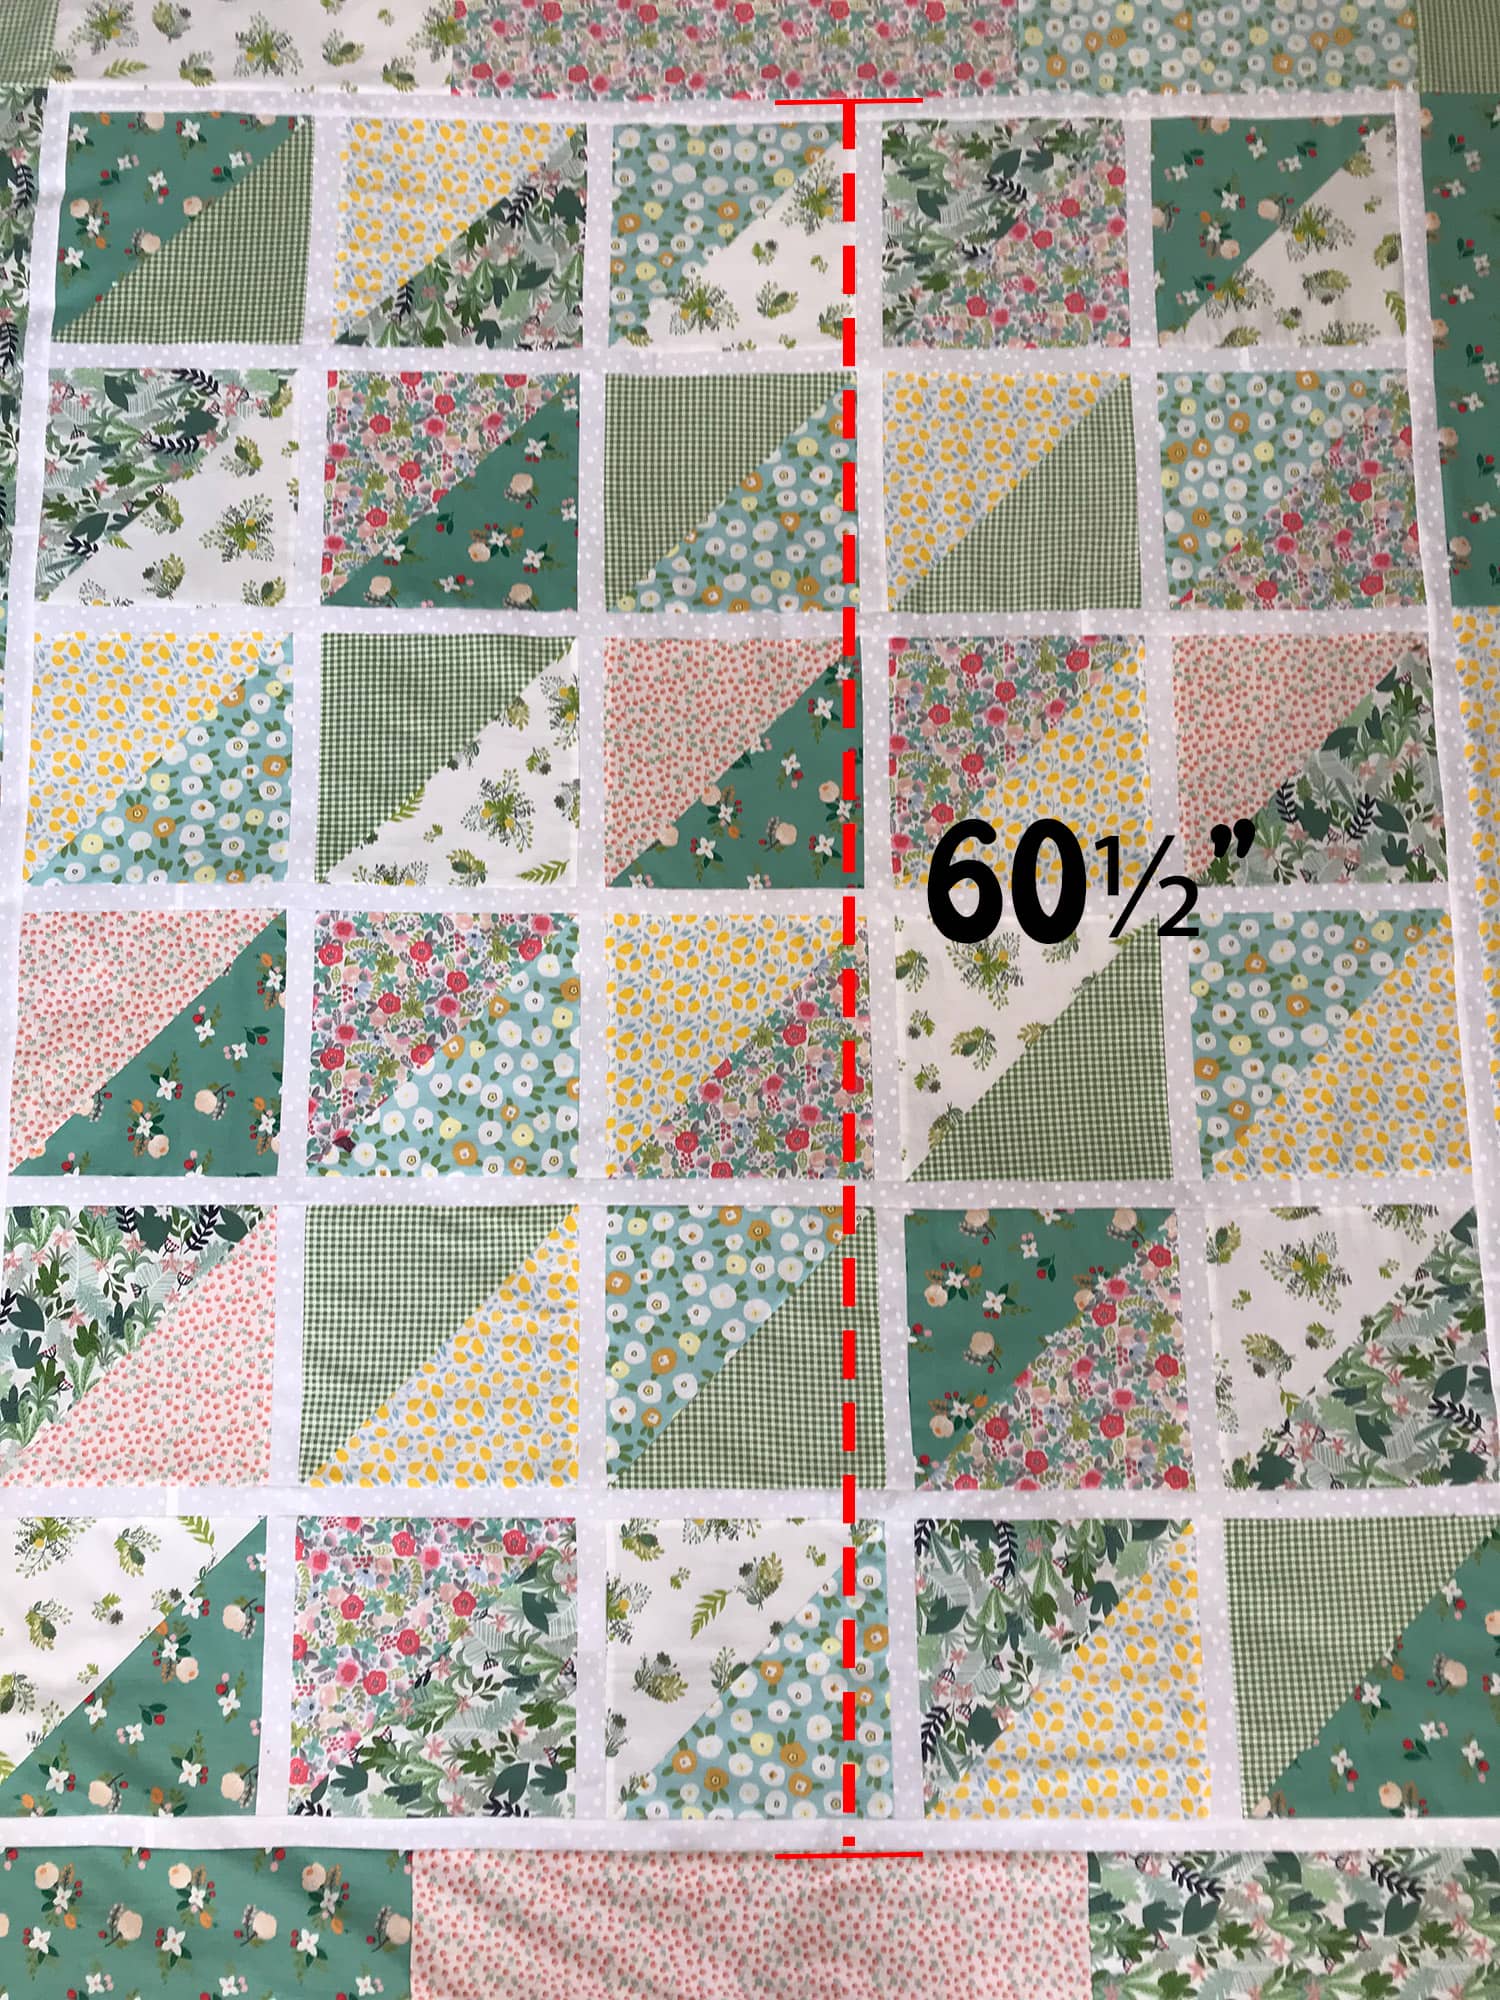
Start by measuring your quilt from the bottom of the sashing piece to the top of the sashing piece as shown in the image below.
Ours measures 60½”, however we need to add a half inch to that to take into account that we are going to be sewing on the cornerstones.
In other words, our side borders need to measure 61″.
- Sew the 3 pieces together as you did with the top and bottom strips.
- Take one strip and fold it in half.
- Lay the folded edge along the zero line on your mat. Remember we are going to cut the excess from the raw edges not the folded edge.
- Trim the edge back to 30½” (which is half of the 61″).
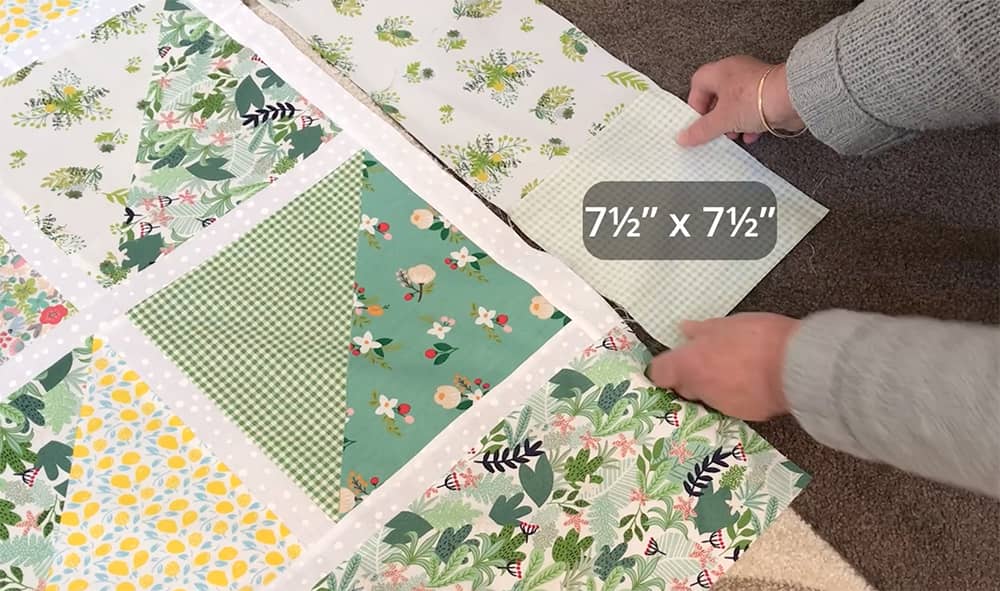
Attach the Cornerstones
Attach a cornerstone to each end of both long strips. The cornerstones should measure 7½” x 7½”. Sew with a quarter inch seam.
Sew the border strip to the quilt taking time to match up the seams of the cornerstones with seams on the top and bottom border strips.
And there you have it a pretty and colourful quilt with a summer time theme. This is an easy project to make and the half square triangles certainly showcase the pretty patterns.
A big thank you to Mrs Quilty for providing us with this box of lovely fabric. Apparently, there have been a few problems with the quality of the fabric in the past, but I can only comment on what I have experienced, and the fabric we received was good quality and nice to work with.


Vicki says
I have bought these fabrics from Temu at great prices. They deliver free to Europe. This makes a quilt inexpensive. I have seen most of their fabrics on various USA quilting sites. They all come precut which makes life easy. Your packs look great but like all these monthly subscribes they are only available in their home country. Thank goodness for Temu.
Alanda Craft says
I agree Vicki. Temu fabric is inexpensive and what we have had so far has been nice to work with. Not top quality but on par with a lot of the fabric that we get from our local Spotlight store. I think you will find that the monthly subscriptions the we get are available internationally. We reside in Australia and both Mrs Quilty and Cotton cuts ship to Oz.