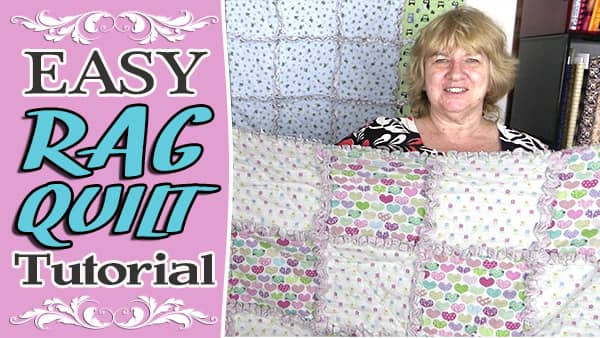
In this tutorial, we show you how to make the easiest Rag Quilt ever. These rag quilts are quick to make and they look absolutely awesome. We are using flannel so they are also warm and cuddly.
Watch the video below or scroll down for the step-by-step written instructions
Checkerboard Rag Quilt
What you Need:
- 2¼ yards flannel colour 1 – back
- 2¼ yards flannel colour 2 – middle
- 1¼ yards flannel colour 1 – top
- 1¼ yards flannel colour 2 – top
Tools and Equipment Used in this Project:
You can check the latest prices at Amazon by clicking on the links below:
- Janome Horizon Quilting Machine
- Singer Confidence Quilter
- Rag Quilt Scissors – the scissors we own seem to only be available in Australia however we found some Fiskars scissors that have received very good reviews on Amazon
Finished Size
The finished size of the quilt is approximately 44″ x 52½”.
Method:
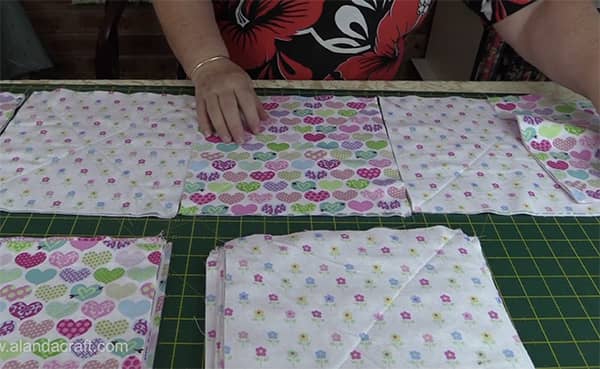
- Cut 30 x 10″ squares for the back
- Cut 30 x 10″ squares for the middle
- Cut 15 x 10″ squares from colour 1 – top
- Cut 15 x 10″ squares from colour 2 – top
If you are using a directional print, make sure you put them in a pile all facing the same way
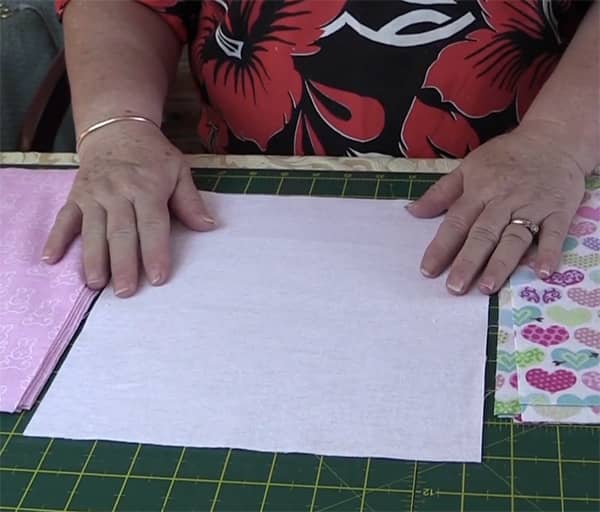
- Take one 10″ back square and lay it face down on the table. – Our backing square is pink so we place it pink side down.
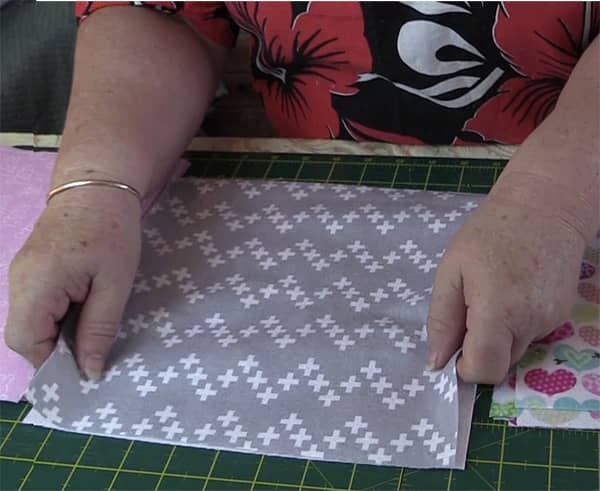
- Take one 10″ middle square and lay it on the top of the backing piece – right side up.
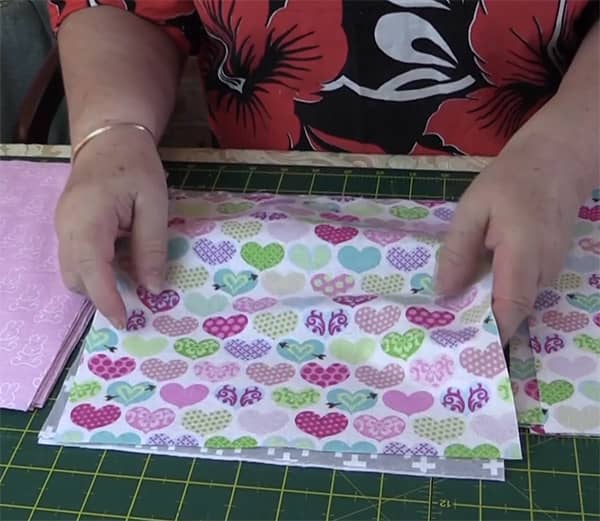
- Take one of the 10″ top squares and lay it right side up on top of the middle square.
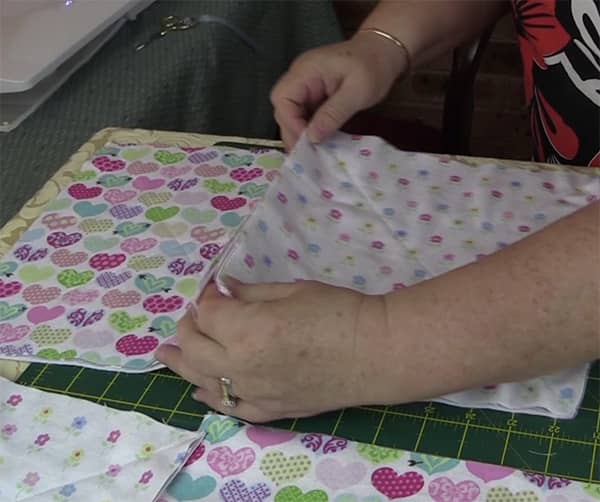
You have effectively made a 10″ fleece sandwich.
NOTE: Check that any directional prints are facing the right way
- Pin the squares together leaving the diagonal areas clear as we are going to sew diagonal lines in both directions across each sandwich (the three squares together).
- When you have sewn the diagonal lines across all 30 squares, lay them out on the table in a checkerboard design – 5 squares across and 6 squares down.
NOTE: because we are making 6 rows you will end up with the two bottom quilt corners being different to the top corners. If you want these to be the same you will need to add a row. However, this quilt is big enough for us and we don’t mind having different corners at each end.
- Take 2 squares and pin them with the wrong sides together so that the seam is on the front side of the quilt.
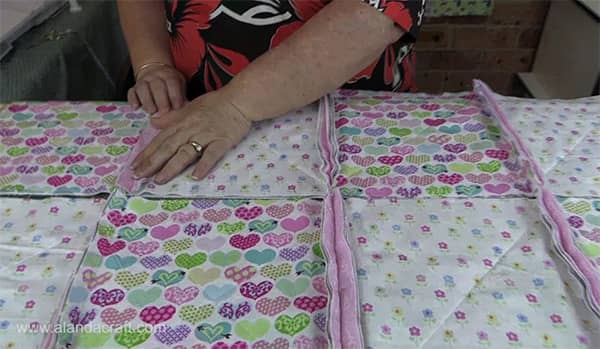
- Sew the squares together with a ¾” seam making sure that the seams are open flat and that the underneath seams do not get caught and twisted.
- Join all the squares in row 1 then sew the squares in row 2 etc until all the squares are sewn into rows.
- Now we join the rows together, once again keeping the seams open and making sure we don’t catch the bottom seam when we are sewing. If you do then simply unpick a few stitches, lay the seam flat and sew over it and use a locking or back stitch to make sure the stitching won’t unravel.
- Sew a ¾” seam all the way around the outer edge of the quilt.
.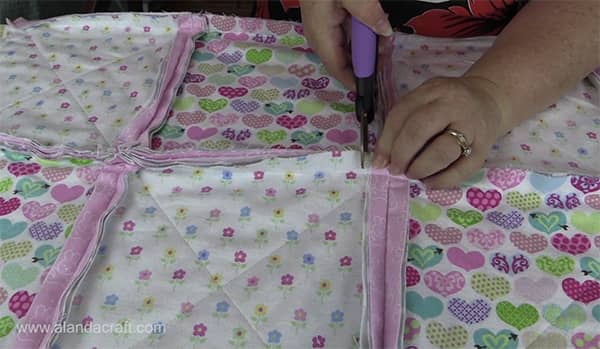
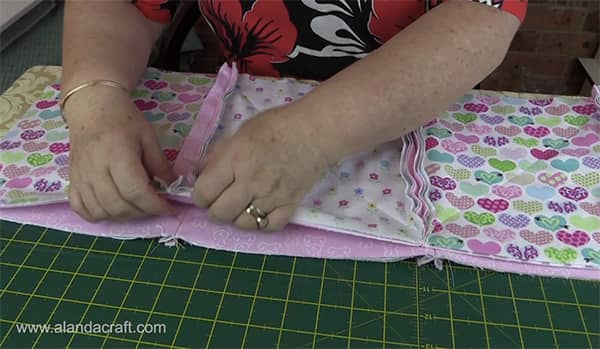
- It’s time now to take a seat and get out your rag cutting scissors.
- Make a cut about every ½”.
- Stop before the seam line – Take care to NOT cut the seam line.
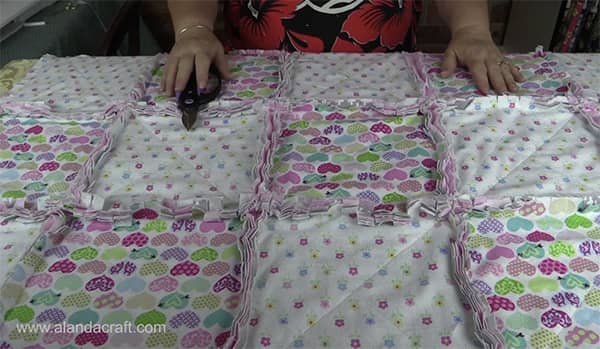
Once you have cut every seam and all the way around the edges of the quilt, it’s time to toss it into the washing machine. You don’t need detergent, just water is fine for this step. Once the quilt has been through the wash and spin cycle, toss it into the dryer. This is going to give us the ragged edge effect that we are looking for.
You will notice that there will be a lot and I do mean a lot of fluff in the lint collector, but that is normal.
Once it’s dry, its finished. So quick and easy.
Rag Quilt With a border
What you Need:
- 2¼ yards flannel colour 1 – back
- 2¼ yards flannel colour 2 – middle
- 1 yards flannel colour 1 – top
- 1½ yards flannel colour 2 – top
Method:
- Cut 30 x 10″ squares for the back
- Cut 30 x 10″ squares for the middle
- Cut 12 x 10″ squares from colour 1 – top – inner square
- Cut 18 x 10″ squares from colour 2 – top – border
Construct using the same method as for the checkerboard pattern. The only difference is in how we lay the front pieces out with colour 2 as the outside border and colour 1 as the square inner top.


Rose says
I would like to know where you got your beautiful fabrics I cannot find it anywhere, thank you.
Alanda says
We purchased the fabric from our local Spotlight store here in Australia.
Annette says
I buy mine at Walmart
Nancy says
You didn’t wash your flannel before you cut out the blocks?
I have heard both side of the story about washing the flannel before
and not washing it before you cut out blocks.
Loved your tutorial! Thanks!
Wanda says
Thank you Nancy. No we don’t generally wash the fabric beforehand. It’s just matter of choice. The only time we would wash a fabric is if there was a chance it may shrink, in which case we would measure of a piece, wash it and remeasure it after it dried. We find that most good quality fabrics are pretty stable these days.
Diane Schubert says
Hi Alanda Craft Thank you so much for your Tutorial as I am a visual person in the learning . It was very easy tp understand the process of making a rag quilt .Thank you again. And I really enjoy your Tutorials using the Brother Scan N Cut CM900.
Alanda says
Thank you for your lovely comment Diane. It’s always encouraging to receive such nice feedback.
Karen F. says
I love the way you teach how to make the rag quilt. My question is what size does that make? I need a quilt for a King size bed. Not sure how to figure how many squares I’ll need. It will be my first quilt ever. What is the best material to use? I do not like flannel. Thank You So Much for your tutorial it was perfect.
Alanda says
Thank you for your lovely comment, Karen. The quilt we made measures 51″ x 44″. Each of the squares measures 10″unfinished, and we sew them together with a 3/4″ seam, so the finished size of each square measures 8 3/4″.
Firstly you will need to determine how big your quilt is going to be and multiply 8.75″ by however many squares it is going to take. For example to get a quilt measuring 105″ x 96.75″ multiply 8.75″ X 12 = 105″ and 8.75″ x 11 = 96.25″. So you just need to adjust the number of squares you need by the size you want to make. Hope this makes sense.
Flannel is what gives a rag quilt it’s nice fluffy finish, you could use quilting material but I’m not sure how raggy it will look when it’s finished.
Sandra Bendig says
Such a clear and easy pattern! Thank you so much for sharing this. I see several of these under the Christmas tree for family this year!
Sandra
Alanda says
Thank you for your comment Sandra. Your family members will be delighted with these quilts. You are going to have so much fun tailoring each quilt so that they are unique to the person receiving them. 🙂
Tammy says
Thank you for the great tutorial! I just finished making and giving 2 rag quilts (one mostly gray and one mostly blue) to two teen grandsons! Turned out beautifully! Let me emphasize the amount of lint these quilts produce – not only in the dryer’s lint trap, but also all over my clothes and the house! Worth it, though – love them! Wish I could share pictures with you!
Alanda Craft says
lol, yes these quilts can make a bit of a mess, but they are so worth it. We would love to see some photos of your quilts. Tammy. Here is a link where you can share some photos and tell us a bit about the quilts /submit-your-project/
Susan says
I would like to know when sewing the diangal from 1 corner to the next do we sew all the way to the ends of the corner?
Alanda Craft says
Yes, we just run off the ends.
Marthese Cilia says
Hi what size is the quilt ?Thank you
Alanda Craft says
The finished size of the quilt measures approx approximately 44″ x 52½”.
Shelley says
I work with the vacuum cleaner fitted with the nozzle attachment next to me. Picks up all the fluff and threads.
Rebecca Barr says
Thank You,
I have watched so many videos on how to make this quilt and this is the most clearest on how to I’ve seen yet.
I now know I can do this myself. Your easy instructions gave me the confidence I needed to start.
I can’t wait to see your other projects.
Alanda Craft says
Thank you for your lovely comment, Rebecca. I think you will like how easy this quilt comes together. It’s a good starting point for someone starting out. Happy quilting.:)
Jill says
Your pattern states 30 squares for back and middle, but only 29 for front? I just bought the fabric to make one for my granddaughter and wanted to verify before I started cutting! Love this and I’m so excited to start making one! Thank you!
Alanda Craft says
Thank you for pointing that out Jill. That was a typo, and I can certainly see why it was confusing. You do need 30 squares that have 3 layers of fabric each, so a total of 90 squares. I have updated the post with the correct information. Cheers
Kathy says
Can you use 2 pieces of cotton an 1 piece flannel for center
Alanda Craft says
Yes Kathy you can use 2 pieces of cotton and 1 piece of flannel for the centre. The main object of these rag quilts is to use fabric that will fray easily to give the desired effect.
Kathy Moore says
Are you using 3 pieces of flannel instead 4 of 2 flannel and 1 piece of batting
Alanda Craft says
For each of the 3 layers we used flannel only. We did not use batting.
Judy Thomas says
An advertisement pops up in the middle of the video and won’t go
Alanda Craft says
You can also view the video on our YouTube channel here: https://www.youtube.com/watch?v=RiDiZ__7nCI
Mary Ingram says
I would love to make a baby quilt for my great grandbaby. Can you tell me the size and how many blocks I would need for that project? Thank you for a wonderful tutorial!
Maxine Rasberry says
I love your tutorial. I have made quite a few rag quilts and usually use two quilting cottons with flannel in between.It usually rags very well. I love the flannels you used and hope to make an. All flannel quilt now.. I also like the 3/4 inch seams. I learned using 1/2 inch seams and. Want to try it . Very good tutorial!
Lynda Tomilin says
If I am using batting in the middle, would I cut that layer smaller than the top an bottom pieces so that it doesn’t come through for the ragging part? So for example, say I am doing half inch stitching, cut the batting squares one inch smaller?
Alanda Craft says
You can definitely do that and many do. You can also leave the batting the same size as the outside pieces although it may be more difficult to snip the edges as you have more layers to cut through.
Glenys Mortimore says
Hi you have given me the confidence to make a rag quilt can I use cotton as my top layerwith my 2 squares of flannel
Alanda Craft says
Yes Glenys, you can do that. 😊 Just keep in mind that cotton may not fray as well as the flannel. Which is what gives these quilts their distinctive look.
ROBYN CENTERS says
Scissors can they be purchased and shipped to US
Alanda Craft says
You can purchase rag quilt scissors from Amazon, here is a link https://amzn.to/2YdP61O to one style but if you type in rag quilt scissors there are a number of other styles.
Julie Redl says
You might note that for the middle layer, you won’t see it at all so there’s no need to buy any lovely design for those, you can use cheap plain white or other solid color.
Alanda Craft says
Thank you for the tip Julie.
Elizabeth (Liz) Rieder says
My son got married this summer. I would like to make a rag quilt as a combined wedding/Christmas gift for the couple. I am truly a rank beginner! I’ve never quilted anything! Love your tutorial, AND the printed directions! I’m thinking I would like for the finished size of the squares to be 6 inches, so would I cut each square 7 1/2″? Would like for the quilt to be throw (50×72″) size when finished. How many squares would I need for this? Sorry for so many questions, but I do not want to mess this up, especially since this will be my “virgin” quilt. Thank you, very much for your help!!
Alanda Craft says
Hi Elizabeth, your son and his wife will love your thoughtful gift. So much love goes into making each quilt. Yes you are correct in that you will need to cut your squares at 7 1/2″. This will give you the 6″ finished square and 3/4″ seams. I have estimated that you will need 108 squares in each fabric. 108 squares will give you a finished quilt size of 54″x72″. You will have 9 squares across the width and 12 squares in length. So your quilt will be slightly bigger that you were looking at. But please check these measurement before cutting your fabric as I haven’t made one of these quilt with 6″ squares. I like to use 10″ squares (less work). Cheers, Wanda
Annette says
Hi there, I have tried making these quilts and have so much issue with the stitching – for the life of me I can not get the tension right and the thread on the bottom bunches up and knots. Very frustrating. Any tips and tricks? I use a walking foot. Many thanks 😊😊
Alanda Craft says
We don’t adjust the tension at all, we leave it on the default setting. But when the thread goes wonky on the bottom, it usually means a bobbin issue. Have you tried a different bobbin and checked if the thread has been wound firmly on the bobbin and isn’t loose?
Linda Burns says
The fluffiness of the seams ..? More fabric layers, wider seams or snipping closer together?