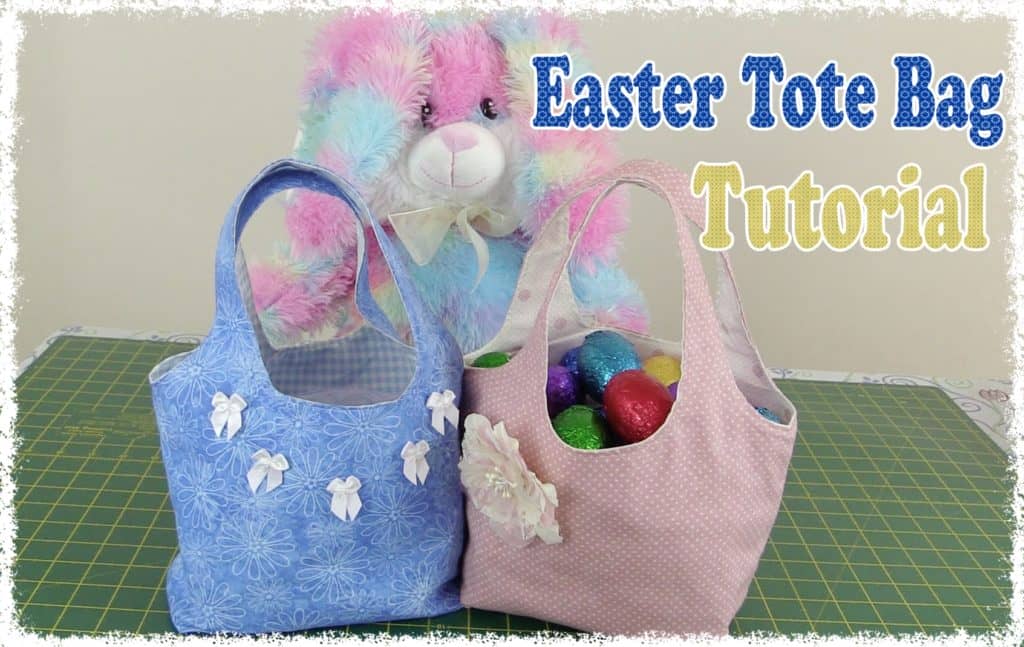
This bag is constructed a little differently from our usual bags, in fact, it quite a bit different. But it’s relatively easy to make and it looks just great. We were unable to get Easter fabric from our local stores, which would have made it really relevant to Easter, so we just used some of our on-hand fabric stash.
Watch the Video Below
TOOLS USED IN THIS TUTORIAL
You can check the latest prices at Amazon by clicking on the links below:
- Creative Grids Ruler 8½” x 24½”
- Olfa 24″ x 36″ double-sided healing mat
- Olfa 60mm rotary cutter
- Oliso Iron
- Gutermann Sew-All thread
What You Need
Fabric Required
- Main – (11″ x 15″) x 2
- Lining – (11″ x 15″) x 2
The trick to this bag is the handles. We mucked it up a couple of times when putting the prototypes together, so just make sure you pay attention during that part of the video.
I left a 3-inch opening to allow for ease of stitching the handles together and to make it easier for beginners, but if you can manage with a smaller gap, by all means, do so.
A 2″-2½” gap will mean less fiddling to neaten the handles before topstitching them. It makes no difference to the finish of the bag, it’s just whatever you feel comfortable working with.
Download the pattern here
RIGHT CLICK TO SAVE
Easter-Bag-Pattern-1
Easter-Bag-Pattern-2
Download both files to your computer, print both and tape together as shown in the video.
- Right Click on the links below and ‘Save As.’
- Save the images to your computer, I created a folder where I save my downloadable projects.
- Press Print
On the Print Screen
- Select Scale to Fit
- Select Print Entire Image.


Beatrice says
Hello, The video is great. Thank you.
I tried to print the pattern and it seems a bit small (Are the lines on your green cutting mat 1 inch apart?) Perhaps I did something wrong when printing (scale?). How many inches is the base of the pattern supposed to be? And how tall is it when the two pieces are taped together?
Thanks.
Alanda says
Yes, the lines on our mat are 1 inch apart. It is only a little bag but I just measured a completed bag and it measures approx 12 inches high by 10 inches wide.
Beatrice says
Thank you! I managed to print the pictures in what seems to be a more accurate size. Hoping to finish the bag soon.
Alanda says
That’s great Beatrice. Looking forward to seeing photos of your completed bag on our Readers Projects page /submit-your-project/
Beatrice says
Hello, the bag is finished and has been gifted! It turned out great! Unfortunately, I don’t have a picture of the finished bag because I was in too much of a hurry. Hoping to be able to get my hands on it (if only temporarily!) to take a proper picture soon. Am starting a second bag today!
Alanda says
Excellent Beatrice. These bags do make lovely gifts. We are looking forward to seeing photos of your finished bags. 🙂
I’ve done the same thing, been so excited to get the project finished, gifted it and then realised I’ve forgotten to photograph it. We like to keep a record of the colours and materials we have used.
Maureen says
Hello Alanda and Paula,
I have tried to download this pattern but it never comes out like it shows it should.
I have a Brother Inkjet Printer.
Not sure if this is the problem or not.
Do you have any suggestions on this that I could try.
I love this little bag and was disappointed it wouldn’t print properly.
Thank you very much.
Maureen from New Zealand
Alanda says
No sure what you mean Maureen by “it doesn’t print out as it should”. We also have an Brother Inkjet Printer and I have just printed out both pieces and it worked just fine. Please let me know exactly what the issue is that you are having so that I can help. I downloaded the files to my computer, I have a Mac, and then opened the file and printed it out without any problems.
Barbra says
Can someone please tell me how to download the pattern, I went to the link and when I clicked for the pattern it shows up as pretty small and there was no download button.
Alanda says
Just right click with your mouse and select the Save As option. This will save to your computer. Then open it from there and it will appear for you to print.
Charlotte Joyner says
I just finished making one! And now I have 6 more to finish in the next week.
Thank you for the great tutorial!
Alanda Craft says
That’s awesome Charlotte. They are pretty quick to put together and by the time you get to the sixth one, you will be an expert.